This post is the first in a two-part series that explains how to implement two consignment inventory scenarios in Acumatica. The first involves placing your inventory at a customer site, while the second involves storing vendor inventory in your warehouse until is it needed. This tutorial assumes a working knowledge of Acumatica, but is also designed to give those who don’t have that knowledge a glimpse into what Acumatica Cloud ERP Software can do to transform business processes.
Demo Built in Acumatica Environment: 5.20.1452
Data: SalesDemo Data from Acumatica’s Partner Portal

Business Purpose
Consignment involves two main business concepts: where inventory is stored and who owns the inventory. In this post we will discuss the first of the two scenarios below:
- Inventory stored at your customer’s site, you own inventory until used by the customer
- Inventory stored at your site, vendor owns inventory
The implementation of both scenarios involves setting up a consignment warehouse. In Acumatica this is easily achieved by creating a virtual warehouse, which is explained below.
Scenario 1: Inventory at your customer’s site, you own inventory
Say, for example, that one of your customers wants to have a supply of your products that they will store and sell. The goods are located on your customer’s site, but remain on your books until they are sold.
These sold items are reported monthly in a report that is sent from your customer to you. This is frequently done via EDI, but in this example we assume sales are batched and reporting in a spreadsheet.
The workflow for this scenario is as follows:
- Sales signs up Customer as consignment vendor and indicates desired stock levels
- Your Shipping Manager is notified that inventory is needed at the customer site
- Your Shipping Manager creates a transfer order to ship goods
- A special transfer provides standard pick-pack-ship functionality of a sales order
- Accounting Manager receives monthly sales reports from customer
- Invoices automatically created

Implementation in Acumatica – Scenario 1
In this scenario your company transfers inventory to a customer site. You own the inventory until the customer uses the items. Implementing scenario can be carried out by taking advantage of the following Acumatica features: transfer replenishment, multiple warehouses/locations, and import/integration utilities.
Step 1: Customer signs up for consigned inventory
A. Create a Customer Warehouse. Add locations as needed.
- You can create separate GL accounts or subaccounts if you want to track your consigned inventory differently.
- Set replenishment class to TRANSFER.
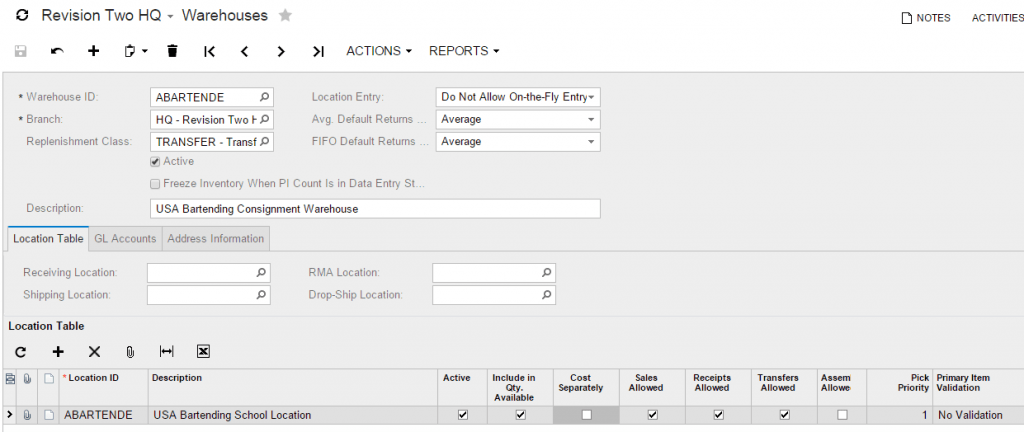
B. Change customer delivery settings to indicate the customer specific warehouse as the default for sales orders.
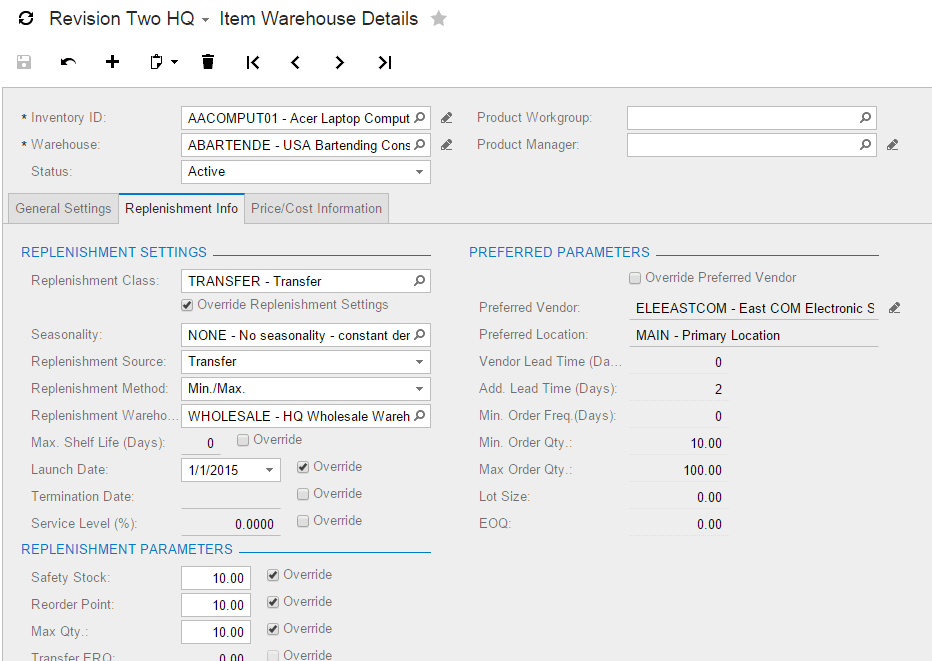
C. Set up inventory levels that the customer wants to keep in the Item Warehouse Details screen
- Create an entry for each inventory items stocked
- In Replenishment Settings tab (see image below):
- Set replenishment source is transfer.
- Set your replenishment warehouse that you want to transfer goods from
- Set safety stock, reorder point, and max quantity as dictated by customer request. In the example below, I maintain 10 items at all times.
Step 2: Ship Items to Your Customer Warehouse
A. Use the Prepare Replenishment screen (IN.50.80.00) to see what orders need to be created. This can be scheduled if needed so that shipping manager does not need to manually check each day.
- In my example I only had 2 items that were requested as illustrated below.

B. Navigate to the Create Transfer Orders screen (SO.50.90.00) in the Sales Order module
- In the screen below I specified my destination warehouse to include only transfers for this customer.

C. After processing the order, you are taken to the Sales Order screen where the Order Type is equal to TR.
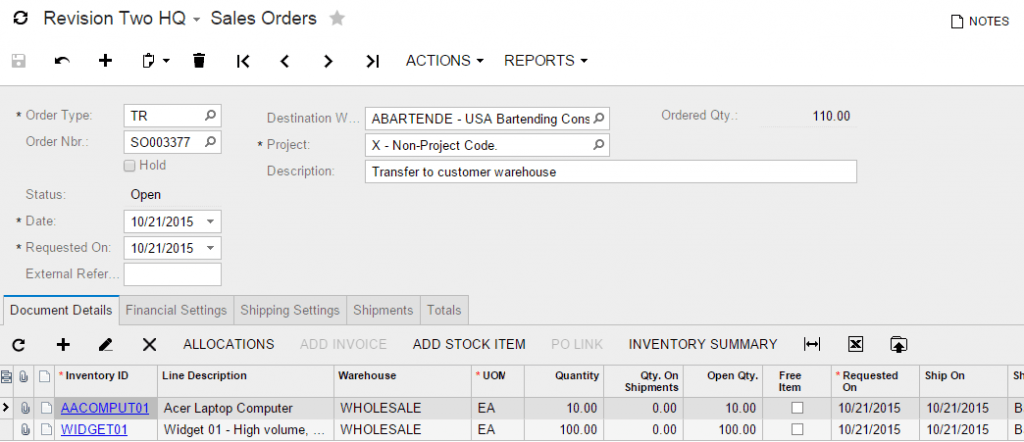
- Note: using the demo data in Oct 2015, there is no available quantity of Widget01 – so I had to purchase some.
D. Special transfer shipping procedures allow you to pick-pack-ship your items. The resulting shipment is below.

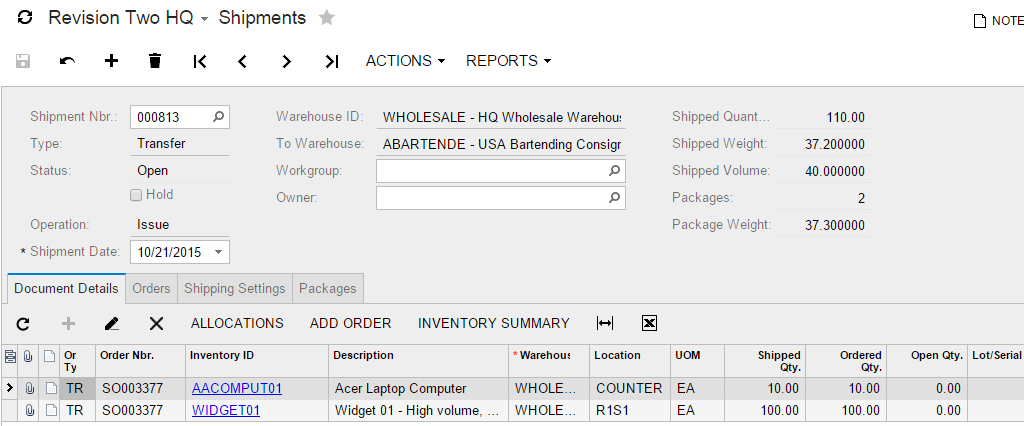
- When ready, confirm the shipment.
- Next select action ‘Update IN’
E. Receive your inventory at the customer warehouse
- If you go to the Inventory Allocation Details screen (IN.40.20.00) you can see the amount in-transit
- Navigate to the Purchase Receipts screen (PO.30.20.00) and select type Transfer Receipt. Click the Add Transfer button to populate the lines. See below.

Step 3: Process Sales
In this example we assume that we receive a spreadsheet containing items that have been used by the customer. We import this as a sales order of type IN. This reduces the warehouse inventory and creates an appropriate AR invoice.
Alternatively, there are vendors that sell RFID cages where inventory can be stored. As items are removed they are automatically added to a report that can be sent and imported. This reduces reliance on customer and or the delivery person items counts.
A. The result of the import is pictured below.
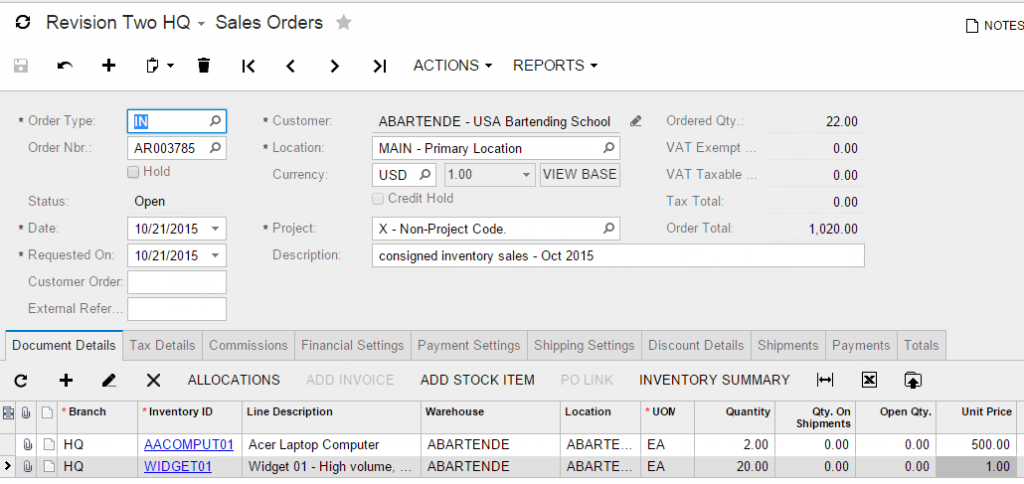
B. Complete the sale by preparing the invoice and releasing it.
Step 4: Repeat the Process
Return to the Prepare Replenishment screen (shown below).
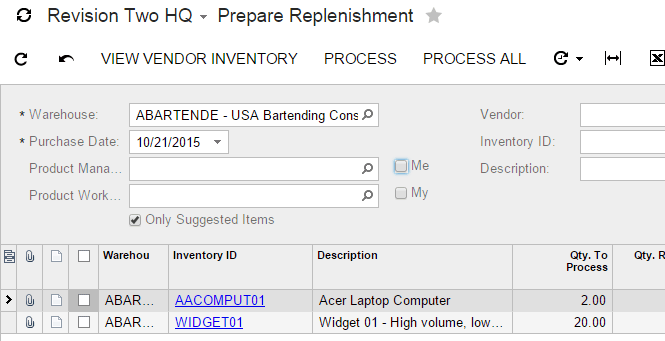
As expected, the recommended transfers equal the amounts that were sold.
Scenario 2: Inventory in your warehouse, vendor owns inventory
In this scenario, one of your vendors provides you (the purchaser of Acumatica) with inventory that you will store and sell. The goods are in your physical possession but should not impact your balance sheet because they are still the property of your vendor.
When you sell the goods, you pick them from the consignment warehouse and ship them to your customer. When this happens, you create a purchase order and take ownership of the goods.
1. Vendor signs up as a consignment vendor.
2. You (Acumatica system owner) receive consigned goods from vendor.
- This includes a report to the vendor on what has been received.
- Vendor consigned items are stored in warehouse and available for sale.
3. Sales order created for consigned goods
4. Consigned Items are sold
- Items are picked, packed, and shipped to the customer
- A purchase order is created and sent to the vendor – the PO invoice is used to register the GL costs and transfer ownership of the goods to the Acumatica System Owner
5. Customer Invoice created
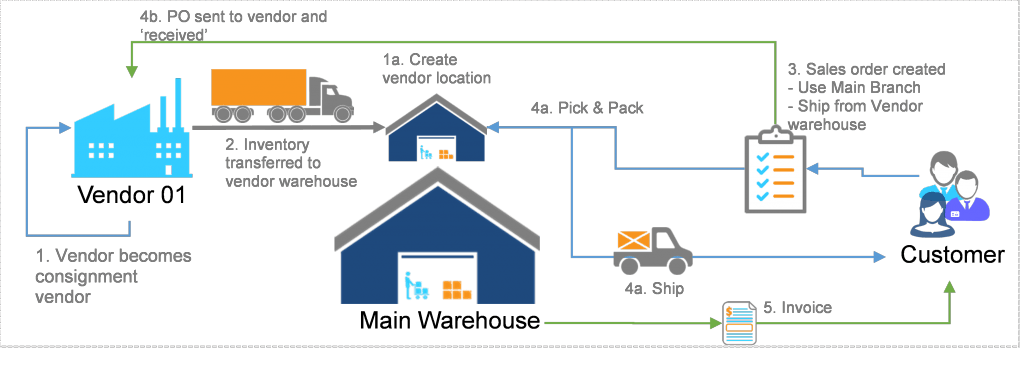
In this example, we assume the vendor arrangement only requires sending a single invoice on a periodic basis. This allows us to follow the normal customer sales order process and do a periodic inventory count to create a purchase order for our vendor.
An alternative vendor agreement may require a purchase order for each sales order that you process. If this is the case, the purchase order (step 4b) can be created at the same time as the sales order (step 4a) by selecting the option Mark for PO on the sales order and setting the PO source as purchase to order. In this case we have already ‘received’ the goods because they are in the vendor warehouse.
Implementation in Acumatica – Scenario 2
In this scenario your company receives inventory from a vendor that is placed into a separate location. The vendor owns the inventory until you remove it and use it. This scenario can be implemented by taking advantage of the following Acumatica features: multiple warehouses/locations, multiple ledgers, inter-company transactions, and import/integration utilities.
Step 1: Vendor signs up as a ‘consignment vendor’
1. Create a new branch and a new warehouse that are linked to a separate ledger so consigned inventory is not on your books

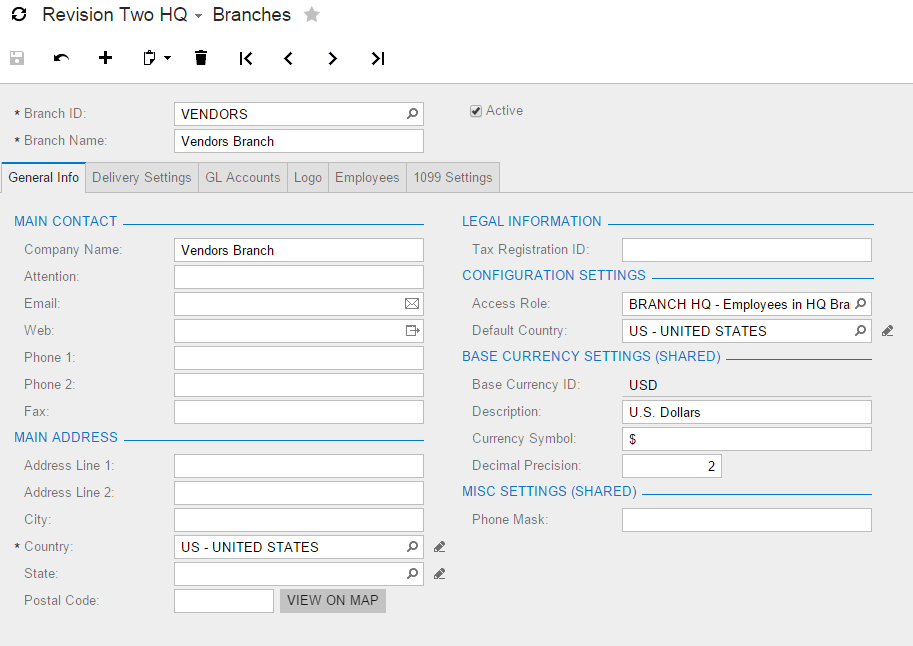
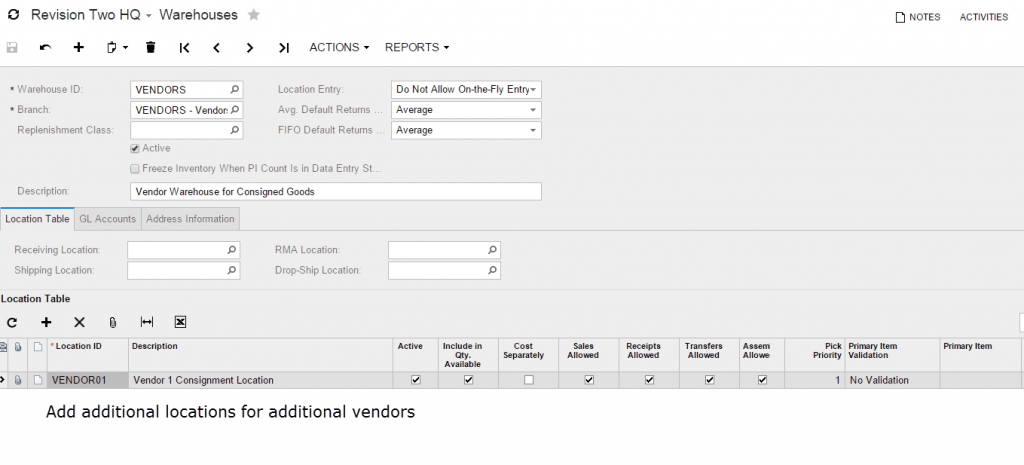
- The vendor warehouse could be a virtual warehouse – it does not have to be a separate building or fenced off space in your warehouse.
- Multiple vendors can be linked to this warehouse and branch, so creating a second vendor will be easier than creating the first – all you need to do for the second vendor is add a warehouse location. With multiple vendors, check the cost separately flag for each warehouse location.
- Set the Inventory Account to the new account (see step c below) called Vendor Owned Inventory
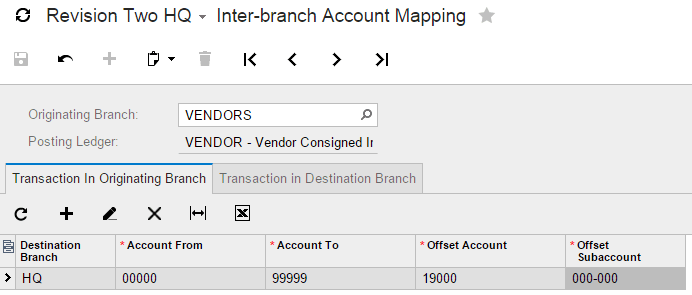
2. Link Customer Branch and Ledger. When inter-company transactions are turned on, you set this up in Finance > General Ledger > Configuration > Manage > Inter-branch Account Mapping as illustrated below.
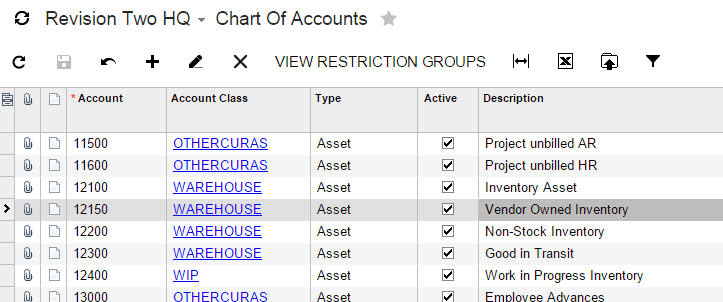
3. Create a new account called Vendor Owned Inventory to store inventory assets on the vendor’s balance sheet.
Step 2: Receive consigned inventory from your vendor
1. Create a reason code for the consigned inventory.
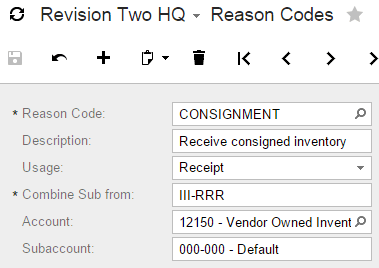
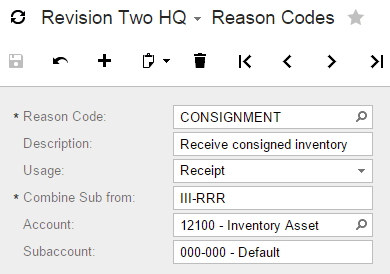
In this paper, I used the first option – the vendor owned inventory account. I created inventory items with the same inventory account – so when we receive an item, the transaction creates a debit and a credit in the same account and no value accumulates in the vendor warehouse. I could have also created a subaccount segment for tracking vendors if required.
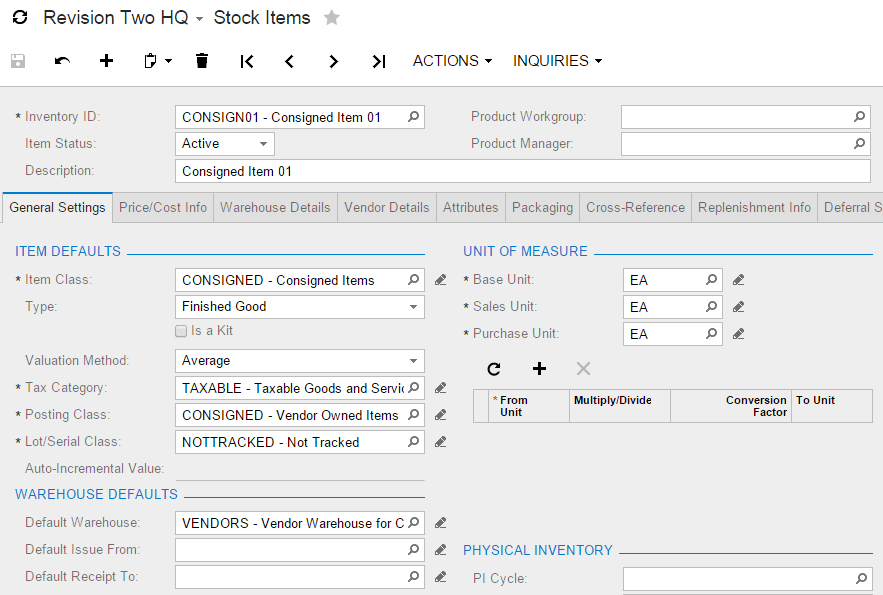
The second reason code option is slightly easier to setup because most of my existing inventory items in the demo data use this account.
2. Enter and release a receipt for your goods

Important items on the receipt include:
- Go into the VENDOR branch to receive the goods so nothing appears on your ledger/books.
- Confirm the VENDOR branch.
- Confirm the VENDORS warehouse (this inventory defaults to this warehouse).
- Enter the location for the vendor which you are receiving the goods from.
- Entering a cost is optional, but might be useful for reporting.
- Select the reason code based on your setup in the preceding step
3. After releasing your receipt, the following transaction and inventory appears:

4. A signed report could be created and emailed to the vendor to verify the receipt of the goods. The current available report that can be run from the receipt screen appears below:

Step 3: Vendor Consigned Goods are Available for Sale
1. Run an inventory summary report to verify that the goods are available in the vendor warehouse.
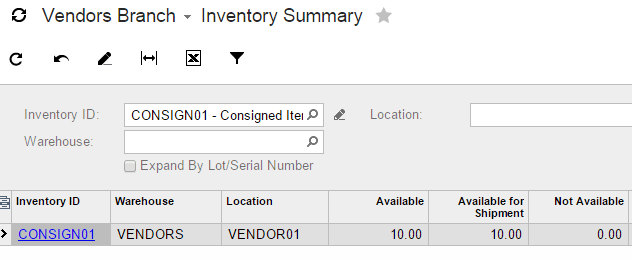
The way that I constructed my reason codes, nothing shows up on the balance sheet of the VENDORS ledger.
Step 4: Sales of Consigned Items
The sale of consigned items is similar to the standard sales process.
1. Create a sales order to sell the items
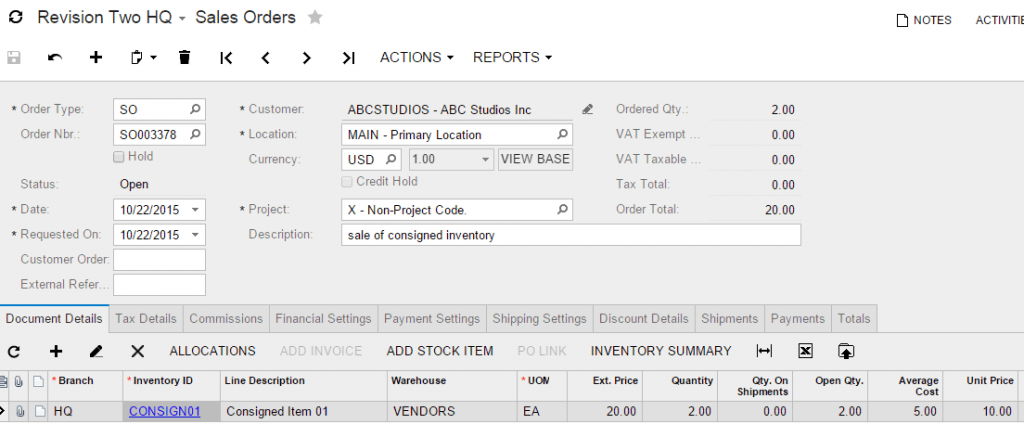
- Sell from the HQ branch
- The warehouse was automatically assigned as VENDORS because that was the default for my consignment item
2. Create the shipment, print the pick list, pack the items

- Items are picked from the consignment warehouse
3. Confirm shipment, prepare invoice, release invoice – review financial transactions
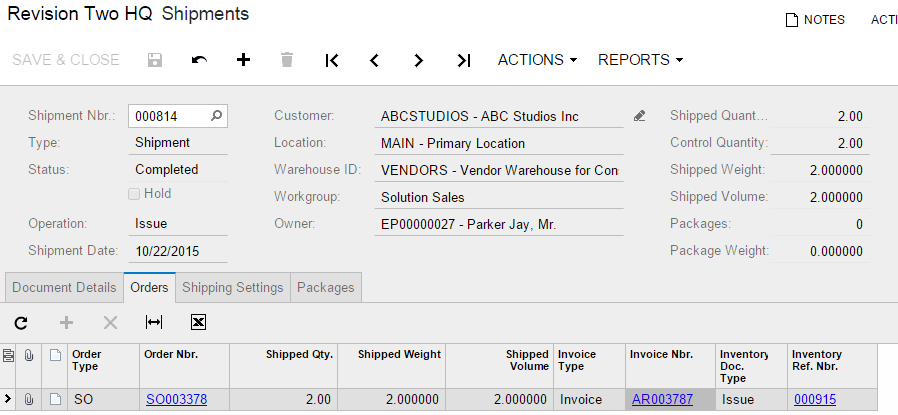
- Invoice: debit Accounts Receivable HQ) | credit Sales Revenue (HQ)
- Inventory: debit Cost of Goods Sold (HQ)| credit Vendor Owned Inventory (VENDOR)
- Inter-Company (if turned on): db Due From HQ | cr Due to VENDOR
- The resulting vendor balance sheet from this series of transactions is:
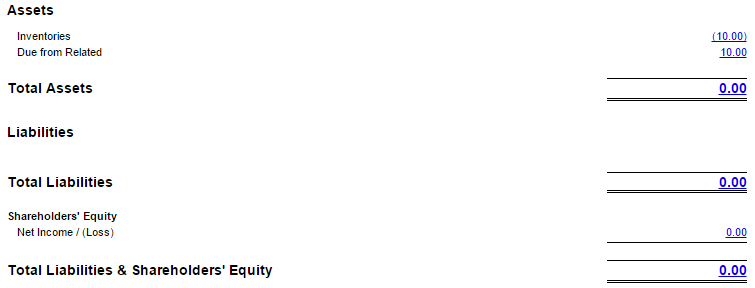
The due from related (HQ) can be cleared when we generate our purchase orders.
Step 5: Create Purchase Order (or report) for Vendor(s)
Create a report for the vendor that reports the sale of items over the time period. This can be used to create the vendor invoice or purchase order.
The Account Details report will provide this information and can easily be exported and imported as a PO.

Conclusion
Acumatica has built-in functionality to manage consigned inventory scenarios and Acumatica’s business model fits the needs of distribution companies that work with consigned inventory. The web-based architecture makes it easy for vendors and customers to be included in business processes from remote locations. Unlimited user pricing makes it economical to add these infrequent users with no additional licensing fees.
The scenarios discussed in this post and our post last week are a sample of different potential mechanisms for managing consigned inventory. The addition of EDI interfaces and RFID technology can improve the level of automation, restocking, and inventory management.
Have a unique consignment scenario? Contact djohnson@acumatica.com with requirements to see if the solution can be easily adapted for your needs.
 Canada (English)
 Colombia
 Caribbean and Puerto Rico
 Ecuador
 India
India
 Indonesia
 Ireland
 Malaysia
 Mexico
 Panama
 Peru
Peru
 Philippines
 Singapore
 South Africa
 Sri Lanka
 Thailand
 United Kingdom
 United States


