Every business has unique workflows involving communication with employees and external people. In Acumatica 2018 R1, you can configure Business Events to automate unique business processes.
Today’s Technical Tuesday post offers a short tutorial and explanation of Acumatica Business Events.
Environment: 18.101.0039
Data: SalesDemo data from partner portal
Business Events provide the ability to react to data changes by creating email notifications and updating business data. This means that you can automate complex business processes without programming. And because Acumatica is all about continuous innovation and improvement, we will be adding additional notification and data update options, such as SMS messaging and activity creation.
Business automation scenarios
The system allows you to automate many diverse business scenarios, such as:
- Warning customers of upcoming invoice due dates
- Notifying customers when their orders are ready for delivery or pickup
- Updating (closing or re-assigning) sales opportunities X days past their expected close
- Notifying support personnel when case SLAs are not being met
- Reminding customers to order if they have quarterly budget remaining
- Notifying warehouse personnel to be on the lookout of incoming shipments
The flexibility of Business Events can be used to support several other scenarios.
In this post, we implement a solution to help manage support cases. In this example, our organization allows customers to create support cases using the convenience of an online portal.
Our customers often create support cases without providing enough information for support personnel to resolve the issue; keeping cases on track is an important part of providing excellent customer service. In this example, we automate several tasks so support personnel can focus on helping customers instead of spending time following up on information requests. To do this, we will:
- Notify the case creator/customer when additional information is required to continue working on the case
- Send an automated reminder to the customer if five days have passed without receiving any information
- Automatically notify the customer and close the case after 10 days have passed without receiving required information.
Acumatica Implementation: Customer support case management
Business events in Acumatica are generically configured as described below.
1. Build a generic inquiry that includes the data you want to monitor
2. Define how you will monitor the data
– Monitor continuously as records are changed
– Monitor according to a user defined schedule
3. Define the criteria for taking action
– Set triggers based on data field changes
– Set triggers based on data record adds/deletes/changes
4. Build the actions to take when your trigger criteria are met
– Create email templates to notify people
– Create import scenarios to change data records
In this example, we create three business events to help us manage support cases.
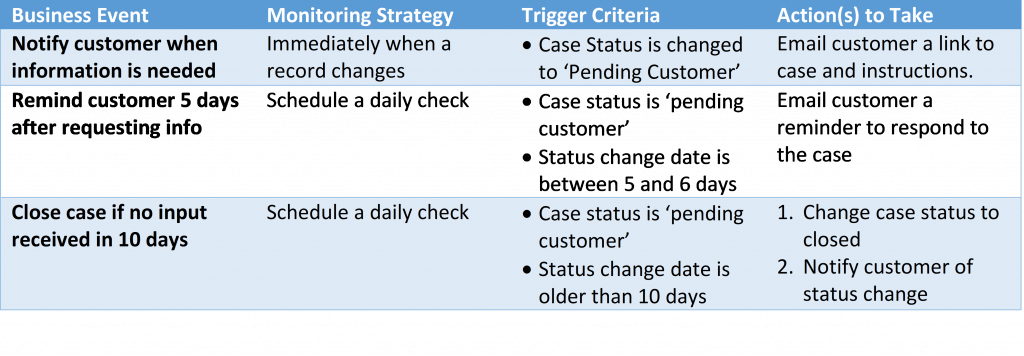
During the implementation, we explore options and show how easily the criteria can be modified.
Step 1: Select data
Acumatica Business Events are driven from Generic Inquiries. To begin the implementation, we need to write a generic inquiry that contains the following:
- Monitoring: All data fields that you want to monitor must be included
- Triggers: Include all data fields that you will use to decide when to react (i.e. case status and change date)
- Action Schedules: Include data to be used in the conditions for your schedule
- Email Notifications: Include data fields that you want to paste into your email (i.e. customer name)
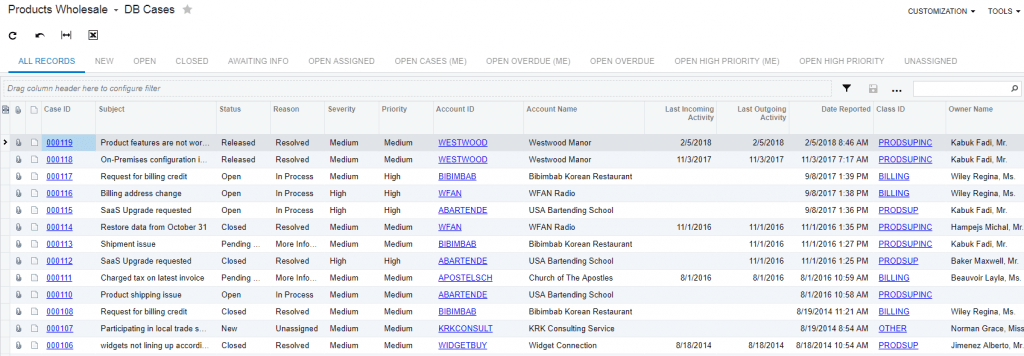
To simplify the process, I used a generic inquiry that already exists in the SalesDemo data called DB-Cases. The output from this inquiry for April 2018 demo data is illustrated below.
Step 2: Create a Business Event
Business Events include data, monitoring conditions, triggers, and subscribers. In this example, subscribers are either email notifications or import scenarios.
For the first event, we want to help customer service notify customers when they need additional data. To do this, we define the fields in the screen below.
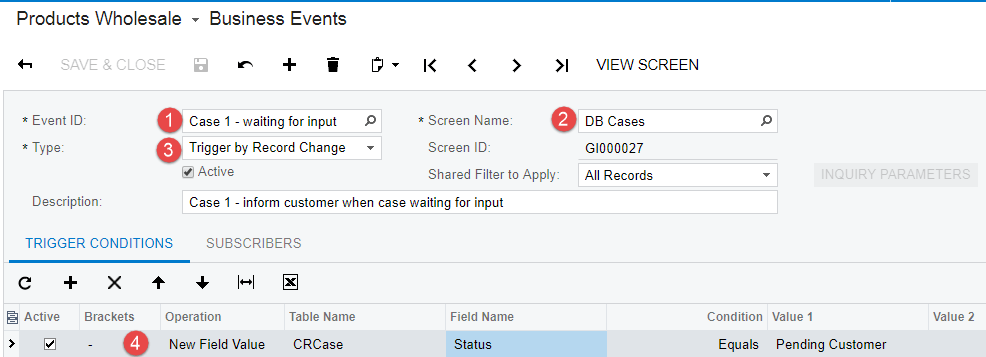
- Define an Event ID.
- Select the generic inquiry with the data you want to monitor.
- Define the monitoring type. In this example, the system monitors when a record in the inquiry changes.
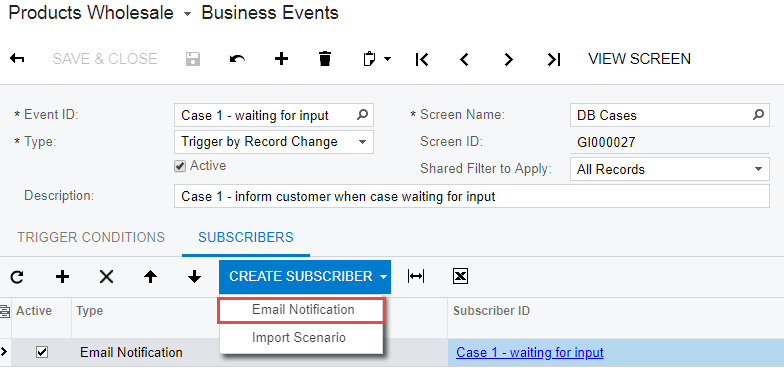
- Define the trigger conditions. When a case is changed, the system determines if the case status is ‘pending customer’. If so, the system initiates the actions defined in the subscribers tab. Subscribers are activities that are performed when my trigger conditions are met.
For this event, I want to email the customer, so I click Create Subscriber and select Email Notification.
I define the notification template below.
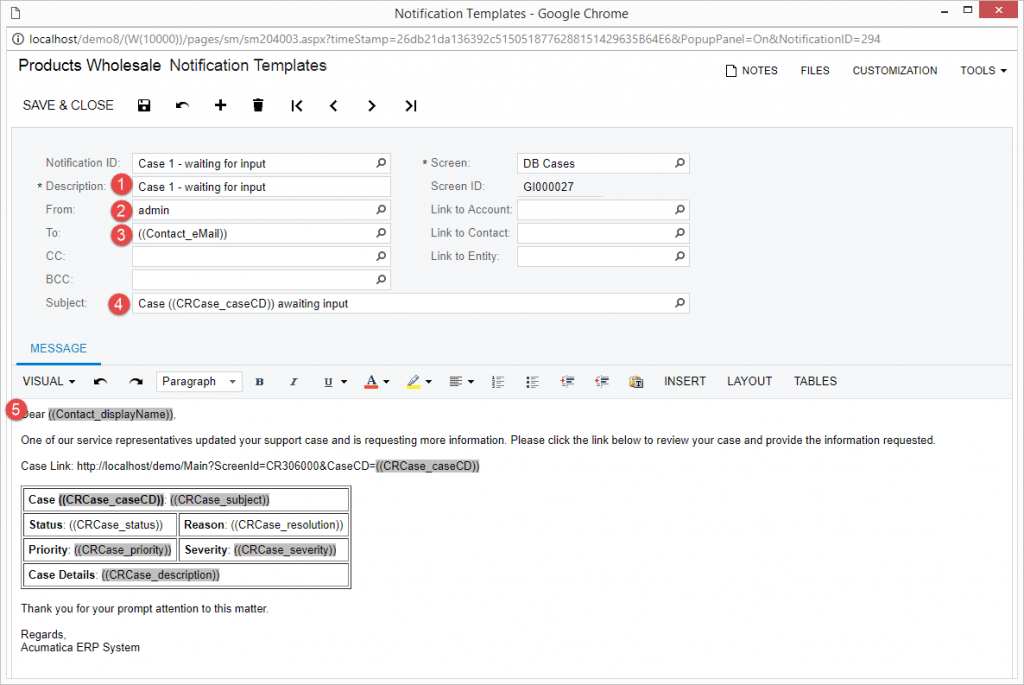
- Enter a notification template description.
- Select a system email account that the email will arrive from. There is only one email in the SalesDemo data, but an actual implementation may utilize support@SomeURL.com.
- Select the destination email address. This is the address of the Contact on the support case. In my version of the SalesDemo data, the Contact Email was not available, so I opened the generic inquiry called DB-Cases and added a field containing the email address that I wanted to select as shown below.

- Add a subject. By clicking the magnifying glass on the line, you can add data fields from your generic inquiry.
- Create your email using the editor. Note that I added information about the case and created a URL string so the recipient can open the support case with one click.
Step 3: Test
To test this event, simply enter a support case as shown below.
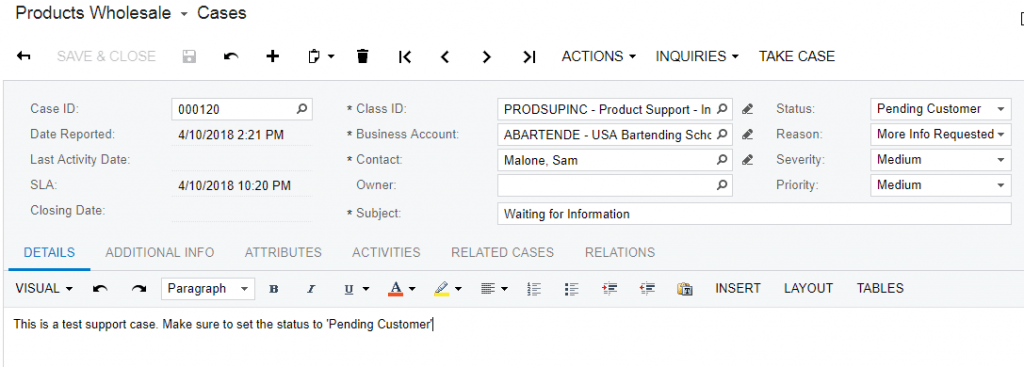
After you save the record, open the screen ‘Emails Pending Processing’ and uncheck the Assigned to Me box. Then you will see that the notification has been created and added to the list of emails that will be sent.
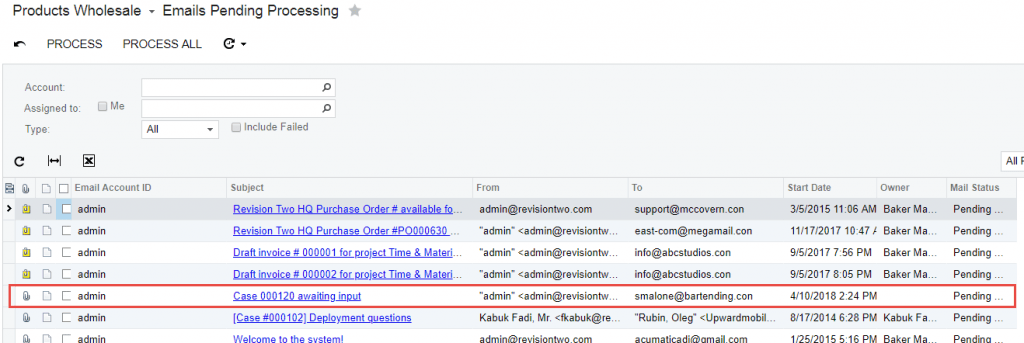
If you activate the email scheduler, then the email is sent automatically.
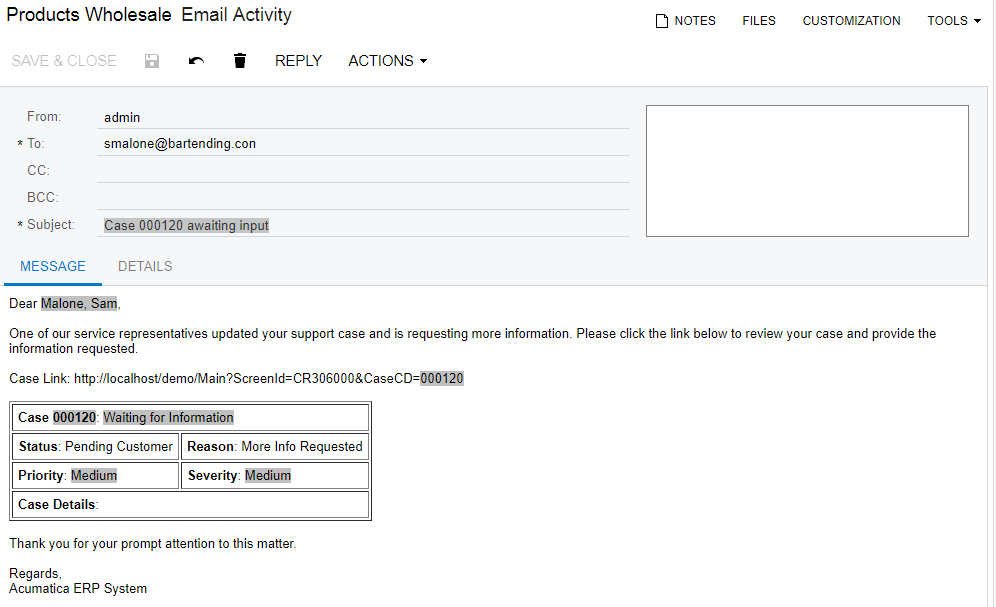
When you click on the email subject, you can see the email that will be sent to your customer.
Implement Business Event 2: Trigger by Schedule
For the second event, we want to move cases forward by automatically reminding customers that they have cases that require input. Automating this process will keep cases moving without creating busywork for support personnel.
In this example, I demonstrate how to create a schedule to inspect data.

- In this case, the Type ‘Trigger by Schedule’ exposes a new tab where I can define an automatically recurring process to check the conditions. The scheduler will run even when nobody changes the record.
- I added two additional conditions.
a. The reason condition (if activated) allows me to be more specific about when to create an email. This allows me to tailor my email to the situation.
b. Since I plan to run the process one time per day, I inspect the Status Change Date to determine when the case is between five-and-six days old.
The subscribers tab allows me to create a notification template similar to the first example. This is illustrated below.
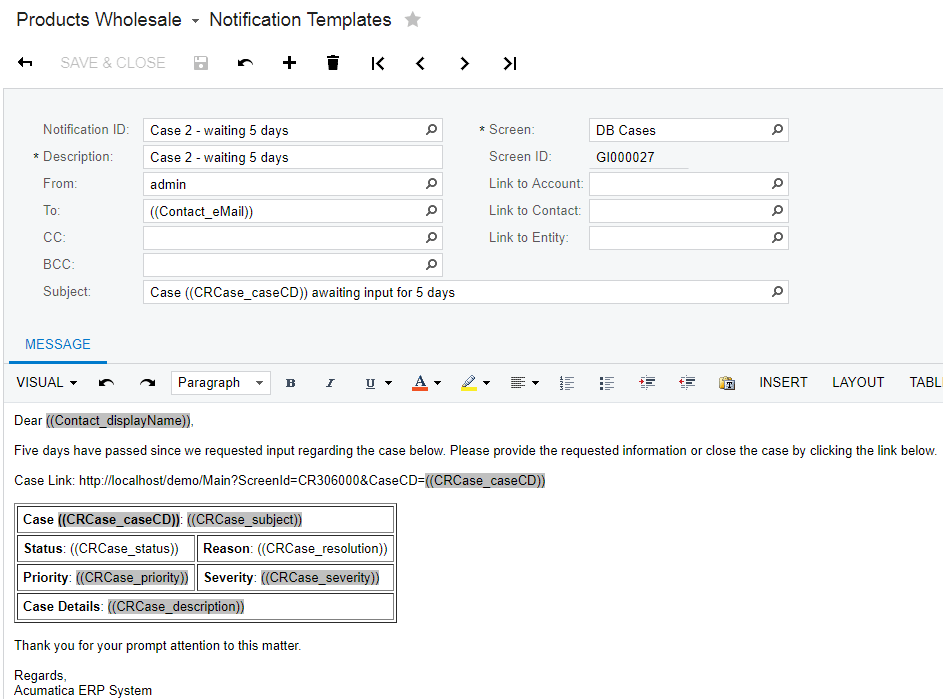
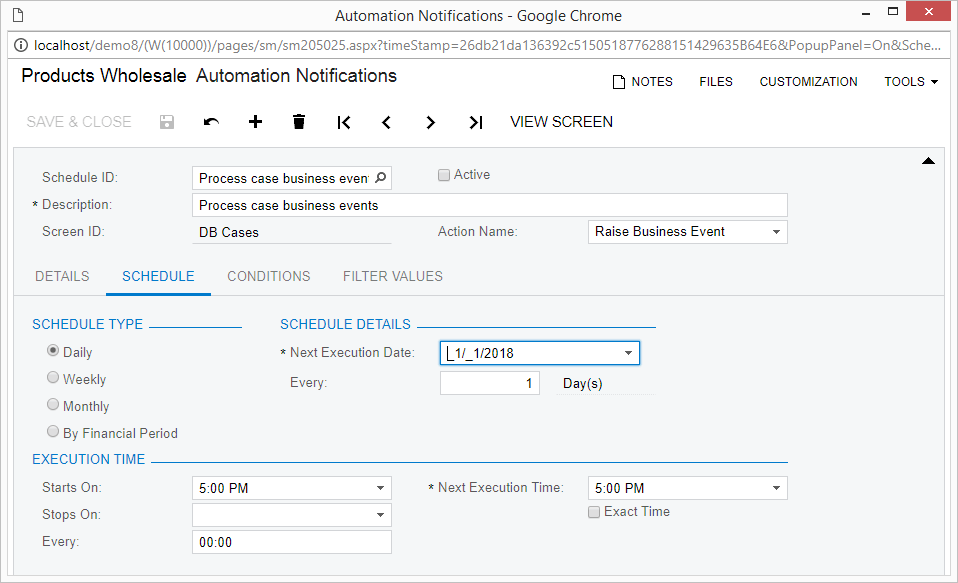
Next, I navigate to the subscribers tab and create a schedule. The schedule is set to run automatically and initiate the business event. In this case, I set the schedule to run daily at 5 pm. Do not forget to activate the schedule.
Testing this example is more difficult because it requires a case that is between five-and-six days old.
Implement Business Event 3: Trigger by Schedule with Record Change
For the third event, we want to automatically close cases which seem to have been abandoned by the customer.
The implementation looks like Event 2 with a slightly different trigger condition.

I can use the same schedule that I created for Event 2.

In the subscribers tab below, notice there are two different activities to perform. The first activity involves creating an email as in the prior events. The second activity uses the power of integration services to modify the support case. In this example, the case will automatically be closed.

Below is the import scenario that will automatically close cases that are passed to it. The business event will only pass cases where the trigger conditions (status = Pending Customer, Status Changed Date > 10 days) are met.
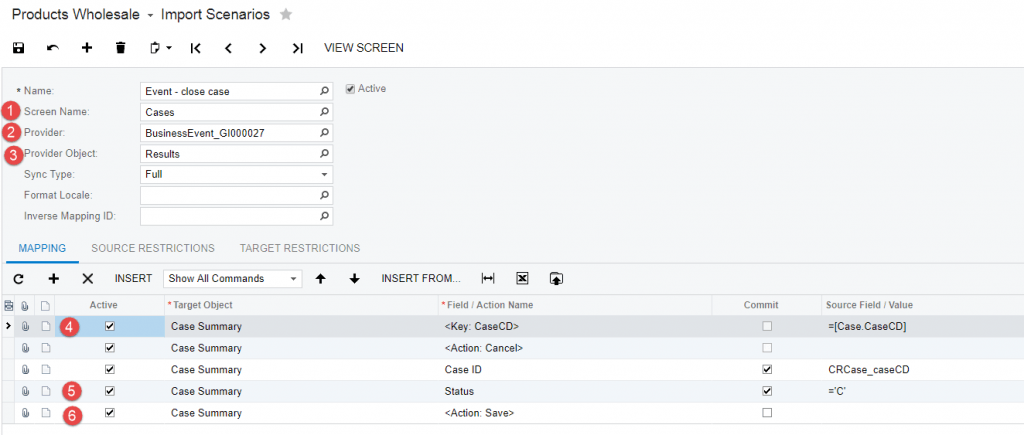
Additional information about writing import scenarios is available in Acumatica University class I100, Integration Scenarios. Below are notes describing the screen shot above.
- Screen name: Select the ‘Cases’ screen since we will be updating case records. Unlike other areas in Business Events, integration tools do not use the generic inquiry.
- Provider: The system automatically creates a provider for your business event. Instead of having to specify a spreadsheet or other input, you can use the records linked to the generic inquiry that powers the business event.
- Provider Object: Select Results so the output of your inquiry, including all data fields, are available to the import scenario.
- Mapping Key: In the mapping section, your first record must specify the key to uniquely define the record. The key field(s) must be included in the output of your generic inquiry so they can be selected in the Source Field/Value column.
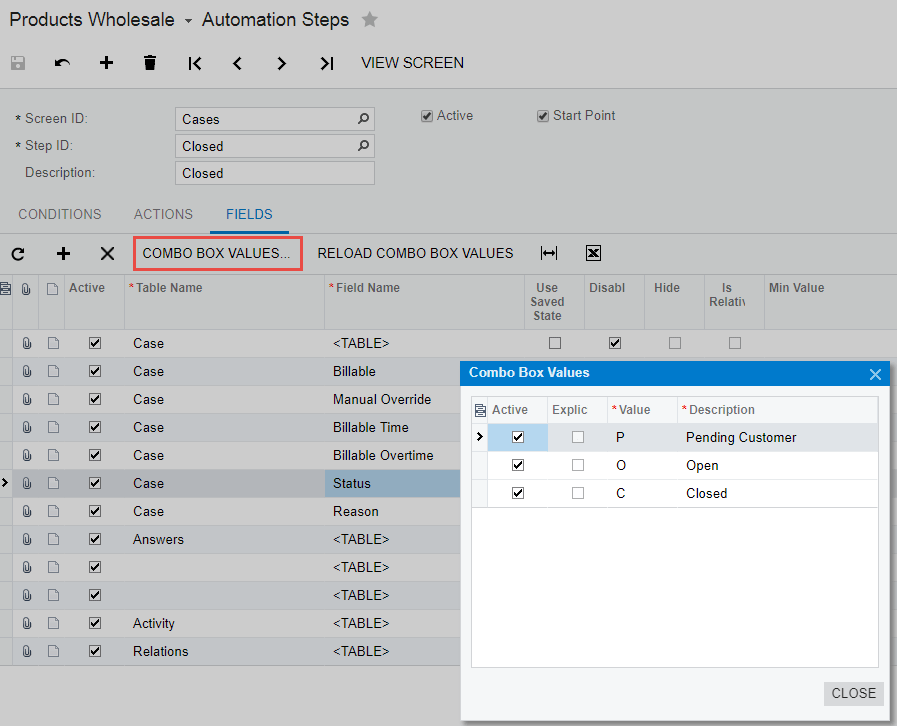
- Fields to Update: Include values for all fields that you want to update. In this example, we only need to change the Status field from ‘Pending Customer’ to Closed. For this change, it is tempting to fill the Source Field / Value with =’Closed’ but this will not work. I found the value to assign by going to the Automation Steps screen as shown below.
- Always remember to place an “Action: Save” step at the end or your scenario will not work.
Testing the Result
Before testing the results, I ran the generic inquiry and created a filter that was identical to the Trigger Conditions in the business event. The result of this query shows five records that should be changed when I activate the automation schedule.
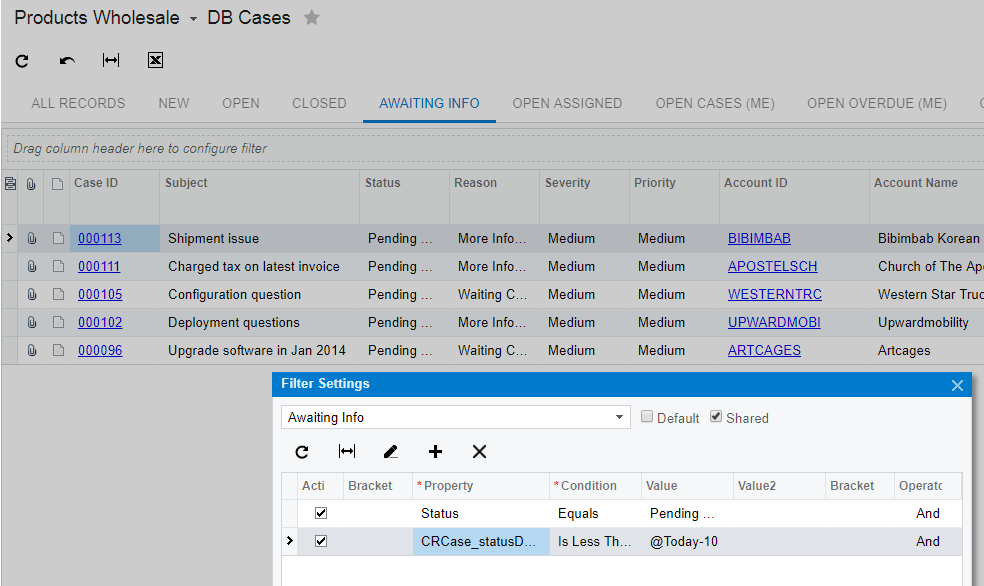
Next, I activated my Automation Schedule. After doing this, I switch to my Business Event screen to see if the event was processed.

From this screen, I see that the Business Event was executed. This should have caused two things to happen. First, an email should be queued to the case creator. Second, the five cases above should be closed.
By opening the first case in the list, I can see that the status was automatically changed.

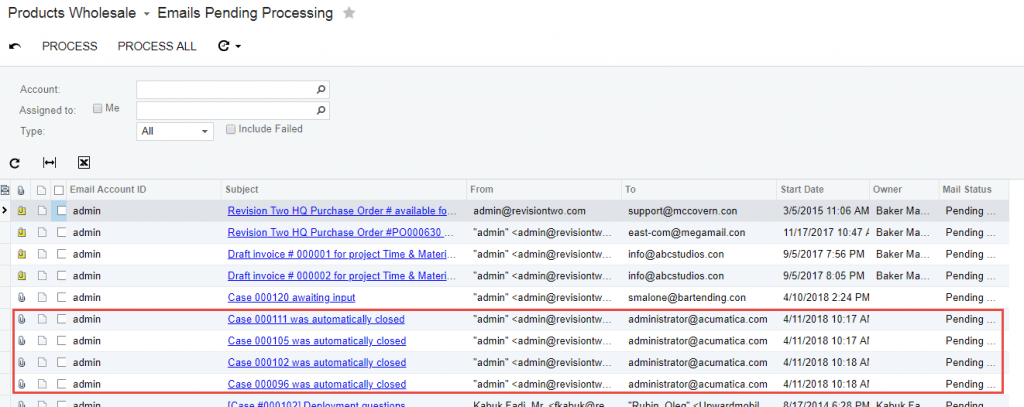
And on the Emails Pending Processing screen, you can see that several emails have been created to notify users that their cases were closed.
Extending the support-related example
Configuring additional customer support events is easy. Here are a few examples of things that can be automated:
- More Granular Messages: You can introduce the reason field on cases to create business events with different email instructions depending on whether you are waiting for input or waiting for acceptance.
- Case Oriented Responses: You can use the case class to provide different actions depending on the type of support case – you may want to prepare a different schedule for urgent cases than for billing questions.
- Customer Exceptions: You can utilize business account fields so persnickety clients do not receive notifications.
- Keep Others in the Loop: Include the salesperson ID or other field in your inquiry so you can notify salespeople when their clients open support cases.
Additional Business Automation Examples
In this post, I showed a simple example involving customer support processes, but Business Events can be applied to all objects within Acumatica.
- Client Budget: Suppose you have a client with several employees who place orders with you. The billing contact wants to be notified when his organization is approaching a monthly budget. Using Acumatica Business Events, you can easily configure this scenario to provide best-in-class service to your customers.
- Process Completed: Business Events can be used to notify people when critical processes are completed. Assume there are several employees that want to run reports as soon as you close a financial period. You can easily configure a process so that the minute a financial period is closed, relevant employees are notified by email.
- Purchase Delayed: Using a dashboard, you can track overdue purchase receipts, but using Business Events, you can provide additional business automation and notifications. Assume your warehouse manager needs to verify that goods shipped from an off-shore vendor are going to arrive on time. Using Business Events, you can email the purchasing manager seven days prior to the expected receipt of the goods so he can call the vendor and make sure that things are on track.
Acumatica Business Events streamline your business processes
Acumatica Business Events provide a powerful tool for automating business processes through configuration instead of programming and customization. Business Events compliment Acumatica dashboards to drive work processes. Dashboards provide real-time visual data for people who are regularly logged into Acumatica. Business Events provide near-real-time notifications for employees who require infrequent notifications as well as for external contacts who do not have system logins.
Most importantly, Business Events can be configured to be specific to your business. The flexible framework and easy to use interface allow non-technical individuals to configure scenarios on-the-fly.
Ultimately, you can automate your unique internal business processes with Acumatica Business Events, resulting in increased efficiency and communication. Please contact us if you have any questions about Acumatica Business Events or any of the business automation scenarios I presented today. Also, check out past Technical Tuesday posts, such as our most recent on new accounting standards, for more in-depth tutorials and explanations regarding Acumatica cloud ERP.
 Canada (English)
 Colombia
 Caribbean and Puerto Rico
 Ecuador
 India
India
 Indonesia
 Ireland
 Malaysia
 Mexico
 Panama
 Peru
Peru
 Philippines
 Singapore
 South Africa
 Sri Lanka
 Thailand
 United Kingdom
 United States


