Reviewed: Feb, 2023
Acumatica supports advanced revenue recognition requirements for different business processes.
- The Project Accounting module supports advanced revenue recognition for complex projects with variable delivery schedules, time-based billing, change orders, and uncertain completion dates. Professional services companies and construction firms use project accounting to manage deferred revenue and project profitability. The project accounting module is the topic of this article.
- The Deferred Revenue module supports advanced revenue recognition for sales orders, customer invoices, and vendor bills. Use cases include insurance prepayments, sales orders with multiple delivery arrangements, and recurring customer and vendor contracts. When a bill or invoice is processed, the deferred revenue module automatically creates a pre-defined schedule based on the line items on the bill or invoice. The deferred revenue module and ASC 606 compliance are covered here.
Acumatica customers may purchase one or both modules depending on their deferred revenue needs.
Business Purpose
Project Accounting helps customers create profit-and-loss statements for specific jobs or company initiatives. The Project Accounting module can also be used for advanced revenue recognition.
Revenue recognition principles for GAAP and IFRS state:
- Revenues are recognized when they are earned.
- Revenues are earned when products are delivered or services are performed
This means that project billing occurs independently of revenue recognition. It also means that the system will need to recognize revenue based on the percentage of the work that has been completed on the project.

Using Project Accounting for revenue recognition supports the following methods:
- Completed contract method. The system accumulates expenses as work-in-progress and converts them back to cost of goods sold when the project is complete
- Percentage of completion method. The system automatically recognizes revenue based on actual expenses as a percentage of the project budget. Expenses can be managed by quantity or amount. Expenses are tabulated in real-time.
Business Scenarios
In this article we example a large project involving primarily labor and some materials. To be GAAP compliant, the customer needs to recognize revenue when work is completed, not when bills are sent and paid. The events associated with this project include: budgeting the project, collecting a project prepayment, entering and approving timecards, delivering materials to the job site, processing project change orders, and final billing.
The table below shows the desired impact of these events on revenue recognition.
| Event | Impact on Revenue Recognition |
| Project budget and setup | Establish revenue targets and percent complete criteria |
| Issue a prepayment or bill to client | Increase liability account (i.e. billings in excess of costs) |
| Deliver materials to job site | Create invoice, recognize revenue for price of goods |
| Enter/approve timesheets | Recognize revenue (debit: billings in excess of costs; credit: revenue) |
| Project change order | Change budget, change revenue recognition appropriately |
| Final billing | Adjust final revenue and expense totals if required |
Acumatica Implementation: Project Accounting with Revenue Recognition
This implementation example utilizes the project accounting module. We demonstrate the steps below.
- Create a project with budget and revenue recognition plan
- Issue an invoice for prepayment
- Record weekly labor expenses and recognize revenue
- Process a change order and modify revenue recognition
- (optional) Deliver materials to the site
Environment: 6.10.0010
Data: SalesDemo data from partner portal
Setup Steps
To begin, create an allocation rule designed to recognize revenue based on the project budget. This is demonstrated below.
I started with the SalesDemo data, so I need to create a new liability GL account called billings in excess of costs. Link it to the unrecognized revenue account group as illustrated below.

Next I create a new allocation rule designed to recognize revenue as follows
- Create a step to allocate your revenue budget. When you select the ‘allocate budget’ option, the system automatically computes the percentage of completion at the project task level and multiplies it by the budget amount specified in the account group from and account group to. The system computes a delta between this amount and the amount already allocated. The delta amount is allocated per the allocation settings tab.
- Complete the Calculation Rules tab as shown below
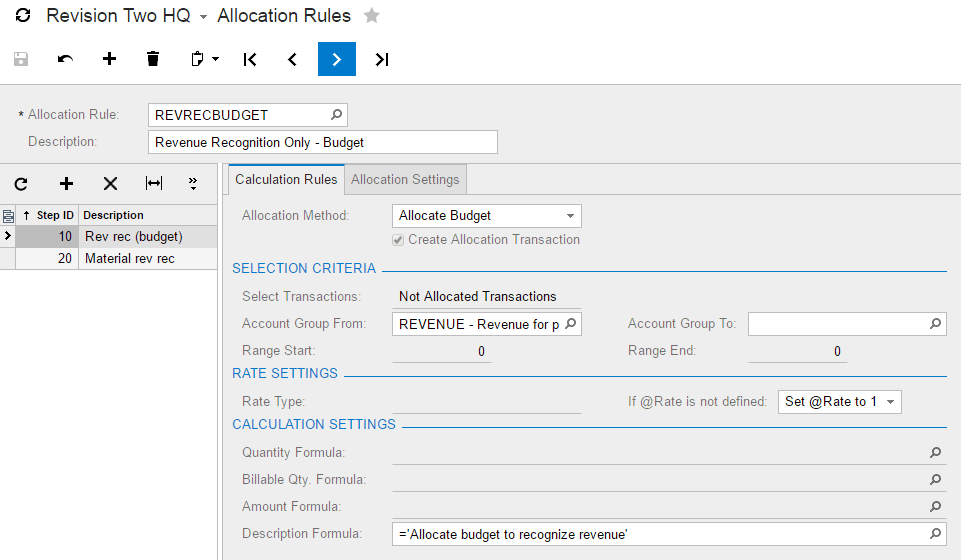
- Complete the Allocation Settings tab as shown below. This creates a GL transaction based on the amount in the calculation rule tab (revenue budget) and pushes it to specific GL accounts. We debit the account “Billings in Excess of Costs” and credit the account “Sales Revenue”.
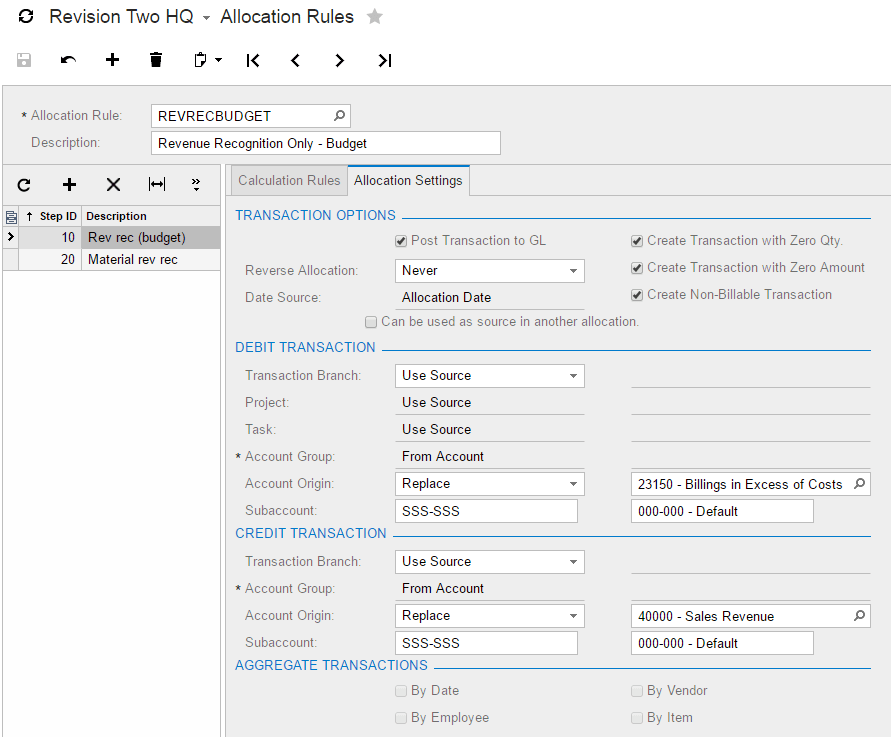
- The net result of this allocation step is as follows:
- System retrieves an amount based on the revenue budget for your task multiplied by the percent complete for the task
- System creates a GL entry for the amount calculated for the debit and credit accounts specified
- (optional) Create a second step to recognize material expenses immediately. This step will immediately recognize revenue when we ship inventory items to our job site. This is an optional step because the accounting can be managed as follows:
- If you create a sales order and create a bill when the shipment to the job site is confirmed, the revenue can be immediately recognized.
- If you create an inventory issue, an appropriate ‘reason code’ can immediately recognize the cost of goods sold.
Demonstrate Revenue Recognition
Step 1: Create the Project
In this example, we create a simple project with only one task. To create the project and task:
- Navigate to Organization > Projects > Work Area > Manage > Projects
- Click “+” to create a new project and name it (I named mine REVREC01). The details of the project are not critical to this example.
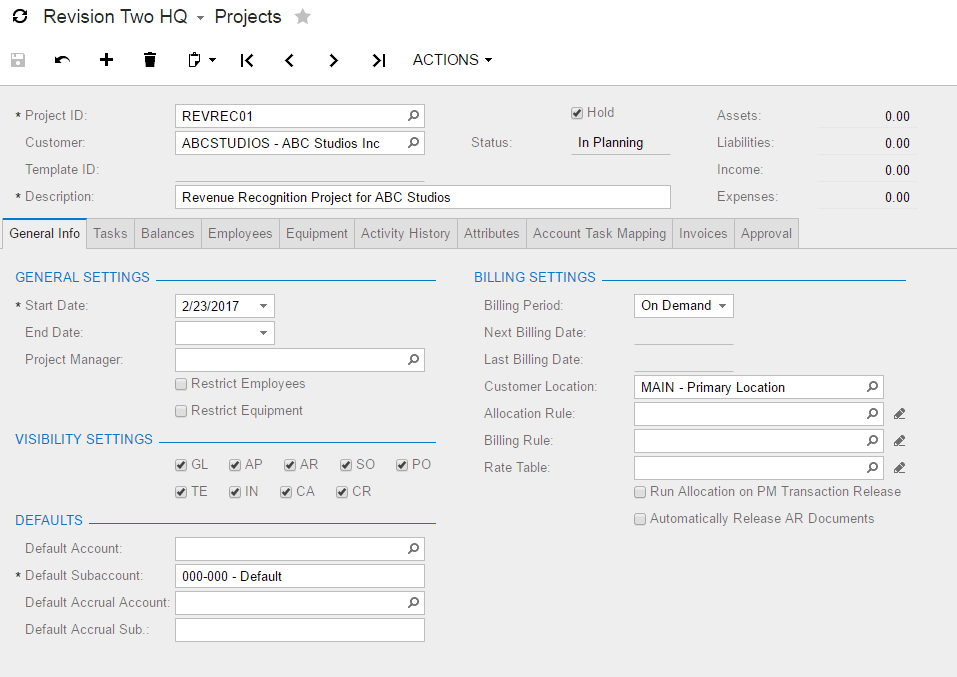
- Click “Tasks” tab and create a new task, then click “view task” to get a pop-up with the task screen below
- Important: the completion calculation must be set to either Budgeted Quantity or Budgeted Amount. In this example we will use budgeted quantity because we will recognize revenue based on the number of hours that are logged versus the hours that are budgeted for our project.
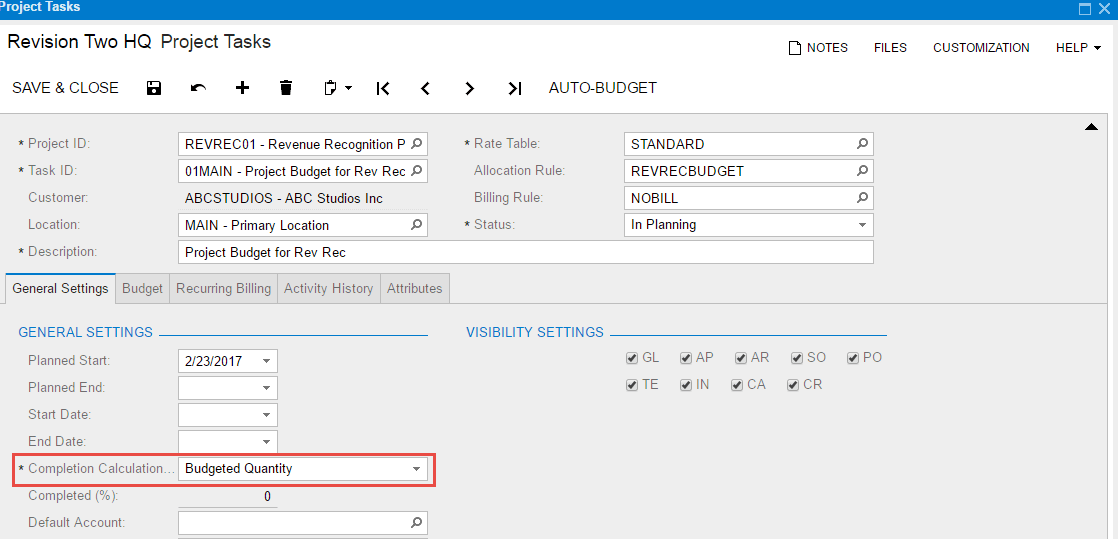
- Click “Budget” tab and create budget items as shown below.
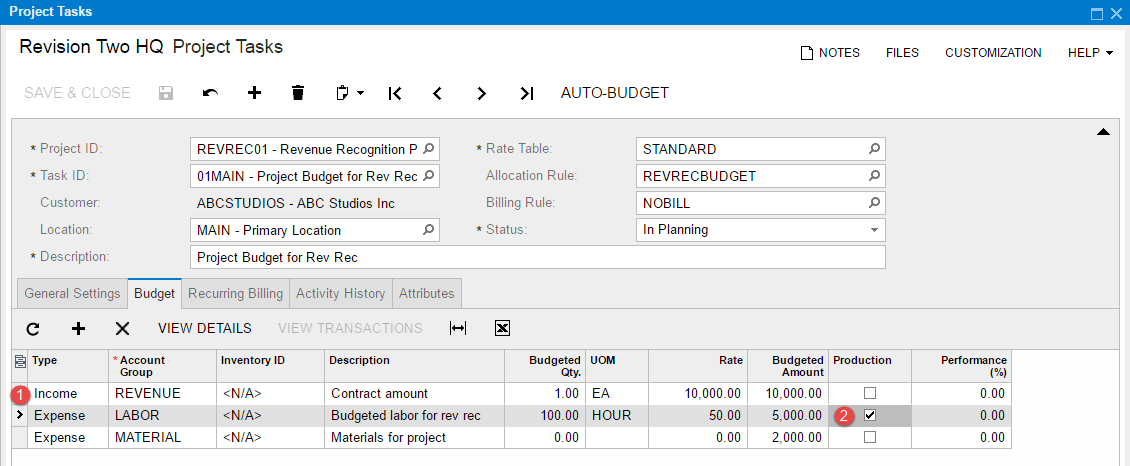
- Note 1: the revenue amount is set to be the total amount of revenue you will recognize for the project
- Note 2: the labor line must have the production box checked. This lets the system know that we want to use the quantity in this column for the percentage complete calculation. You may select more than one column.
- Activate your project task and activate your project
Your project is now setup and active. We can begin entering transactions against the project.
Step 2: Create a prepayment invoice for your project
After the project is active, we can issue an invoice to the client.
- Navigate to Finance > AR > Work Area > Enter > Invoices and Memos
- Create an invoice for your client
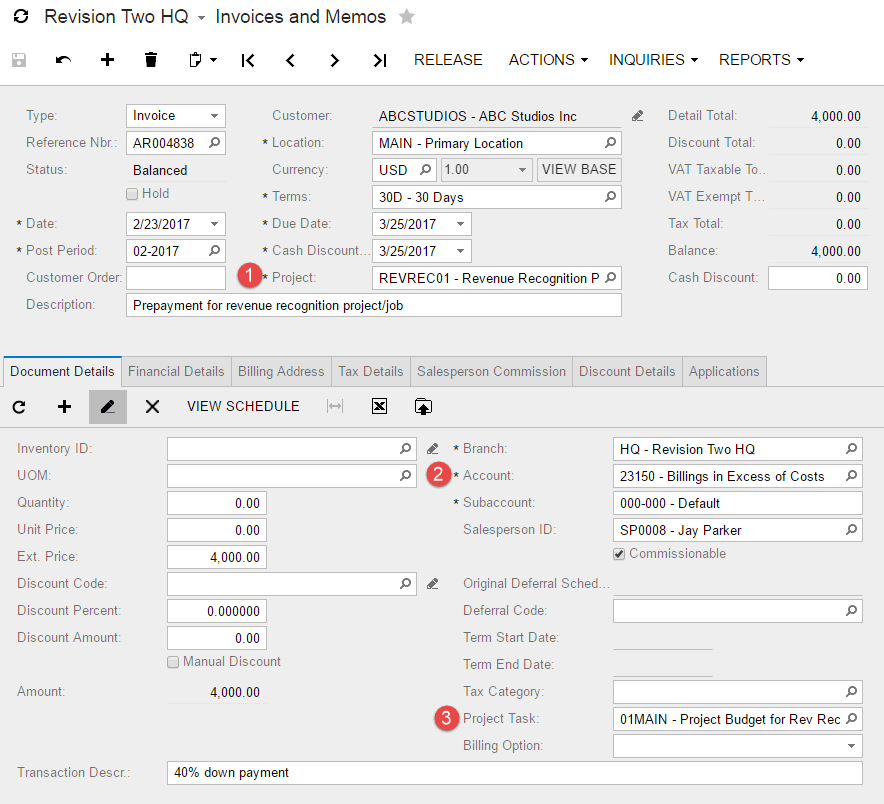
- Invoice notes
- Make sure you specify your project (#1) as well as your project task (#3)
- Specify your account called billings in excess of costs. Optionally, you can set this as your default revenue account on your customer record.
- When using ABCSTUDIOS as my customer I had to disable credit limits and turn off an automatic discount calculation. Using a different customer would be easier.
- Release the invoice to post it to your project
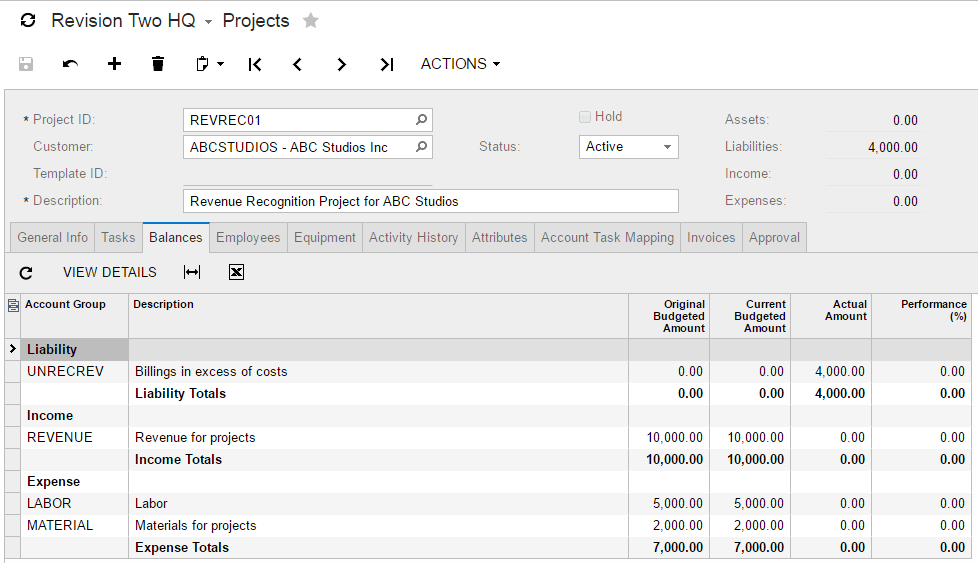
- As expected, there is no impact on revenue. The amount debits the AR asset account and credits the Billings in Excess of Costs liability account.
Step 3: Record weekly labor expenses and review revenue recognition
In this step we create a timesheet, approve/release the timesheet, run our allocation and note impacts on our project financials.
- Login as Jane Doe (doe/123) and enter a timecard that is linked to the project. Ten hours will represent 10% of the projects total of 100 hours.

- Submit the timecard using Action > Submit
- Login as Michael Andrews (andrews/123) to approve and release the timecard (you can also do it as admin)
- Review the impact of this labor transaction on the project P&L
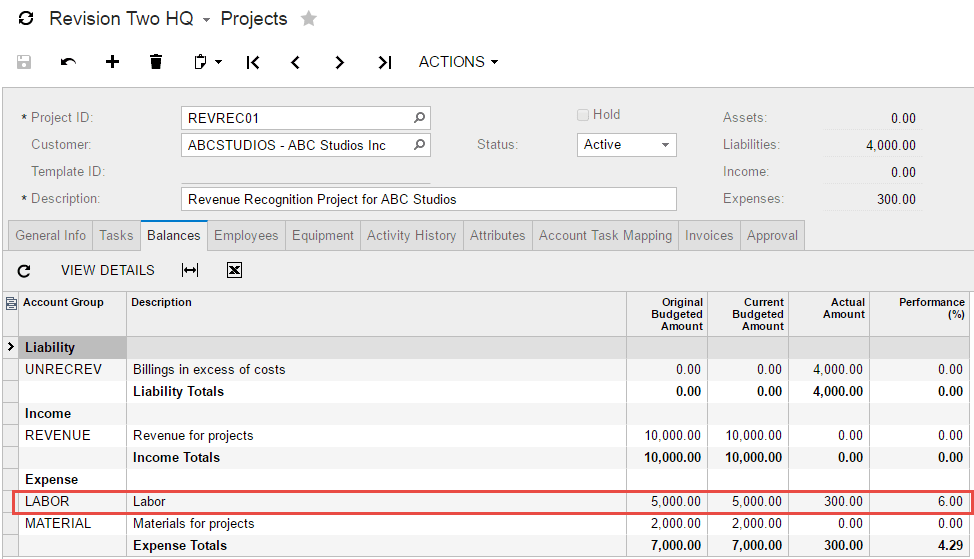
- Note that expenses have now posted to the project. The amount of the expense is the total hours (10) multiplied by Jane Doe’s cost ($30/hour from the employee record).
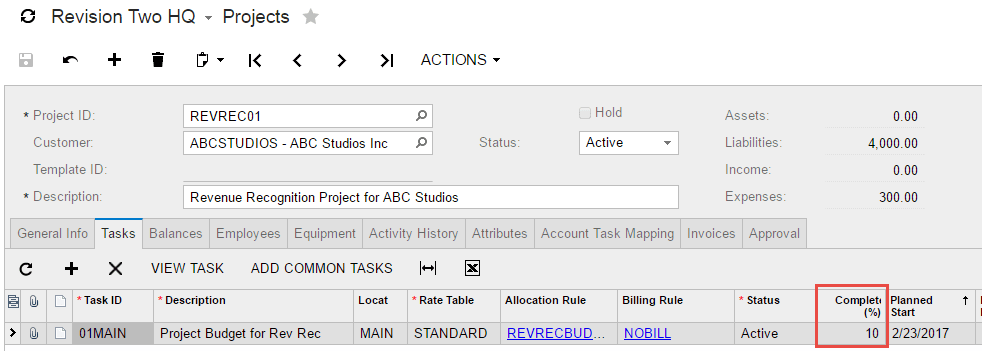
- Note that expenses have now posted to the project. The amount of the expense is the total hours (10) multiplied by Jane Doe’s cost ($30/hour from the employee record).
- Why is the performance different from the completion percentage? The two are not in sync because our percentage completion is based on hours and the performance percentage is based on amount. We budgeted $50/hour for labor and Jane Doe only costs $30/hour – so the performance is less (i.e. we are lower than budget). The appropriate project completion percentage (10%) is listed on the task.
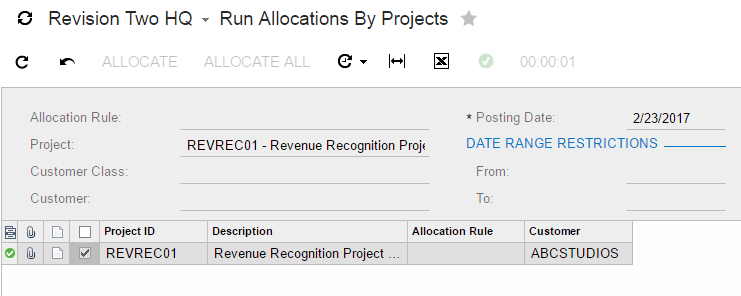
- Run the allocation. This would normally be scheduled to automatically occur at the end of the timecard submission period, but I ran it manually.
- Navigate to Organization > Projects > Processes > Recurring > Run Allocations by Projects
- Select your project and press the allocate button
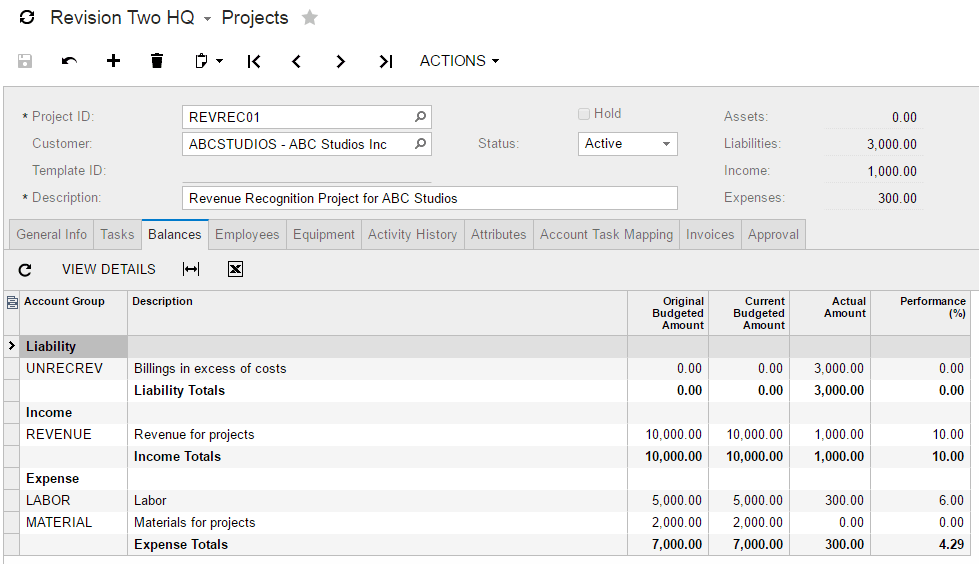
- When we return to the project P&L, we increased recognized revenue (10% of project) and reduced the liability for billings in excess of costs.
Step 4: Process a change order and note results on our revenue recognition
Assume that our project is taking longer than expected. This means that we have recognized more revenue than we should have. To fix this situation, we can adjust the amount of labor hours budgeted for our project and re-run our allocation process.
- Navigate to Project Tasks and select the budget tab
- Change the budgeted labor hours from 100 to 150 as illustrated below. When you do this, the completion percentage will switch to 6.667% on the project.
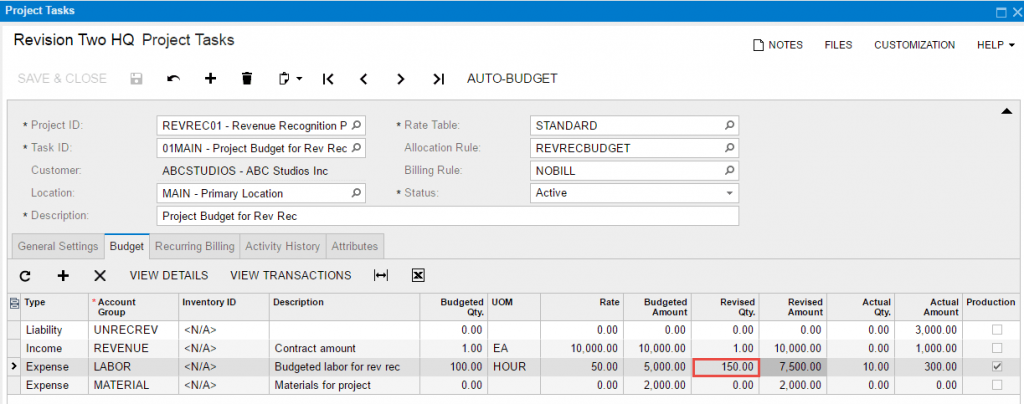
- Run project allocation again and notice that your revenue recognition has been updated as shown below.

- Note: You do not need to run allocations immediately. A scheduled allocation will pick up all changes including budget changes and additional timesheets.
The system supports other change order scenarios:
- Customer Billed Change Order. If your customer changes the scope of the project and agrees to pay, then you adjust the labor hours (maybe by adding a new labor line with the Production flag checked) and you adjust the contract amount in the revenue line. The system will automatically adjust revenue recognition to the new project parameters.
- Work Performed before Bills Issued. If you start performing work before billing, then the system will create a negative balance in the Billings in excess of costs account. You will still be able to recognize revenue based on the labor completed.
Conclusion
Acumatica Project Accounting supports revenue recognition using both the percentage of completion and the completed contract methods. Revenue recognition is automatically updated when the project budget or revenue estimate changes in the middle of a job.
In this article we reviewed an example demonstrating the percentage of completion method – but the same principles apply to the completed contract method. With the completed contract method, the setup is slightly easier because all work in progress is recognized in a single transaction.
Advantages of Modern ERP
Acumatica Cloud ERP is web-based, so employees can enter timesheets and expense reports from anywhere using their Android or iOS device. With unlimited user licensing and a powerful mobile framework, Acumatica allows your business to collect time and expenses from all employees in real-time.
In the legacy ERP world, employees without a license or a desktop computer enter their timesheets when they return to their home or office environment. Approvals can be delayed until the approving manager is at his desk. With Acumatica ERP, all tasks are easily completed remotely using a mobile phone.
This means that your business recognizes revenue faster with much less administrative overhead.
 Canada (English)
 Colombia
 Caribbean and Puerto Rico
 Ecuador
 India
India
 Indonesia
 Ireland
 Malaysia
 Mexico
 Panama
 Peru
Peru
 Philippines
 Singapore
 South Africa
 Sri Lanka
 Thailand
 United Kingdom
 United States


