Reviewed: Jan, 2023
For this week’s Technical Tuesday, I will be explaining two ways of changing field labels on Acumatica screens. Labels can be changed through a minor customization or done by creating a new language pack.
Environment: 5.30.1672
Data: Use SalesDemo demo data from partner portal.

Scenario Overview
Business Problem
Different industries have different terminology. For the ERP system to be easy to use, the terminology must match the lingo used by the customer.
For example, a layman may say “light bulb” while an electrical distributor may call it a “lamp.” This type of change is easily managed by loading the appropriate description on the stock items screen.
But what if a “customer” is referred to as a “member” or a “project” would be better explained as a “job.” Changes to Acumatica screen labels can easily address this and make the system more user-friendly.
Demonstration Scenario
In this document, we will demonstrate 2 options for changing labels:
- Create a language pack for industry vernacular.
- Create a small customization to change the labels within the system.
Each scenario has benefits, as described below.
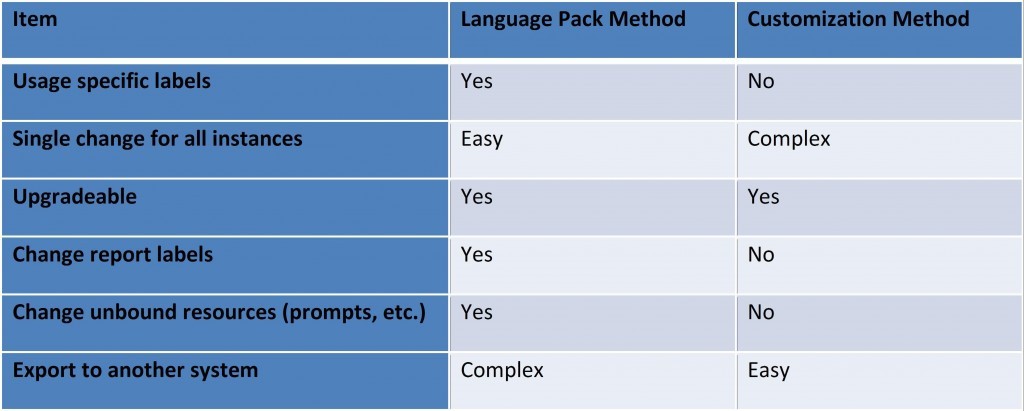
Acumatica Implementation – Option 1 – Language Pack
Creating a language pack is very easy and allows you to essentially ‘translate’ the less familiar terms into the lingo of your client. The steps are outlined below.
- Create system locale
- Customize language for your new locale
- Collect Translation Sets
- Change terminology
- Select new language for all users
Step 1: Create System Locale
- Navigate to SM.20.05.50 (System > management > System Locales)
- Click the “+” button to add a new system locale and type ‘en’ in the search box as illustrated below.
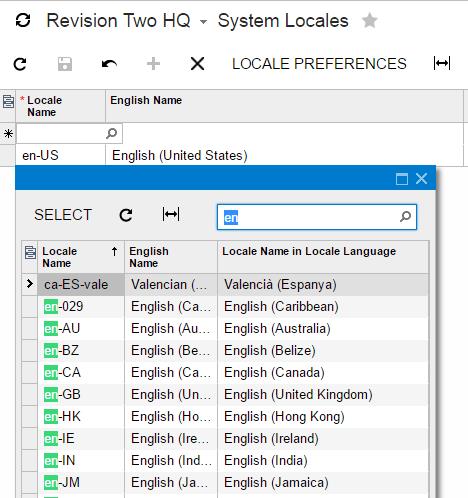
There are plenty of versions of English to select. I selected Canada and activated it. You may have to change the Custom Locale Format because dates, decimal symbols, and times will reflect the selected locale. For example, in Canada the date is displayed as 2016-05-19 instead of 5/19/2016.

- If done correctly, the login screen will offer a choice of languages as illustrated below.

Step 2: Customize Language in Your New Locale
At this point the Customer Lingo language pack and standard English are the same. To begin the process of translating, you create a translation set and then gather data into the translation set. Acumatica makes this easy and includes data from several sources including: screens, error messages, charts, and unbound data.
Create Translation Set
- Navigate to SM.21.15.00 (System > Management > Manage > Translation Sets)
- Select the screens and unbound data you want to add to your translation set as shown below.
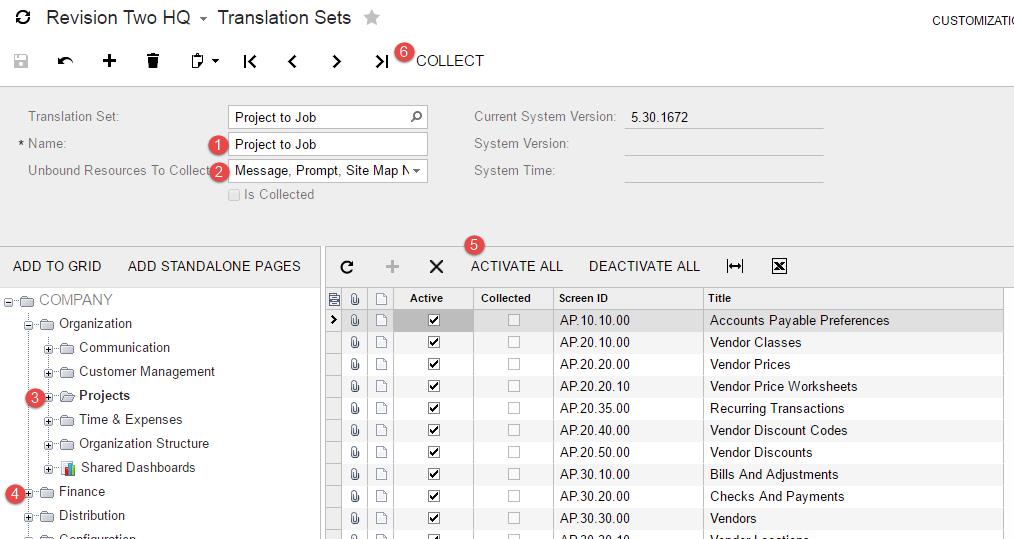
- Type a collection set name
- Select unbound resources to collect (these are string types that are not bound to a specific page or form but may still appear while interacting with the screen
- Select Projects, then press Add to Grid. This will automatically add all the screens within the organization tab to your grid (to save time, I only selected the project area – time and expenses would have been another good area to add)
- Select finance, then press Add to Grid. This will automatically add all the screens from the financial area to your translation set to the grid.
- Click activate all to notify the system that you want to translate all the screens you just collected.
- Click Collect. Depending on the data that you select, this can take quite a while. The fewer screens you grab, the faster the process. In my case this took 6 minutes.
Perform the Translation
With all data collected, you can begin doing the translation.
- Navigate to System > Management > Manage > Translation Dictionaries
- Select the language that you would like to translate into (Customer Lingo in this case)
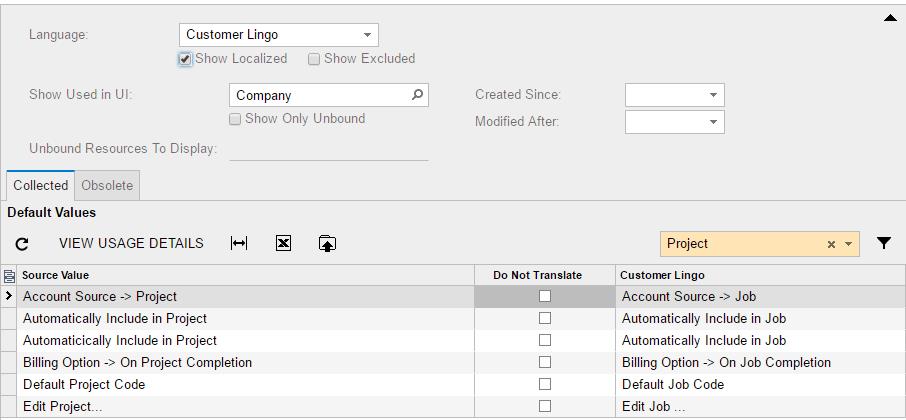
- Optional: to narrow results, I created a filter to select everything containing the work “project” as shown below. Then I applied the filter.
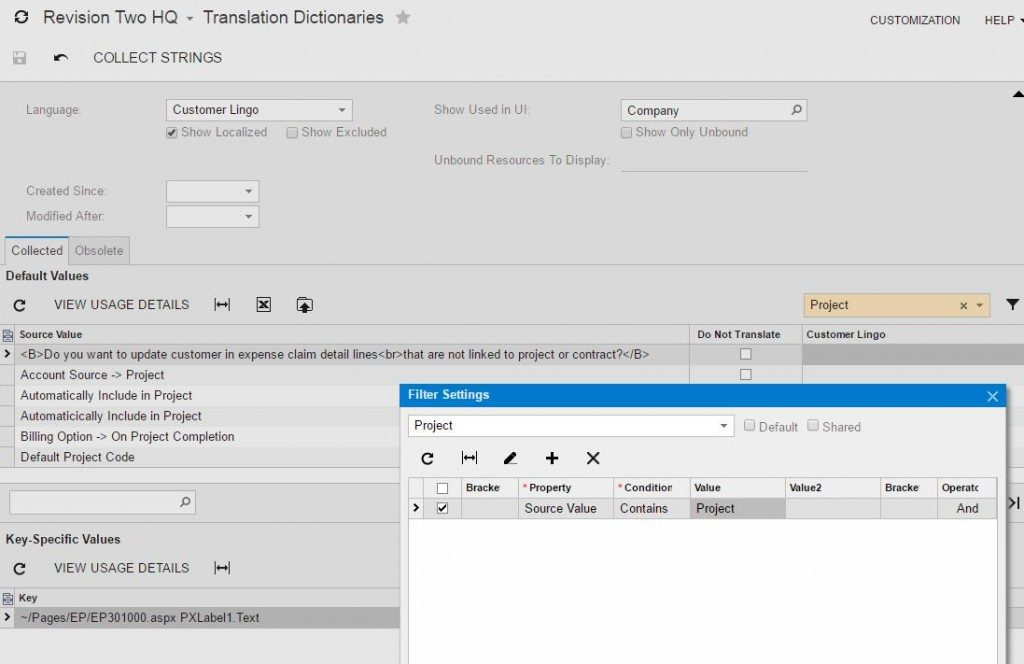
- This filter returned 81 items. So I could to through manually and replace all of the fields or I could export the results to an Excel spreadsheet, change the values, and then import the Excel spreadsheet. In my case, I changed the instances of “project” to “job.”
- I did not translate anything which started as ‘table name’ by clicking the Do Not Translate button by those lines. This narrowed the number of translations to 41. I also did not need to translate things like ‘Select Customization Project” because that did not fit the context of my change. Here is the screen showing some of my translations …
Step 3: Test and Select New ‘Language’ for All Users
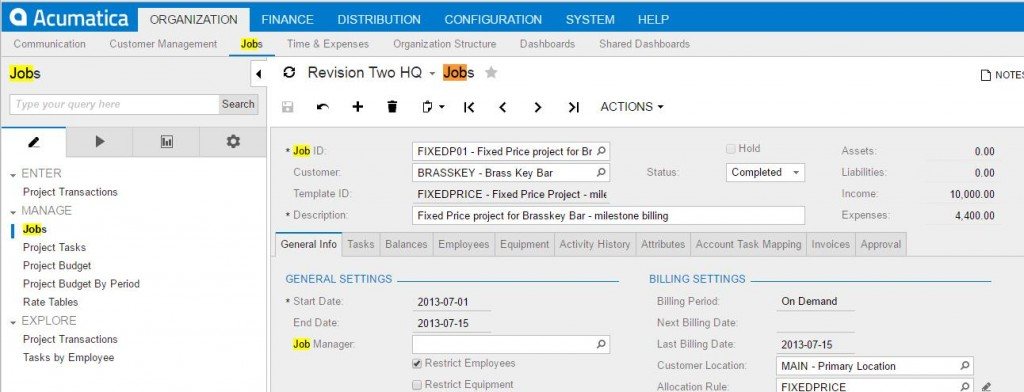
Next, select the Customer Lingo language and login as the administrator. Navigate to the “Project” screen and notice the changes. Not bad for 2 minutes of translating.
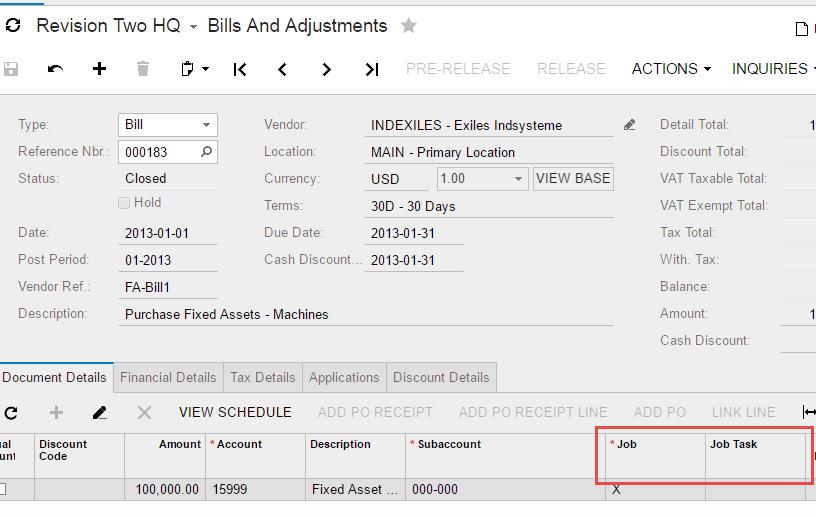
Just as important, you can go to the bills and adjustments screen and see that changes have been made throughout the system.
If you want to activate this automatically for all users, simply go to the System Locales screen and deactivate the original language. Then users do not get a language option on the login screen.
Acumatica Implementation – Option 2 – Customization
A customization allows you to change the labels of the data access class. You can make this change by creating a simple customization project as described here.
The steps are outlined below.
- Create customization project
- Customize labels
- Publish customization
Step 1: Create customization project
Navigate to SM.20.45.05 (System > Customization > Customization Projects) and click the “+” button. Then enter a project name and press save. See results below – I called my customization ProjToJob.

Step 2: Customize labels
We will change the data access class (DAC) by using PXCacheExtension. This label change will be reflected in the entire system where the field is used. Please note, that if the field is further overridden at the “graph level” then you have to customize each individual graph. Here are the steps to initiate that.
- Click the project that you created to open the customization project in a new window
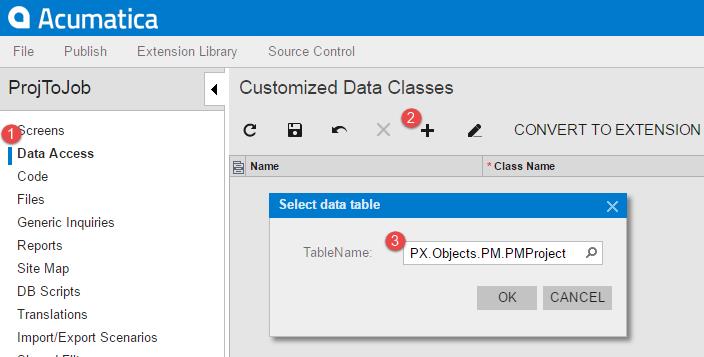
- Click the data access menu
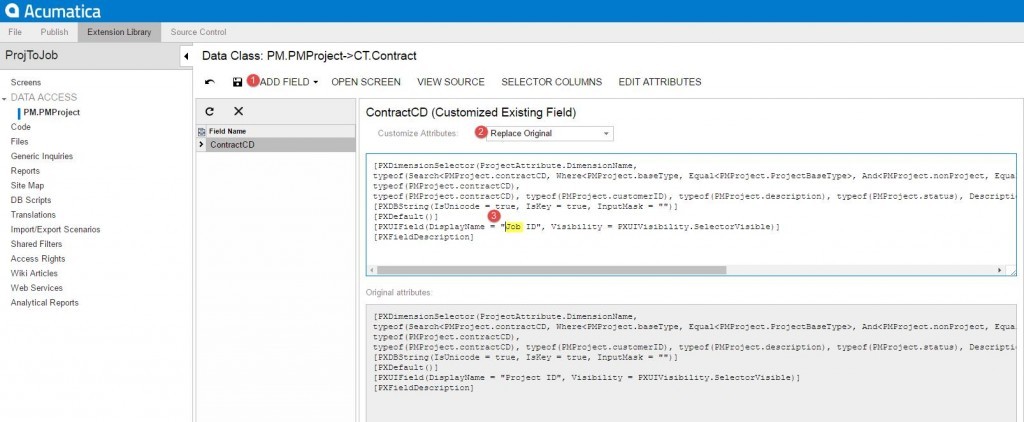
- Click the “+” sign to select the DAC / table you want to customize and start typing PMproject to get the project table. The PM project table is the table that we want to use for this example. Read the appendix to see how I figured this out.
- Select Add Field -> Change Attributes of Base Field
- Pick your Field Name you want to customize from the drop down list. In this case we need the ContractCD field (once again, see appendix 1).
- To Customize the attribute, select the Replace Original, and then type over “Project ID” with the new label as highlighted below. Press save.
Step 3: Publish Customization
Select the publish button and select the appropriate action. In this case I selected ‘Publish Current Project.’ Since the change is very minor, this will happen quickly.
So how did we do?
Open the project screen and you can see that the Project ID is now labeled the Job ID.
That is good news.
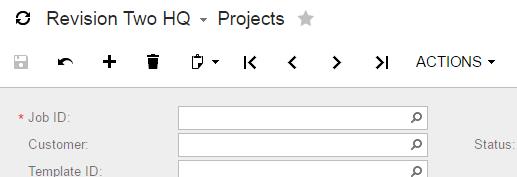
However, if you navigate to the Project Tasks screen. You will notice that the Project ID is still listed as a ‘Project ID’ because it is part of the PMTask data class.
Of course, it is quite easy to change that as well, but the translation method would be the recommended choice for deploying this data label change across several different screens.
Conclusion
Acumatica provides two strategies for changing labels.
The translation method is recommended for changing labels that appear in many data access classes as well as for labels that you want to change in unbound data or data on reports. The translation method also allows you to change labels differently depending on the screen context.
The customization method is recommended for changing labels that appear in a small number of data access classes and need to be easily installed as part of a customization project.
For changing the Acumatica application to represent ‘customer lingo’ would recommend the translation method because it is the easiest and most comprehensive method.
APPENDIX 1: Determining the Object to Customize
To determine the table to customize, navigate to the screen that contains the label you want to change.
Next, select the Customization menu and pick the option to Inspect Element. This will add a question mark to your cursor.
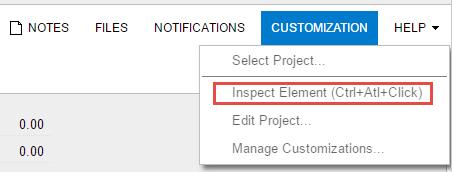
Then, highlight the label you want to inspect and click. The system will show you the results as illustrated below.
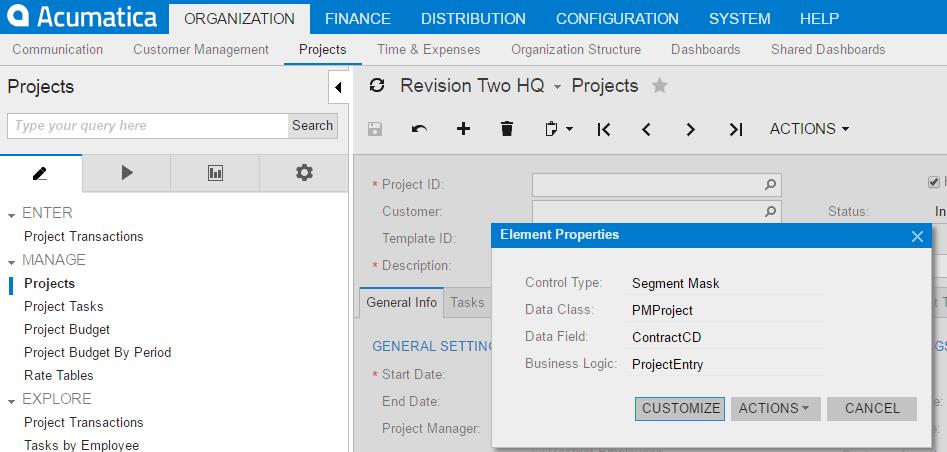
From this result you can see that at the Data Class we need to change is PMProject and the field that we need to change is called ContractCD.
 Canada (English)
 Colombia
 Caribbean and Puerto Rico
 Ecuador
 India
India
 Indonesia
 Ireland
 Malaysia
 Mexico
 Panama
 Peru
Peru
 Philippines
 Singapore
 South Africa
 Sri Lanka
 Thailand
 United Kingdom
 United States


