Introduction
When it comes to managing a spare parts (indirect materials) storeroom, a few key tenants are crucial for an effective inventory. A clean, organized space with an accurate inventory of reliable parts reduces equipment downtime by ensuring supplies are available when needed. A storeroom management plan based on effective standard operating procedures, a robust inventory control system, and a conscientious workforce are key differences between finding a reliable part when needed and a production line shutting down while waiting for parts to arrive.
Perhaps the most critical tool in managing a storeroom, Acumatica ERP fulfills the role of a robust inventory control system. With the ability to handle Lot and Serial Tracked items and multicurrency and multilingual environments, Acumatica ERP can provide global solutions for inventory control. Long a staple in tracking materials, Acumatica ERP enables use of barcode labels to provide their proven role in reducing inaccuracies within the storeroom inventory. As a cloud ERP solution, Acumatica enables centrally managed configuration with remote storeroom support, both using a web browser and the Acumatica mobile app for Android and iOS/iPadOS. This including the remote printing and reading of barcode labels.
While Acumatica provides a means to produce barcode labels, and the Warehouse Management module enables barcode scanning via the mobile app, many companies opt for a 3rd party add-on to meet their unique needs. While all of these solutions may provide an excellent option for warehouse management, they still may not satisfy all customer specific needs. In SETECH’s case, a repair module for tracking and managing broken spare parts and their subsequent repair resulted in a need for a custom label to track each individual part. Neither the repair module nor device hub printing of the custom label is available immediately within the standard Acumatica solution. Fortunately, all the tools are available in the base installation of Acumatica ERP to support creating the new module as well as the ability to print the needed labels remotely and scan them.
The Acumatica Help shows a solution for printing labels to a label printer by downloading the label file to the PC and executing a batch file which in turn sends the file to a printer. However, this solution does not enable printing the label from a mobile device since the mobile device cannot execute the batch file. Portability and built-in cameras in modern and inexpensive tablets make them a desirable accessory to operate a storeroom with mobility. Using the Acumatica mobile app to leverage barcode scanning eliminates the need for expensive barcode scanners of the past which provided a poor user experience and low user adoption rates.
Device Hub overcomes the limitation of printing custom labels (via a label control file) to a label printer by providing a gateway from the cloud to a local PC which accepts the print job and relays it to the connected printer. While setting up Device Hub is relatively easy, generating the label and submitting it to Device Hub is not as intuitive. Fortunately, the solution is easy to implement.
Device Hub
Printing to a label printer via Device Hub requires 3 setup steps. Once completed, an Acumatica user will be able to print to the remote printer placed anywhere that the host PC running Device Hub has access to login to the Acumatica tenant. These steps can be completed for report printers as well, except for a checkbox for Raw Mode shown in Step 2, which must be checked for label printing and unchecked for report printers.
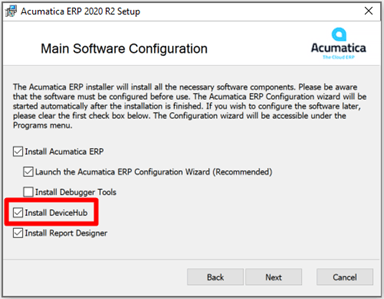
Step 1. Install Device Hub on a PC that is connected to the printer either directly or via the network.
This step is performed using the same version of the Acumatica ERP installation program that the tenant is using. If only Device Hub is desired on this PC, uncheck the other boxes. Keep in mind, that any Device Hub installation will need to be upgraded each time the Acumatica ERP instance is upgraded.
Step 2. Configure Device Hub to communicate with the Acumatica Instance.
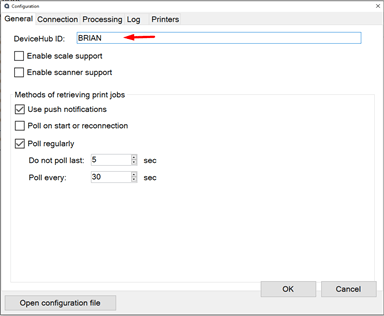
On the General tab, provide a unique name for the Device Hub ID which will identify where the printer can be found remotely. This name will appear in the Printers screen of Acumatica in a later step.
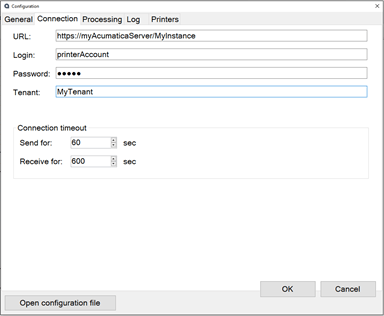
On the Connection tab, enter the URL, account login, account password, and the tenant to connect to the appropriate instance/tenant of Acumatica.
On the Printers tab, click the Add button; provide a name to be used by Acumatica to identify the printer; select the printer as setup on the PC; and very importantly, check the box for Raw Mode for use with compatible label printers. Once completed, click OK.
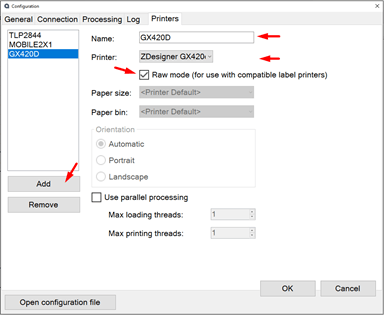
Step 3. In Acumatica on the Printers (SM206510) screen, use the UPDATE PRINTER LIST button to poll the Device Hub instances that are logged into the Acumatica tenant and retrieve the list of defined printers.
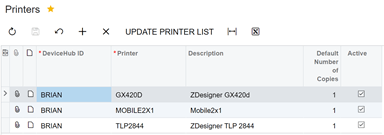
Now the printer should be available for printing remotely from Acumatica as long as Device Hub is running and logged in.
Nota Bene: Although I just provided simple steps in setting up and configuring Device Hub, it bares mentioning of an excellent post by Fernando Amadoz on Configuring Device Hub, written a couple of years ago in March 2019. Reading his post will provide further detail and context as well as some excellent code snippets that may prove helpful to you.
Label Printing
If the printer defined is a simple laser printer on Device Hub, Acumatica can send reports and report-based labels to the printer. However, since the goal is to send a label control file to the label printer, a customization is required to transmit the file to the printer. Fortunately, producing the label control file and sending to the Device Hub printer is an easy 3-step process as well.
First, create a StringBuilder containing each line of the label control file. This can be performed as simply as manually creating each line of the file or as complex as building a complete library of the label printer’s language. Ultimately, the goal is to list one label control instruction per line added to the StringBuilder as per the desired output such as printer setups, text, barcodes, lines, etc.
Next, use the method below to convert the StringBuilder into a byte array and upload into Acumatica as a file. This is where the StringBuilder is converted from a StringBuilder Object into the raw printer control file and sent to the printer.
GIST: https://gist.github.com/BrianMRO/e4b9bbc91f758d9adf9a5f871e74d34e
Finally, include the DHPrint method below (called in the previous step) which instructs Acumatica to send the file to the Device Hub printer.
GIST: https://gist.github.com/BrianMRO/e0a142900050eadcff50c4391a7ea75c
Barcode Scanning via Mobile App
Now that a barcode label has been produced, the next step is to use it. The ability to enable barcode scanning within the Acumatica mobile app couldn’t get much easier. Within the Mobile Application screen definition of the customization project, add special = BarCodeScan to the field that should be scannable as shown below.
GIST: https://gist.github.com/BrianMRO/22e3e01862c5f21de41df0a688ffa9e5
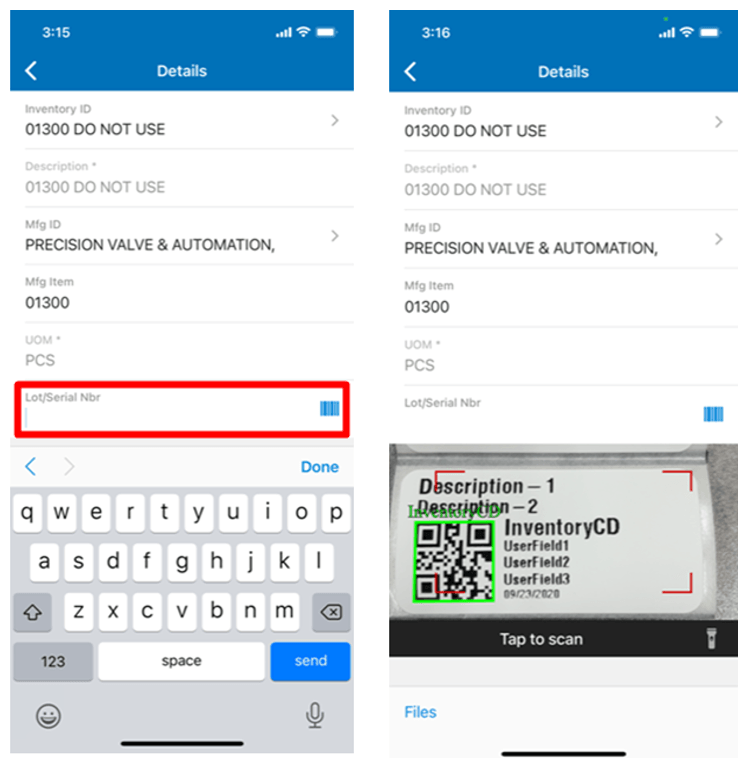
The result should add a barcode icon as shown on the Lot/Serial Nbr field which when tapped will open a camera view to read the barcode.
Conclusion
Using the trifecta of Device Hub label printers, label control files for custom labels, and Mobile App, barcode scanning is easy to achieve in a custom solution within Acumatica ERP. Device Hub enables remote printing anywhere that the host PC can login to the Acumatica tenant. Two simple methods can be created to convert the list of label control instructions into a label control file and subsequently printed via Device Hub. A quick and easy enhancement to screens on the mobile app enables native barcode scanning for a field.
A final note before you begin your own customization to produce and scan barcode labels of your own: Two prerequisites exist for this project. You must create the StringBuilder object adding each label control instruction using .AppendLine(), and you must create a means of deciding which printer on Device Hub to use.
Happy coding!
 Canada (English)
 Colombia
 Caribbean and Puerto Rico
 Ecuador
 India
India
 Indonesia
 Ireland
 Malaysia
 Mexico
 Panama
 Peru
Peru
 Philippines
 Singapore
 South Africa
 Sri Lanka
 Thailand
 United Kingdom
 United States


