Introduction
One of the challenges a company has is to manage its systems’ user base in an orchestrated and secured way. Many systems implement support for standard platforms like Azure, AWS, or Google to allow seamless interaction with those systems by providing features like Single Sign-On (SSO).
Acumatica so far only provides integrated support for Microsoft Active Directory / Federation Services and Azure Active Directory. Additionally, they provide Single Sign-On capabilities with Google and Microsoft accounts, as well as OneLogin through Open ID providers. Particularly with Google, I will be presenting a way to extend this capability and also provide integration of the user base, enabling administrators to create, activate, and deactivate Acumatica users from Google Workspace.
Acumatica Single Sign-On with Google (SSO)
To enable SSO, go to System Management > Enable/Disable Features menu option. Then seek and set the respective feature option:
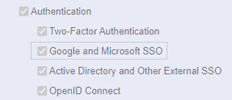
Once it is enabled, on the Login page will appear the Google option to allow one login access to Acumatica.
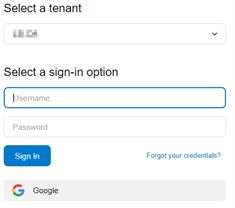
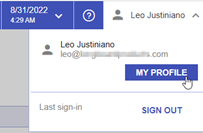
Acumatica enables self-enrolling in SSO through MY PROFILE option
Then go to External Identities and then select Google and click ASSOCIATE USER
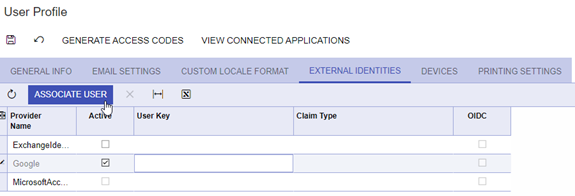
The process of authentication goes to Google using the “current” user session with Google Workspace. Once is complete the Account ID is set as an identifier for the specified identity:

This account ID (User Key) is used to identify the current Google Session of the user while authenticating with Google during the one-click process.
This mechanism is available only to the regular user. It is no available for an administrator, meaning that there is no way to assign a Google identity to a different user but the current user. Also is required to have the user email defined as part of the targeted Google directory.
This article presents an alternative to expand this ability by
- Having the ability to define users in Google and then create them automatically in Acumatica with its Google Identity set.
- Enabling administrators to assign a specific Google Identity to a user by an administrator without the need to authenticate using 2FA.
Setting Visual Studio and Google Requirements
First thing first. How do I connect to Google? For this implementation I used existing NuGet libraries provided by Google:

NuGet list. This implementation used version 1.49.
By adding these libraries, a set of classes become available to implement RESTAPI calls in a friendly way.
Secondly, there are a list of requirements on the Google side to enable the integration of Acumatica with Google Workspace:
- Create a Service Account
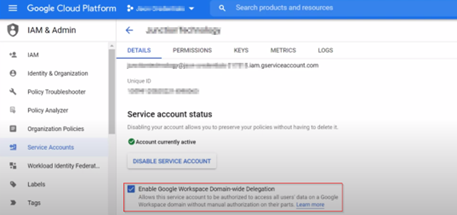
Google Service Account screen
- Create a Private Key File for the service account. I supported both formats JSON and P12 (X.509 backward compatibility) formats. The file is created once for downloading. After that, there is no option to recreate it.
- Create a Workspace Group. The objective is to synchronize Google users that belong to this group. Any other user will be ignored.
- Designate an Access Account. It will be used to query the Google Directory
Storing Private Key File in Acumatica
You could think of uploading the file into Acumatica and that is it. Indeed it is, but I need to have control of the file because is required to interact with Google Workspace endpoints. To that effect, all required and optional parameters described above, plus the Private Key file, must be stored in Acumatica through a setup screen.
To restrict access to the option Files on the screen, I just need to set the following option as false:

To implement a controlled uploading of the file, an Uploading panel is added to the screen:
GIST: https://gist.github.com/tac-ljustiniano/74bfe34432846dea1815d89d44a76380
Connecting to Google
Connecting to Google Workspace requires specifying the access scope. Because Google is the source of truth for user creation, I only need read only access to users and groups. Google provides several options through the class DirectoryService.Scope. The rest is using the Private Key file data for the connection.
GIST: https://gist.github.com/tac-ljustiniano/69a374543c953d0206078dc22d094d22
Retrieving Users
There are 2 places to verify for users:
1. Specific Google User Group. One of the optional requirements is the definition of a group in the Google Directory. By having a group user administration is made easier by just assigning Google users that will be created in Acumatica to that specific group. The group URL definition is a setup parameter.
To retrieve the list of group members I use the class MembersResource.ListRequest:
GIST: https://gist.github.com/tac-ljustiniano/a5962defd78ba5c4b41da107028c900f
2. Global User Directory. It covers all Google accounts. If no group is specified, there is no other choice but sync against it.
To retrieve the list of users from the global Google Directory I use the class UsersResource.ListRequest:
GIST: https://gist.github.com/tac-ljustiniano/27bfcd08a3b7e3c6f8ed975ae7068638
Paging is necessary as by design the Google API delivers a subset of record per request. A single user query also can be implemented using the primary email as key.
Syncing Acumatica Users
By Extending the Users screen to add an action to associate the selected user to a Google directory account, the selected user will be synced with Google directory when the action is invoked. Such an action is placed in the context of EXTERNAL IDENTITIES
GIST: https://gist.github.com/tac-ljustiniano/76d8930ee0b2d849fc8077fa8159b5b8
A more extended version to create, update or disable users is created to process the list of users in Acumatica according to a criteria, using the user email (primary email) as a key:
user@domain.com
The “user” part will become the Acumatica login.
A processing a screen that invokes this process would be required to schedule that syncing process and have it unattended.
Conclusion
Using the Google API and setting the proper access accounts to the Google Workspace, administrators are granted the ability to sync SSO info for different users. Also, scheduled syncing process can be used to have an unattended administration of users in Acumatica. IT Departments only need to assign users to a special group and they will be created in Acumatica. Further work is still needed to extend the scope toward Acumatica Roles. Currently this implementation creates the users with basic access into Acumatica. Still additional permissions must be granted to allow those users to interact with their respective modules.
Happy coding!
 Canada (English)
 Colombia
 Caribbean and Puerto Rico
 Ecuador
 India
India
 Indonesia
 Ireland
 Malaysia
 Mexico
 Panama
 Peru
Peru
 Philippines
 Singapore
 South Africa
 Sri Lanka
 Thailand
 United Kingdom
 United States
