In last week’s post, I introduced you to Single Sign-on (SSO) on the Acumatica Cloud ERP Platform, enabling a more seamless user authentication experience for users. I provided cursory treatment of Microsoft’s Active Directory & Azure Active Directory, focusing on external provider solutions from Google & Microsoft in more depth. I went into quite a bit of detail on implementing each company’s OAuth 2.0 implementations. I think it is worth a follow-up post, revisiting and providing greater detail on Azure Active Directory for completeness.
As I mentioned before, you can easily enable Microsoft’s Active Directory, Azure Active Directory, or Microsoft’s Live ID – or Google’s OAuth 2.0 client IDs with not too much effort.
I have enabled both Google and Microsoft as external providers for users to login into my Acumatica instance below – and added Azure Active Directory. Having these three added, users logging into the system would see the following login screen in figure 1 below.

When users choose one of the external providers, they will be automatically redirected to the sign-in page of the selected identity provider when they navigate to your Acumatica ERP instance. Additionally, you may display Acumatica ERP forms within your other websites. For example, you can embed a link to the Tasks form (EP.40.40.00) within your company’s Office 365 page to view and access your Acumatica ERP task list directly in Office 365.
For detail on integrating Google or LiveID see me previous post here.
Integration with Microsoft Active Directory
Acumatica supports integration with both Microsoft Active Directory (AD) and Microsoft Azure Active Directory (Azure AD) to provide centralized user and access management. Once these products have been integrated with Acumatica, domain users can use their domain credentials to sign in to the system.
By integrating Acumatica Cloud ERP and Azure Active Directory (Azure AD), your users have single sign-on across applications. The users can access the Acumatica ERP instance based on their organizational account in Azure AD. The user access rights in Acumatica ERP have applied automatically, based on the predefined mapping rules between Azure AD groups and Acumatica ERP roles.
Additionally, you can configure silent logon. With silent logon, the users are automatically redirected to the Azure logon screen when they try to access the Acumatica ERP instance. You can configure integration with Azure Active Directory when you implement Acumatica ERP or any time thereafter. When a domain user signs in to Acumatica, an appropriate user account will be created automatically within Acumatica with the user name and password boxes unavailable and with user roles matched to the AD domain groups.
Enabling Microsoft Active Directory
The first thing you need to do to enable Active Directory is to create an Active Directory user account that has Read rights throughout the entire AD forest. This user account must have at least Read rights to the following properties defined in the Active Directory Schema:
objectSid, distinguishedName, sAMAccountName, displayName, description, lastLogon, pwdLastSet, primaryGroupID, and memberOf
.
Next, you will need to make a few edits of the Web.config file of the application instance that you wish to integrate with Active Directory:
<system.web>
<activeDirectory enabled=”true” path=”domain_path” dc=”domain_name”
user=”user_name” password=”user_password” />
</system.web>
The path=”domain_path” parameter is required and should be your AD server path. The dc=”domain_name” parameter is optional and required only in the case if you have more than one domain in the forest. The user account credentials belong to the user account you have created in step above.
As a side note, if you integrate Acumatica with Active Directory Federation Services, you must also configure claims-aware authentication.
After you enable Active Directory, you will need to map Active Directory groups to user roles defined in Acumatica ERP using the User Roles (SM.20.10.05) form – refer as needed to the appropriate help documentation of your application instance. Note that enabling Active Directory integration does NOT affect the standard authorization and authentication mechanism of Acumatica. With the Active Directory integration enabled, you still can create regular (non-AD) users in Acumatica.
Once these steps have been completed, domain users can log on to Acumatica using their domain credentials.
Enabling Microsoft Azure Active Directory
You can configure integration with Azure Active Directory when you implement Acumatica ERP or any time after. When a domain user signs in to Acumatica ERP, an appropriate user account will be created automatically within Acumatica ERP with the user name and password boxes unavailable and with user roles matched to the AD domain groups.
Local & Domain Users
Once you have configured integration, some employees will have both local user accounts in Acumatica ERP and account created automatically for these employees as domain users. You can delete the local accounts of employees who do not perform any administration and configuration tasks in Acumatica ERP. The password policies that are in effect for local users created in Acumatica ERP do not affect domain users. For example, a user signed into Acumatica ERP as an Active Directory domain user will not be able to change the password by using Acumatica ERP. Only domain password policies affect the domain users.
New domain users will automatically get the right to sign in to Acumatica ERP once they join an Active Directory domain. Their membership in Acumatica ERP roles will be automatically updated to comply with the membership of those users in Active Directory domain groups. If needed, you can assign the users to the various Acumatica ERP roles regardless of Active Directory domain groups by using the User Roles (SM.20.10.05) form as mentioned above.
For Azure Active Directory, you will first register your Acumatica ERP instance in the Azure Portal and obtain the OAuth 2.0 credentials and register the client ID and client secret (password) that you obtained to enable single sign-on with Azure Active Directory. Then you will need to map the Azure AD groups to Acumatica ERP roles in the same manner as mentioned earlier.
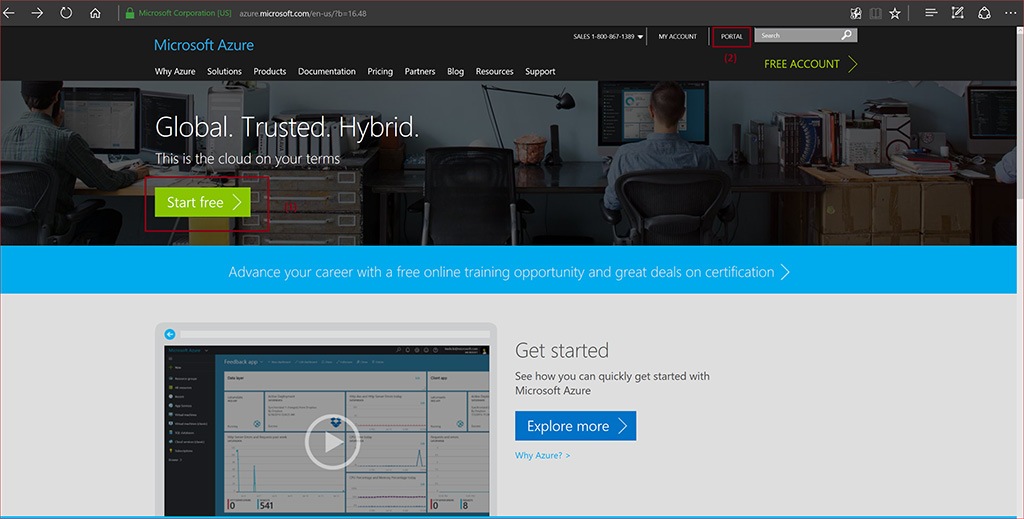
To get started you just go to https://azure.microsoft.com. See Figure 2 below. If you don’t have an Azure Account, you can start with a free- trial (1) and do some initial testing. This is what I did to be able to test and work through integrating Azure Directory myself in order to write about it here. Note at this time, they are transitioning to a new portal (2). Some of the advanced Azure functionality is only available on the new portal.
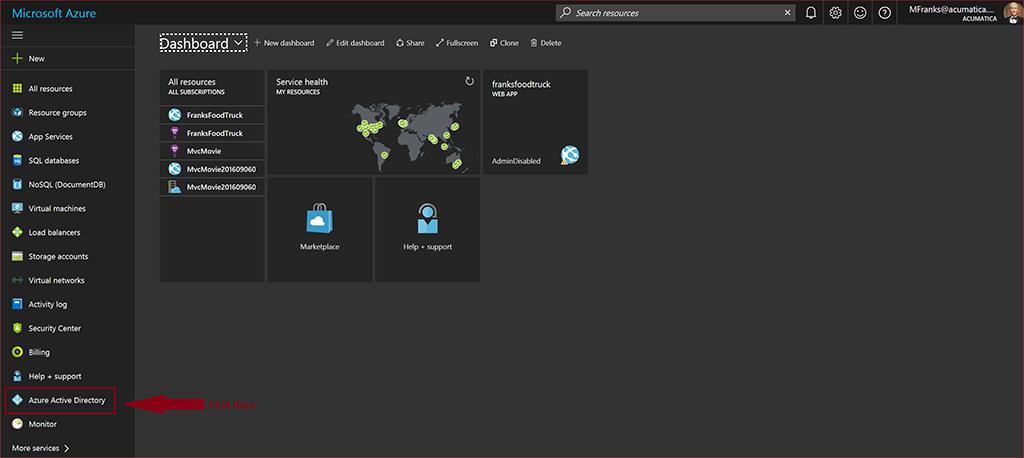
After you have obtained an account, you can register the Acumatica instance, configure your directory, etc. Here below is the new Azure Portal’s dashboard where you manage various services and resources. Simply click on Azure Active Directory in the left panel toward the bottom(Figure 3), and you can begin your enablement of Azure AD.
Registering the Acumatica Instance with Azure AD
Aside from managing your AD domain through the portal, you will need to register your particular Acumatica instance. After selecting Azure Active Directory in the portal, you should now have the following screen similarly displayed as is shown below in Figure 4.
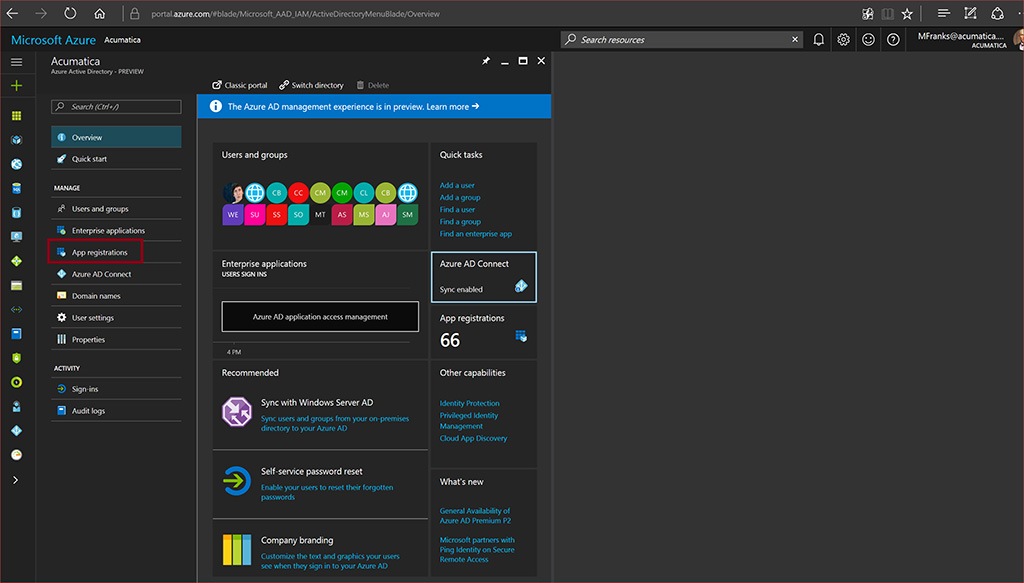
Now select App Registrations under MANAGE in the left pane as shown above. First, notice I have two applications already registered – Figure 5. These I created earlier when testing/experimenting with my implementation a couple of weeks ago (1). But let us add a new registration (2), and name the app instance and specify the application type and the sign- URL (3). Note that the sign-on URL is my particular Acumatica instance running in the cloud – not my local instance. Unlike with the LiveID case from last week’s post, you will be required to have an Acumatica Instance running in the cloud and accessible in order to enable Azure AD with your Acumatica instance.
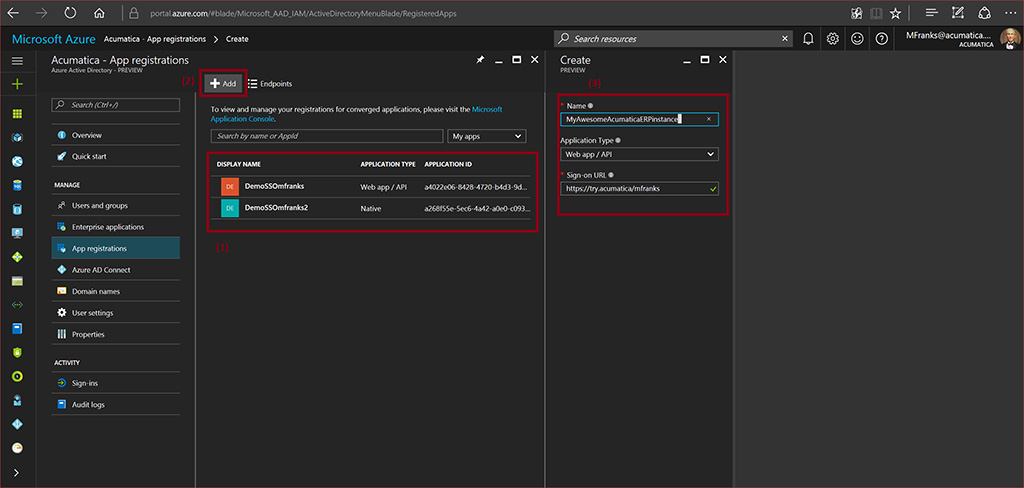
After adding and filling in the required fields, above – click on Create and your registration is nearly complete. You will now notice that you will need to create Keys for the application instance forming your secret or password that is automatically generated. See below in Figure 6.
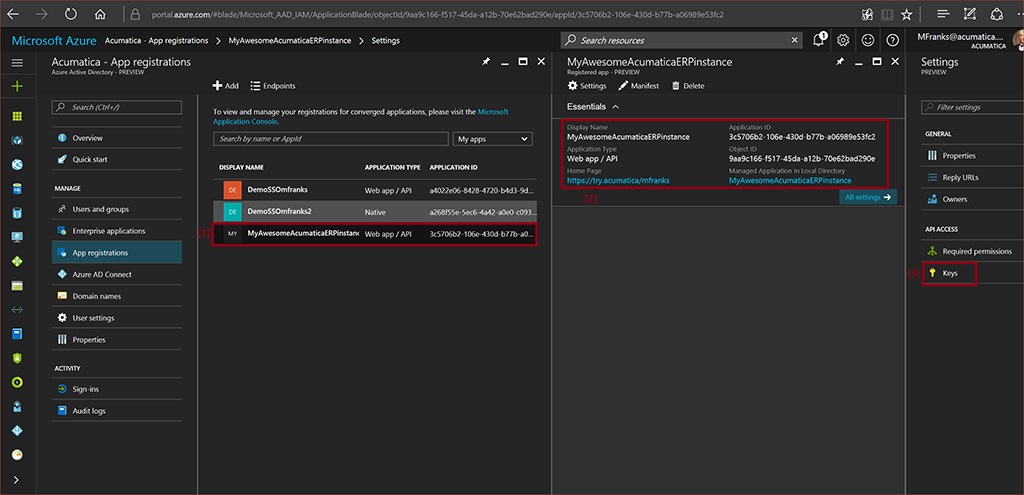
The screen above is presented after the portal registers and generates the unique application ID. Which is shown in the middle-left panel (1). Click on the newly registered application and the instance detail (2) will be displayed and the Settings panel – on the far right. You will need to now select Keys (3) in order to generate your secret/password.
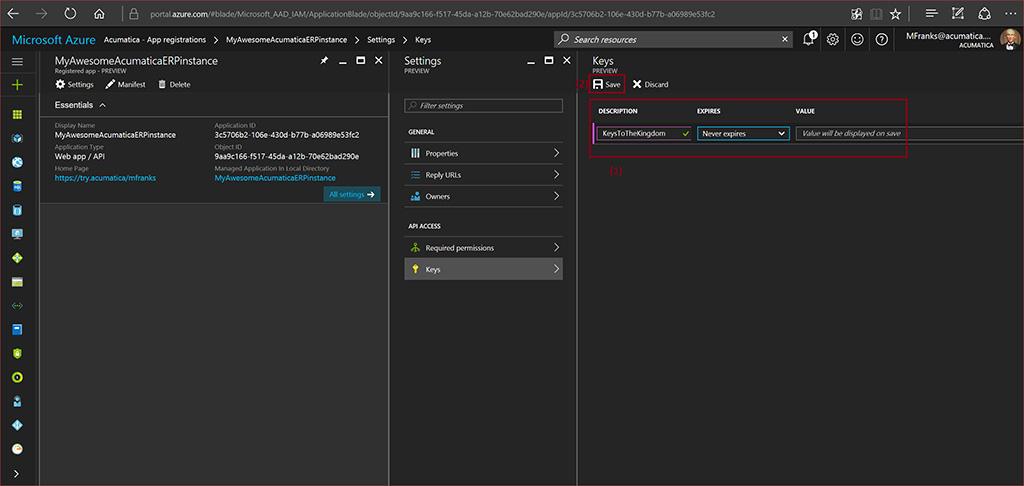
Fill in the Key description, select Expiration (1), and click on Save (2). At this point, your Secret value will be displayed and you will need to copy it right away as when you move from the Keys panel, it will not be visible again. If you fail to do this, you’ll need to delete your instance and start over. You don’t want to do that.
Okay, now the final enablement steps and you’ll be finished – if everything is configured correctly and you properly have all the pieces in place.
Configuring Your Acumatica ERP Instance
The matter remaining is adding the necessary web.config settings and testing. After you have obtained the required credentials from Azure AD portal, you have to register these credentials in your Acumatica ERP instance. Modify the Acumatica instance’s web.config by opening the file from the site’s instance location. The file is usually located in %Program Files%\ Acumatica ERP\<instance name>, where <instance name> is the name of the application instance website. Next, enable Azure AD integration byt adding the following parameters shown below in the ActiveDirectory section located under <system.web> of the web.config file:
<activeDirectory enabled=”true” protocol=”ADAL”
path=”tenant id@OnMicrosoft.com”
user=”application id”
password=”application secret“/>
To clarify, your tenant id is your domain (in my case it is acumatica@OnMicrosoft.com.) User and password are what you saved in the registration process we went through above.
Then in the System.identityModel section of the web.config file, add a reference to your Acumatica ERP instance, as shown below.
<system.identityModel>
<identityConfiguration>…
…
<audienceUris>
<add value=”Acumatica instance URL” />
</audienceUris>
…
</identityConfiguration>
</system.identityModel>
Now, add the following references to the System.identityModel.services section of the web.config, as shown below:
<system.identityModel.services>
<federationConfiguration>
<wsFederation passiveRedirectEnabled=”false”
issuer=”https://login.windows.net/tenant id.onmicrosoft.com/wsfed”
realm=”Acumatica instance URL”
requireHttps=”false” PersistentCookiesOnPassiveRedirects=”false” />
</federationConfiguration>
</system.identityModel.services>
Again, tenant id is your domain as mentioned above. After you finish with the above configurations, save the web.config file. Now that you have finished enabling Azure Active Directory, you should map Azure AD groups to the roles in your Acumatica ERP instance. This was described above earlier under the Microsoft Active Directory section.
Finally, you can run your instance of Acumatica and you will also see that the Acumatica login page will show an Azure AD icon as shown below in Figure 8.
![]()
After clicking on the Azure AD icon, above… In in Acumatica and happy as a clam – Figure 9, below.

Summary
As software systems continue to proliferate to support business processes, users are faced with having to remember an increasing set of credentials. Users typically sign-on to many systems, each of which often involves different usernames and authentication information. Administrators are faced with managing user accounts for each system accessed by their users which need to be coordinated to maintain the integrity of enforcing an organization’s security policy.
Here are a few of the benefits to consider for implementing Single Sign-on:
- Improving security due to users not having to remember multiple sets of credentials.
- Reducing the time to log into systems to individual domains – considering failed logins due to memory lapses.
- Reducing IT costs due to lower number of IT help desk calls for password resets.
- User Convenience and happy users
This completes our discussion on SSO for now. As the landscape continues to develop, we will return to the subject and have more knowledge to impart/transfer to you – which we hope you find timely and informative – helping you make use of our technology platform to solve your business challenges and reduce your operating costs – gained inefficiencies and agilities.


