In today’s post, I thought I would share with you how you can implement Single Sign-on (SSO) on the Acumatica Cloud ERP Platform, enabling a more seamless user authentication experience for your users. With SSO enabled, users can sign in once and then gain access to all systems that trust the security provider used for authentication – such as Google or Microsoft, for example.
Out of the box, you can easily enable Microsoft’s Active Directory, Azure Active Directory, or Microsoft’s Live ID – or Google’s OAuth 2.0 client IDs. You may also use other 3rd-Party solutions as well with a little more work – such as OneLogin as an example. For today, we’ll focus on the out-of-the box solutions and discuss these other Identity Providers in another post in the future.
I have enabled both Google and Microsoft as external providers for users to login into my Acumatica instance below. Users logging into the system would see the following login screen in figure 1 below.

In the case above, users could use either their Acumatica credentials to login – or use their Google account or their MicrosoftLiveID account to sign in, if they have been associated with either of these external providers through their user profile by an administrator of the system.
When users choose one of the external providers, they will be automatically redirected to the sign-in page of the selected identity provider when they navigate to your Acumatica ERP (Enterprise Resource Planning) instance. Additionally, you may display Acumatica ERP forms within your other websites. For example, you can embed a link to the Tasks form (EP.40.40.00) within your company’s Office 365 page to view and access your Acumatica ERP task list directly in Office 365.
Integration with Microsoft Active Directory
Acumatica supports integration with both Microsoft Active Directory (AD) and Microsoft Azure Active Directory (Azure AD) to provide centralized user and access management. Once these products have been integrated with Acumatica, domain users can use their domain credentials to sign in to the system.
By integrating Acumatica Cloud ERP and Azure Active Directory (Azure AD), your users have single sign-on across applications. The users can access the Acumatica ERP instance based on their organizational account in Azure AD. The user access rights in Acumatica ERP are applied automatically, based on the predefined mapping rules between Azure AD groups and Acumatica ERP roles.
Additionally, you can configure silent logon. With silent logon, the users are automatically redirected to the Azure logon screen when they try to access the Acumatica ERP instance. You can configure integration with Azure Active Directory when you implement Acumatica ERP or any time thereafter. When a domain user signs in to Acumatica, an appropriate user account will be created automatically within Acumatica with the user name and password boxes unavailable and with user roles matched to the AD domain groups.
I won’t go into the detail here on configuring Active Directory – as I wish to focus more on external identity providers due to the limitations on space and respecting my audience’s time.
Enabling Microsoft Live ID SSO
Being able to use an external provider for authentication is convenient for both the administrator and the user to use a trusted provider to supply a secure method of authentication. To enable Microsoft’s Live ID in Acumatica you first have to register your Acumatica instance with a Microsoft Live ID Account and obtain OAuth 2.0 credentials.
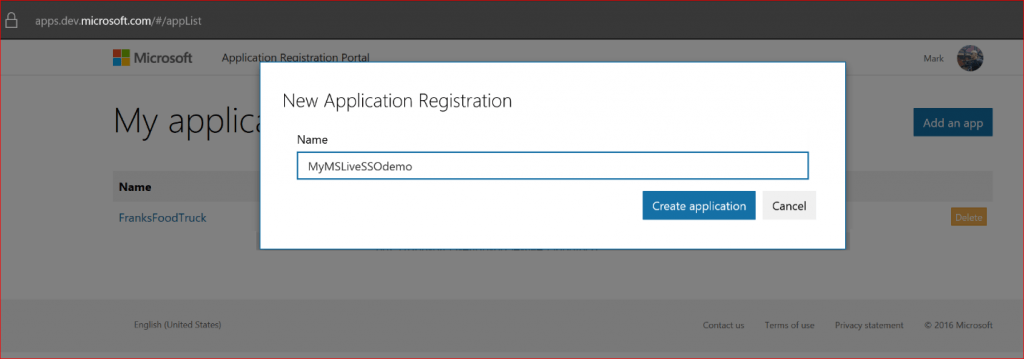
The first step in the process is to sign in to the Microsoft Application Registration Portal – https://account.live.com/developers/applications and add a new application. Click on the Add an app button, enter a name, and then click the Create application button, as shown in the screenshot below in figure 2.
The following screen will pop up – see the screen-shot below, Figure 3. First, you will need to generate a new password under the Application Secrets (2). Copy/write down the password and the application ID (1) as you’ll need these later when setting things up on the Acumatica side. Second, add a platform (3) and choose Web (mobile is the other choice) and enter your Acumatica redirect URL (4) – which will be in the form of https://app.site.net/instancename/Frames/authdock.ashx. If you have an evaluation instance, it will be similar to what you see in the screenshot. If you have a paid license instance, you will additionally add a logo, Terms of Service URL, and Privacy Statement URL – otherwise, no need to add these items.
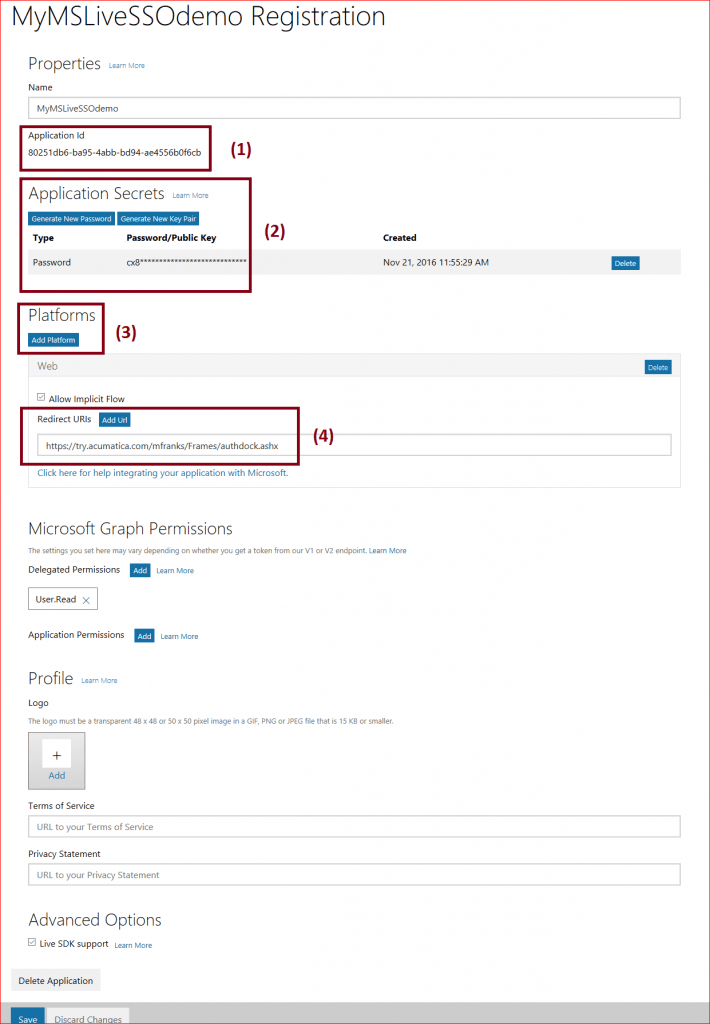
Save your changes, after completing this information in the Microsoft Application Registration Portal and then move on to the necessary configuration in Acumatica which I’ll go over next.
Completing the Acumatica Cloud ERP SSO Live ID Enablement Process
Retrieve your credentials obtained and saved in the steps above and sign in to your Acumatica instance – you’ll need administrative privileges. Select the CONFIGURATION tab, then User Security. In the navigation pane, click Security Preferences under Configure. You should now have the following screen displayed as is shown below in Figure 4.
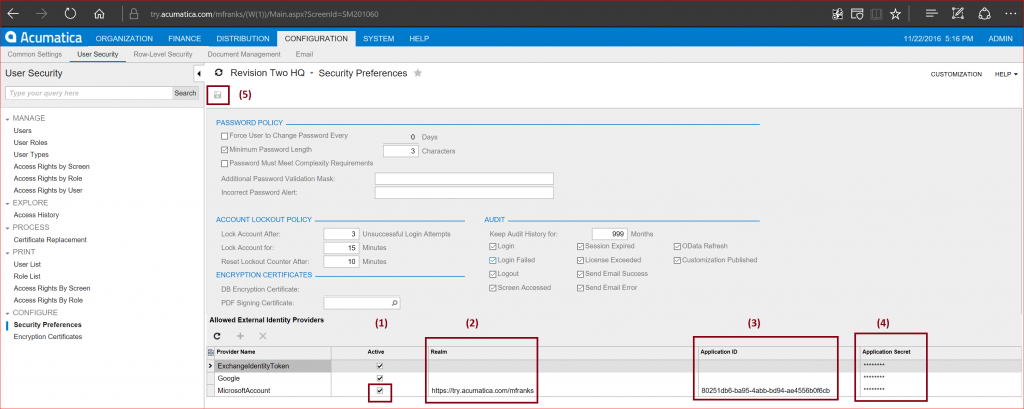
In the Allowed External Identity Providers table, enable the MicrosoftAccount provider by selecting the Active check box (1). In the Realm column (2), enter the full URL of your Acumatica instance—for example, http://app.site.net/instancename — similar to what I had entered above. In the Application ID column (3), paste the Application ID generated by Microsoft as well as the password/secret in the Application Secret column (4). Lastly, on the form toolbar, click the floppy disk icon to save (5).
Once you have completed these steps, you are ready to associate user accounts – this is the final step in configuring SSO for Live ID accounts.
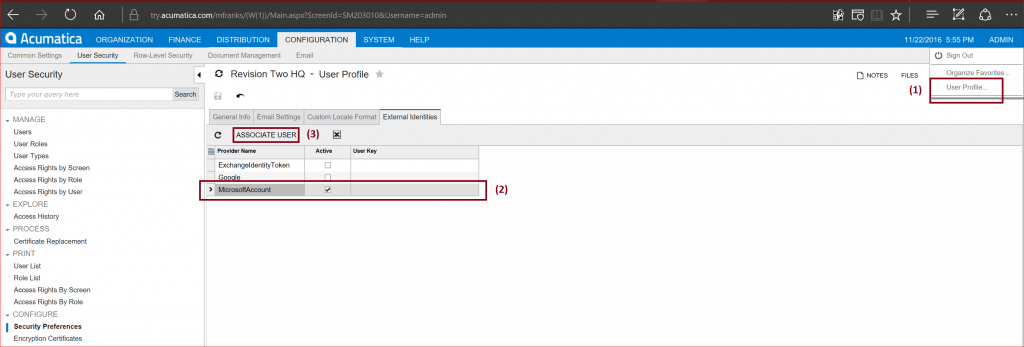
In the info area in the top right corner of the screen, click your user name (ADMIN) and select User Profile… (1). Then on the External Identities tab, select the MicrosoftAccount row in the table (2) and then after making sure that the Active check box is selected, click ASSOCIATE USER (3). This will open the Microsoft Account sign-in page, where you must enter your Microsoft Account email and password – if you are not signed in already – then you must approve the linking of your Live ID account with Acumatica. After which, the User key will be automatically inserted in User Key column for the MicrosoftAccount provider entry above in the screen shot.
Now sign out of Acumatica and sign back in… and instead of entering your login credentials, you simply click on the little blue Windows icon (see below) and you are immediately granted entry into Acumatica without entering your username and password, assuming you have logged in previously – otherwise, you’ll be redirected to enter your Microsoft Live ID credentials.

Slick – don’t you think? Ah, the beauty of SSO. Now that I have enabled this myself for my demo instance, I’m loving life and living large.
Should you wish to enabling silent logon and make it so that your users authenticate themselves with the Microsoft Account identity provider, you enable this by altering the web.config file for the site instance. You will find the file in %Program Files%\ Acumatica ERP\<instance name>, where <instance name> is the name of the application instance website.
Add the silentlogin parameter with value LiveID to the externalAuth section, as shown below:
<externalAuth returnUrl=”Main.aspx”
authUrl=”Frames/AuthDock.ashx”
silentLogin=”LiveID”
externalLogout=”true” selfAssociate=”True” instanceKey=”” />
and save your changes to the fie.
Now let’s move on to the process of enabling Google as your SSO Identity Provider.
Enabling Google SSO
For your users to be able to sign in with their Google account, you first need to register your Acumatica Cloud ERP instance with Google and obtain OAuth 2.0 credentials.
To register your application with your Google account, sign in to the Google Developers Console – https://console.developers.google.com/. This opens the Projects page of the Google Developers Console or what’s presently called the Google API Manager, as shown in the screenshot below. Next to the Google APIs on top menu bar select the dropdown box (1) and click Create project (2) to create a new project, or click the project name to open an existing one as you see below in Figure 7.
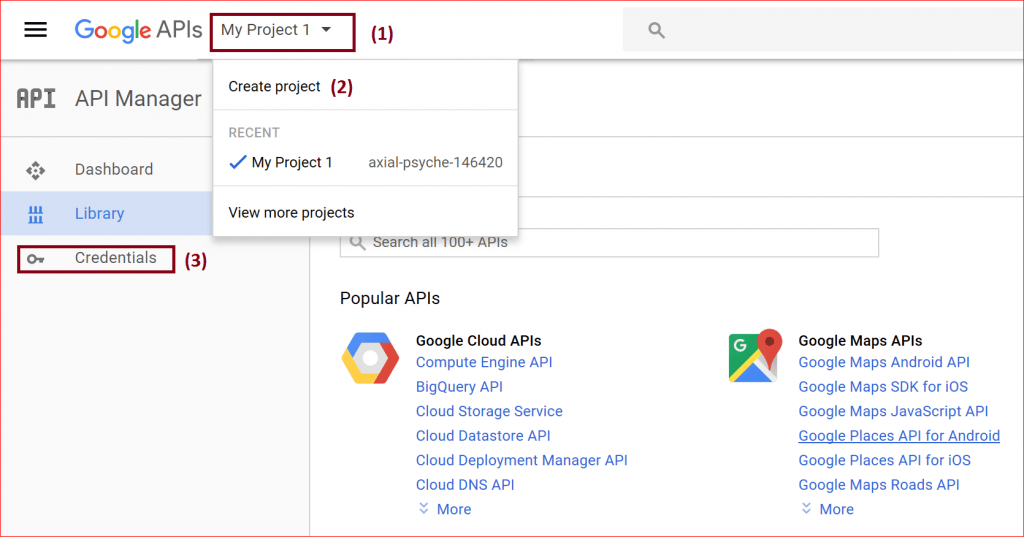
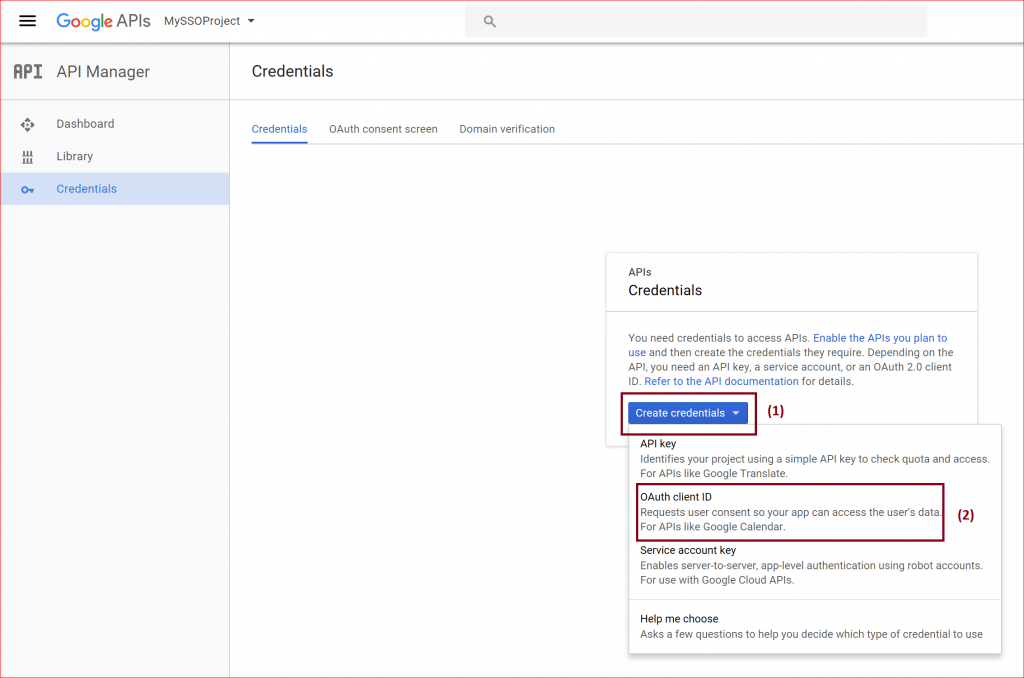
If you are creating a new project, it may take a minute or two… Then in the sidebar on the left, select Credentials (3). After the following screen appears, click Create Credentials (1) and select OAuth client ID from the dropdown box (2) as shown below in Figure 8.
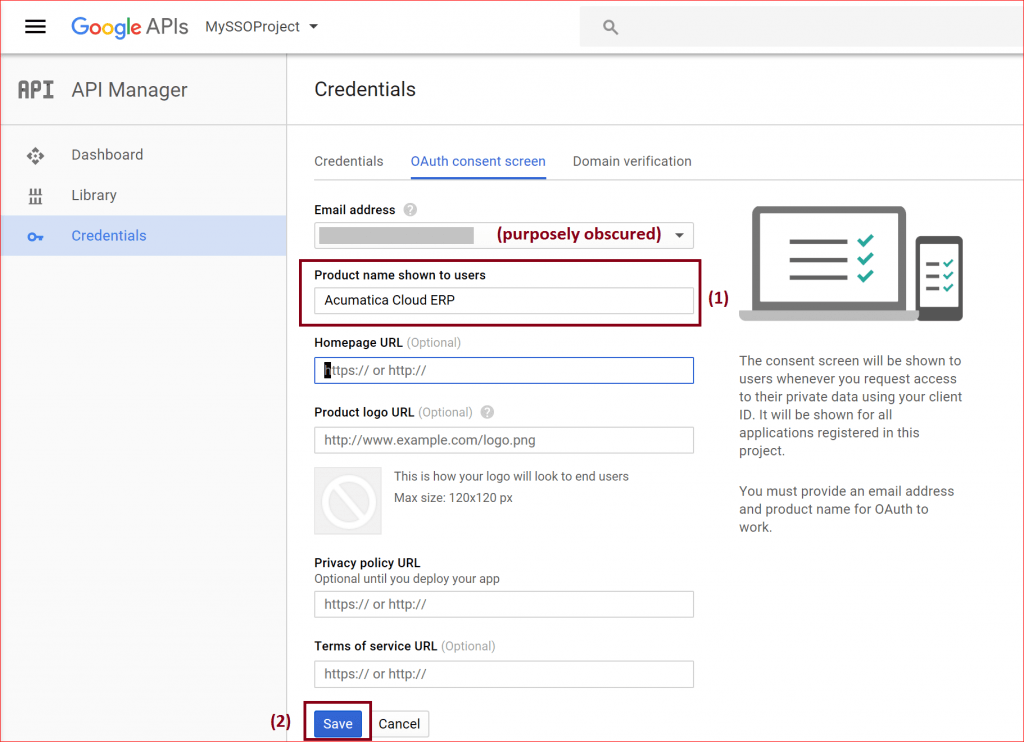
Next, you need to set a product name – configure the consent screen by clicking on the blue button…

On the following screen, type in a Product name (1). You can fill in the other fields as you wish – but they are optional at this point. Click the Save button to save (2) your configuration.
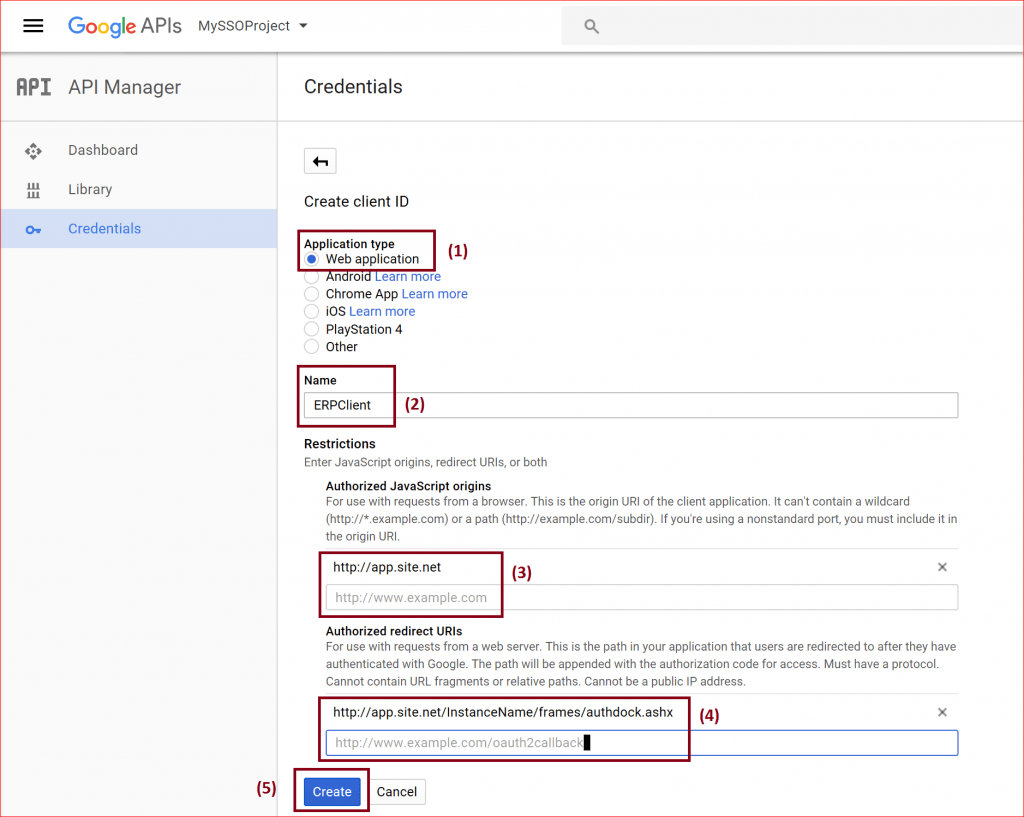
Now you will select the Application type – select Web application (1), enter/choose a client name (2), enter origin URI of the client application (3), the redirect URI (4) as we did in a similar fashion for configuring the Microsoft Live ID external provider. See the screen shot below (Figure 11). When finished click the Create button (5).
At the end of the creation process, you will receive your credentials needed – see the screen shot below (Figure 12). You can copy them and keep them in a safe place to use later in configuring things on the Acumatica side, which I’ll describe briefly as the process is the same as I described above in the MS Live ID case.
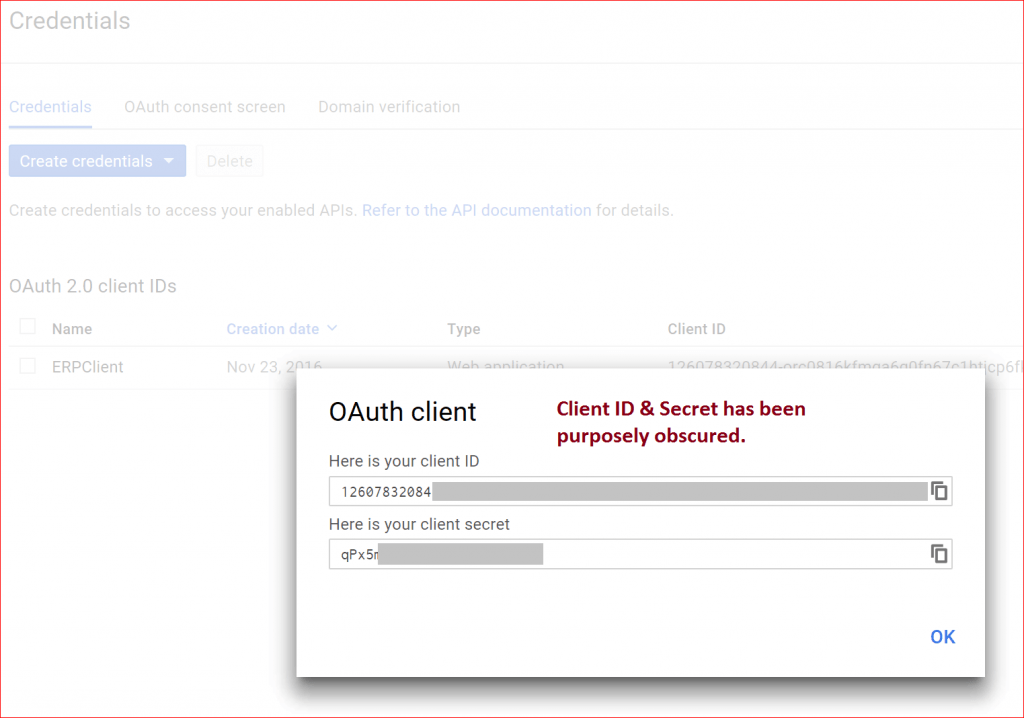
Once you click OK – after copying your credentials, you will be directed to the screen below.

The final steps in the process in enabling SSO for Google is the same as we covered in the Microsoft case earlier. Refer to the screen shots, as necessary from the Microsoft example above.
- Retrieve your credentials obtained and saved in the steps above and sign in to your Acumatica instance – you’ll need administrative privileges. Select the CONFIGURATION tab, then User Security. In the navigation pane, click Security Preferences under Configure.
- In the Allowed External Identity Providers table, enable the Google provider by selecting the Active check box. In the Realm column, enter the full URL of your Acumatica instance—for example, http://app.site.net/instancename.
- In the Application ID column, paste the Application ID generated by Google as well as the secret in the Application Secret column.
- Lastly, on the form toolbar, click the floppy disk icon to save (5).
Once you have completed these steps you are ready to associate user accounts – this is the final step in configuring SSO for Google accounts.
- In the Info area in the top right corner of the screen, click your user name (ADMIN) and select the User Profile.
- Then on the External Identities tab, select the Google row in the table;
- After making sure that the Active check box is selected, click ASSOCIATE USER. This will open the Google Account sign-in page, where you must enter your Google Account email and password – if you are not signed in already – then you must approve the linking your Google account with Acumatica. After which, the User key will be automatically inserted in User Key column for the Google provider entry.
- Now sign out of Acumatica and sign back in… and instead of entering your login credentials, you simply click on the little Google icon (see below – Figure 13) and you are immediately granted entry into Acumatica without entering your username and password.

Summary
As software systems continue to proliferate to support business processes, users are faced with having to remember an increasing set of credentials. Users typically sign-on to many systems, each of which often involve different usernames and authentication information. Administrators are faced with managing user accounts for each system accessed by their users which need to be coordinated to maintain the integrity of enforcing an organization’s security policy.
Here are a few of the benefits to consider for implementing Single Sign-on:
- Improving security due to users not having to remember multiple sets of credentials.
- Reducing the time to log into systems to individual domains – considering failed logins due to memory lapses.
- Reducing IT costs due to lower number of IT help desk calls for password resets.
- User Convenience and happy users
In a future post, I intend to address the implementation other 3rd – Party custom providers such as LoginOne, for example.
 Canada (English)
 Colombia
 Caribbean and Puerto Rico
 Ecuador
 India
India
 Indonesia
 Ireland
 Malaysia
 Mexico
 Panama
 Peru
Peru
 Philippines
 Singapore
 South Africa
 Sri Lanka
 Thailand
 United Kingdom
 United States


