Reviewed: Sep, 2023
Dashboard portability between Acumatica environments provides the ability to deliver horizontal solutions, move dashboards from test environments, and provide demo environments. In this post, we demonstrate how to create a customization project to move SalesDemo dashboards to a different site.

Acumatica dashboard portability
On September 13, 2017, Acumatica released Acumatica 2017 R2. It addressed insight improvements including more personalized and configurable dashboards. Today’s Technical Tuesday will address Acumatica’s dashboard portability.
Environment: 17.200.0401
Data: SalesDemo data from partner portal
Business Purpose
Moving dashboards between Acumatica environments provides the ability to deliver horizontal solutions, move dashboards from test environments, and provide demo environments.
Demonstration Scenario
In this post, we demonstrate how to move SalesDemo dashboards between two Acumatica deployments. The process involves performing the following steps:
- Create a customization project and add dashboard elements to the customization
- Dashboards
- Site map
- Generic inquiries
- Shared filters
- Wiki articles
- Transfer the customization to a different Acumatica deployment
- Publish the customization and verify the dashboards
Acumatica Implementation: Transferring Dashboards between Deployments
Acumatica dashboards can be constructed from generic inquiries, wiki pages, Power BI tiles, and third party websites. We’re going to demonstrate how to transfer the SalesDemo dashboards. These dashboards are built from two elements: generic inquires and wiki pages.
Step 1: Create the Customization Project
Start with the SalesDemo data. Create a customization project (Customization Projects, SM204505) and open it.
Step 2: Add dashboard information to the customization project
Several pieces of information need to be added to the customization project. This includes dashboards, site map locations, generic inquiries, shared filters, and wikis.
Add Dashboards
Inside the customization project add the dashboards you want to transfer. In this example, I selected all dashboards in the SalesDemo deployment.
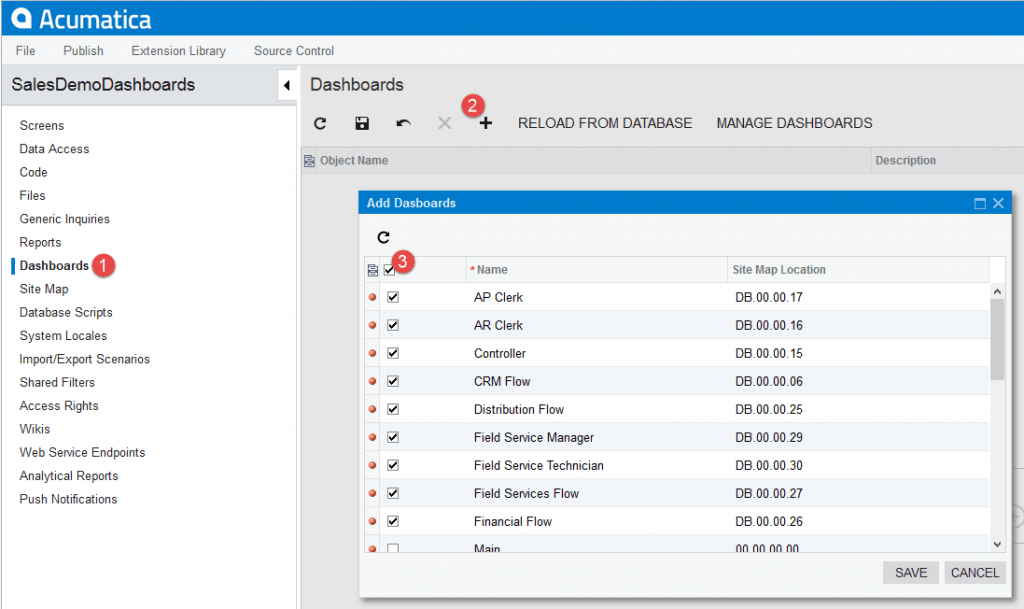
- Click Dashboards in the left menu
- Click the “+” button to add new dashboard to the customization project
- Select the dashboards that you want to transfer
Add Site Map Files
In addition to adding the dashboards, you need to add the sitemap where the dashboards are located.
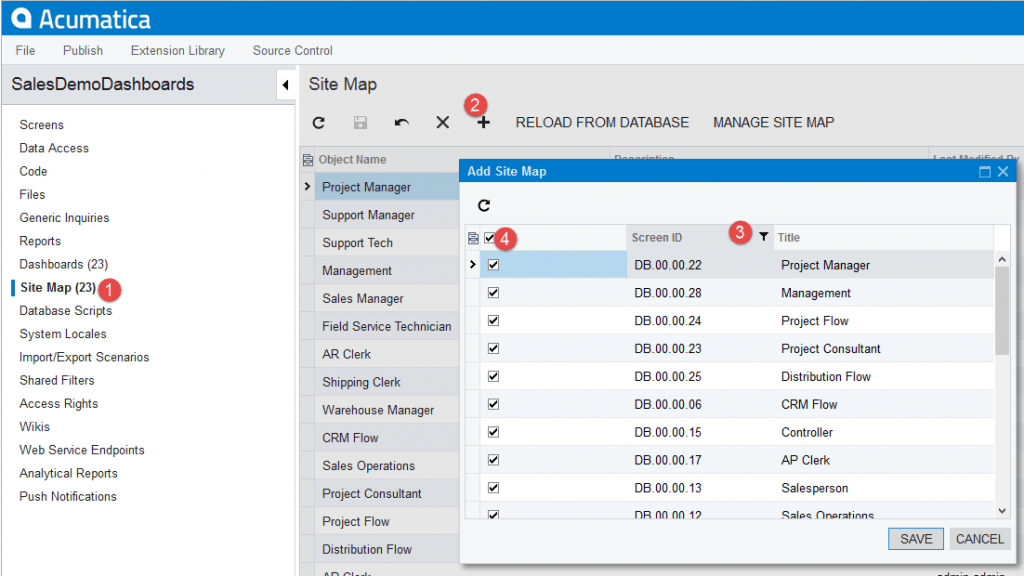
- Click Site Map in the left menu.
- Click the “+” button to open the dialog window.
- The Add Site Map dialog window includes several customizations to the site map. To include only dashboards, select the first two characters as “DB”.
- Select all the dashboards that you want to add. The sitemap total (23) matches the dashboard total.
Add Generic Inquiries
The dashboards are driven from several generic inquiries that select data for the charts, data tables, and KPIs. Therefore, we need to add the generic inquiries to the customization project.
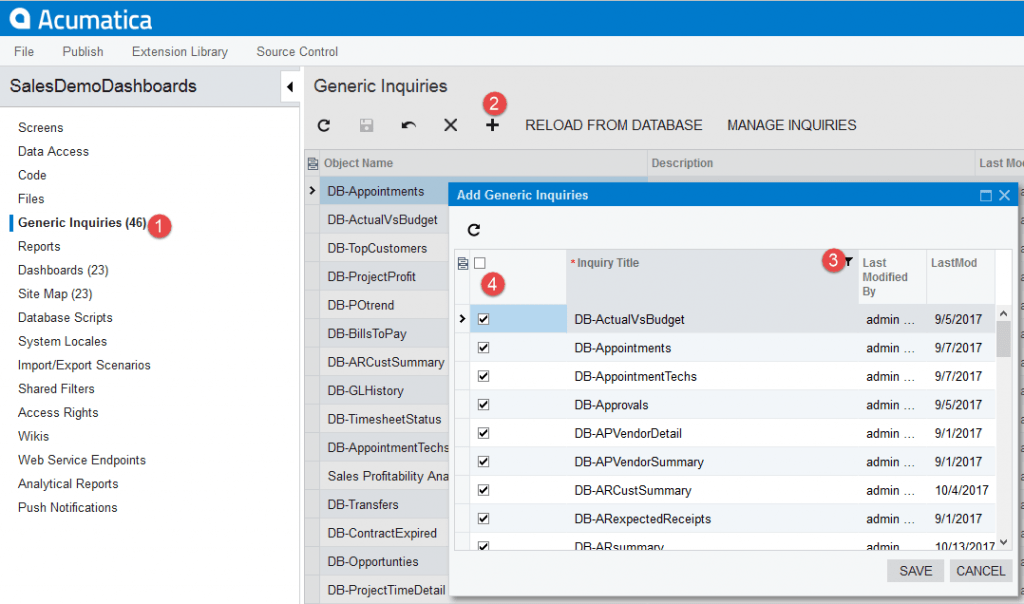
- Click Generic Inquires in the left menu.
- Click the “+” button to open the Add Generic Inquiries dialog window.
- The Add Generic Inquiries dialog window includes several generic inquiries. To select the inquiries related to dashboards, filter by “DB”. You also need to add Invoiced Items, Sales Profitability Analysis Detailed, and SalespersonSales which are used in several dashboards.
- Select all the generic inquiries that you want to add.
Add Shared Filters
In addition to generic inquires, we need to export the shared filters that are linked to the shared inquiries. The shared filters are used by several dashboards to select the proper data.
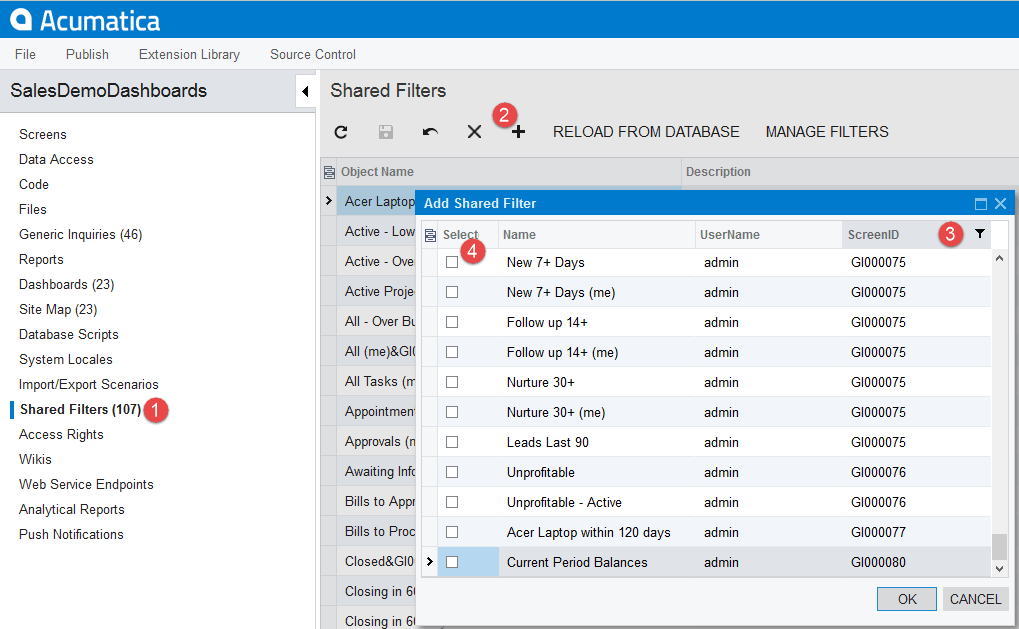
- Click Shared Filters in the left menu.
- Click the “+” button to open the Add Shared Filters dialog window.
- The Add Shared Filters dialog window includes several filters. To select the filters related to the generic inquires, filter by “GI” in the Screen ID column.
- Select all the shared filters that you want to add.
Add Wikis
Wikis store html pages that are placed in the SalesDemo dashboards to make navigation easier.
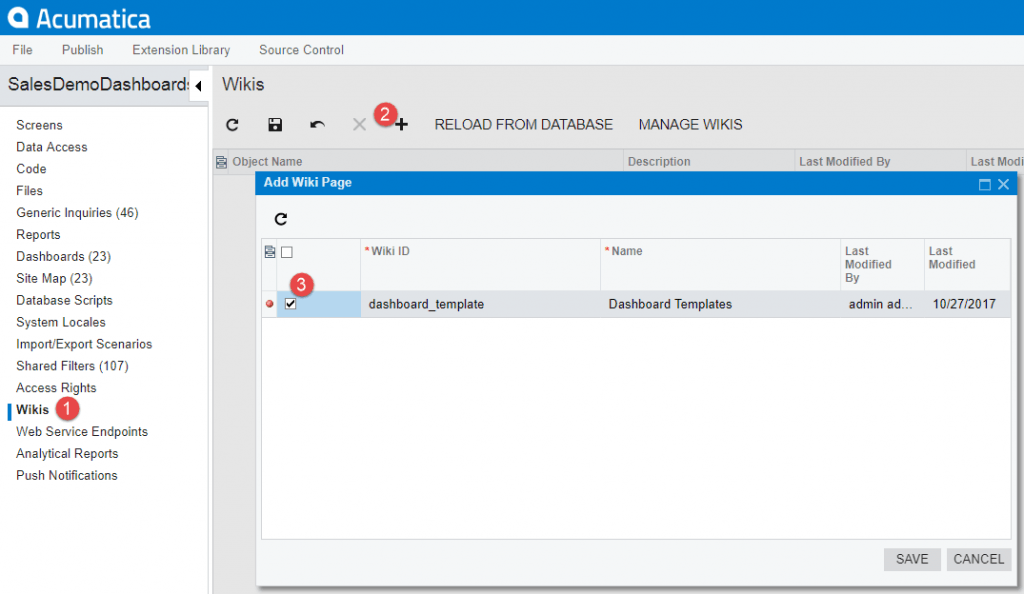
- Click Wikis in the left menu.
- Click the “+” button to open the Add Wiki Page dialog window.
- Select the dashboard_template wiki and save.
The customization project now contains all of the files needed to transfer the dashboards to a new deployment.
Step 3: Package and transfer the customization project
On the customizations projects screen, select your customization and click the export button.

Place the resulting .zip file in a location where you can import it from the target application.
Step 4: Import and publish the customization project
For this demonstration, I created a site with the C100 data installed. This site only contains one dashboard.
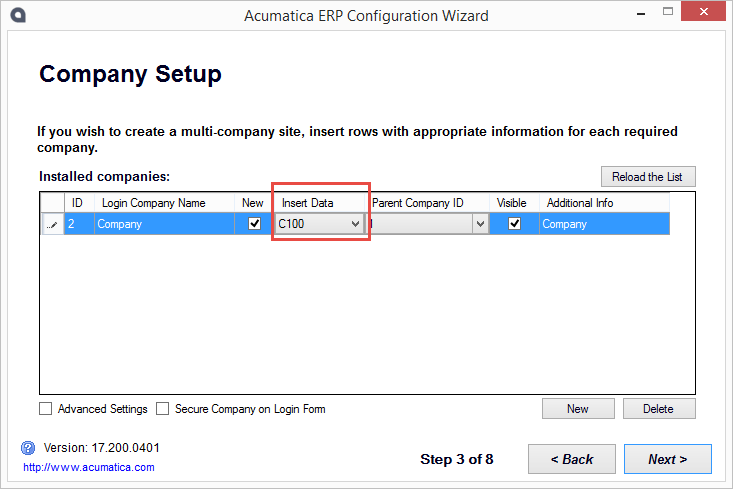
Installing the Customization
To start, launch your target application, login, navigate to the Customizations Projects screen and import the project file (.zip) that contains the dashboard information.

After the project is imported, publish the project.
| Updating a Customization Project
If you forget to include some of the dashboard inquiries or other files, it is easy to add them. 1. Go to the source application and add them to the existing customization project. Re-export the project. 2. Go to the target application and unpublish the project. Unpublishing will not remove the dashboards that you have already created. Delete the project. 3. Re-import the project. Re-publish the customization. The second publish will go much faster because the system will skip the files that are already published. |
Update the Wiki articles
Dashboards using generic inquiries as information sources are complete. The dashboards that contain wiki articles of type HTML will be missing some of the graphics that are referenced in the HTML files. As a result, these tiles will show blank pages. If the Article Type equals Wiki, then graphics will transfer.
To fix then, go to the Wiki screen and select the Dashboard Templates wiki. Add the wiki to the site map and the help files as illustrated in the screen below.
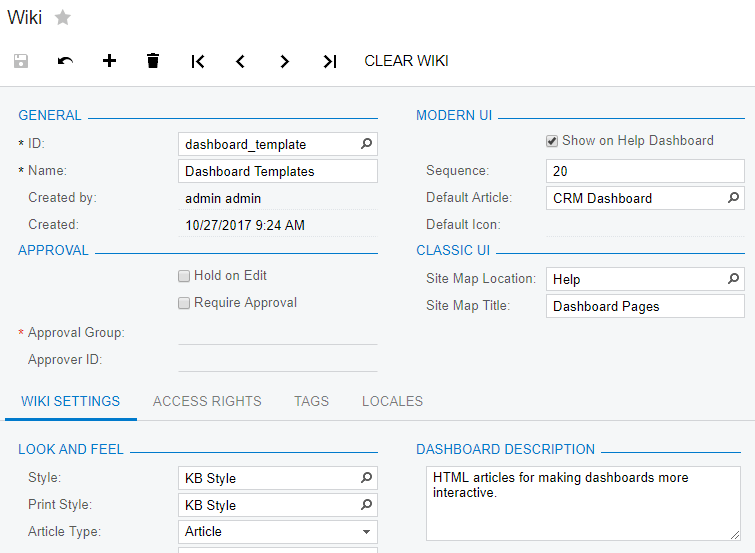
Navigate to the wiki and open articles of type HTML that are missing graphics. In this example, I opened the CRM Dashboard.
To upload and link a new file, do the following:
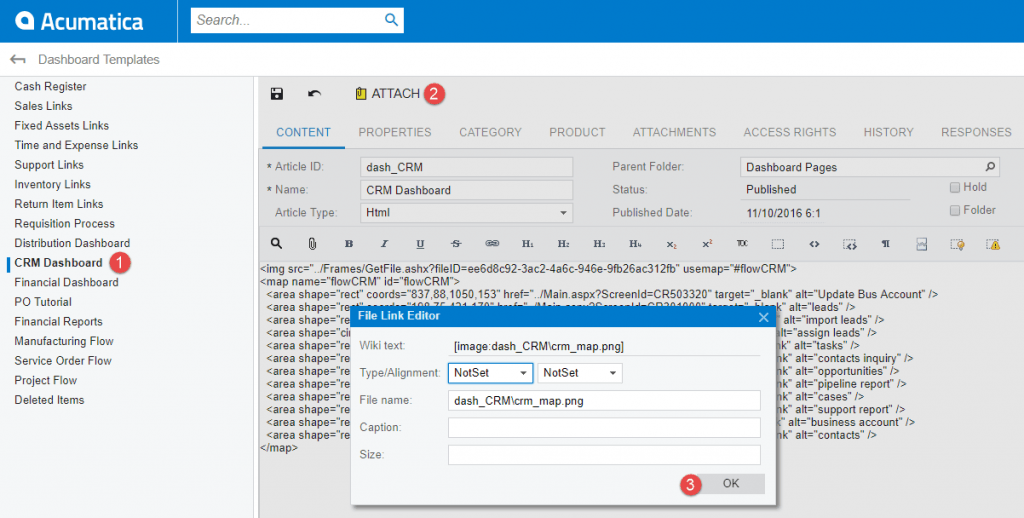
1. Click the CRM Dashboard Wiki article
2. Click the attach button and select the file to upload
3. On the File Link Editor dialog box press ok. We will not be adding a wiki file link because this is an HTML dashboard.

4. Click the Attachments Tab
5. Click the Get Link Button
6. In the External Link highlight the File ID and copy/paste it into the wiki article as illustrated below.
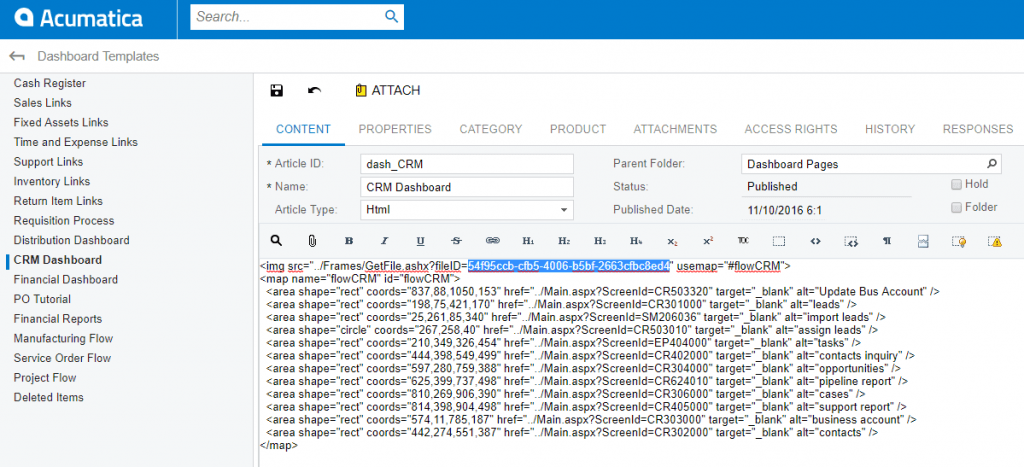
Verify dashboards
After the customization is published, a dashboard workspace is published.
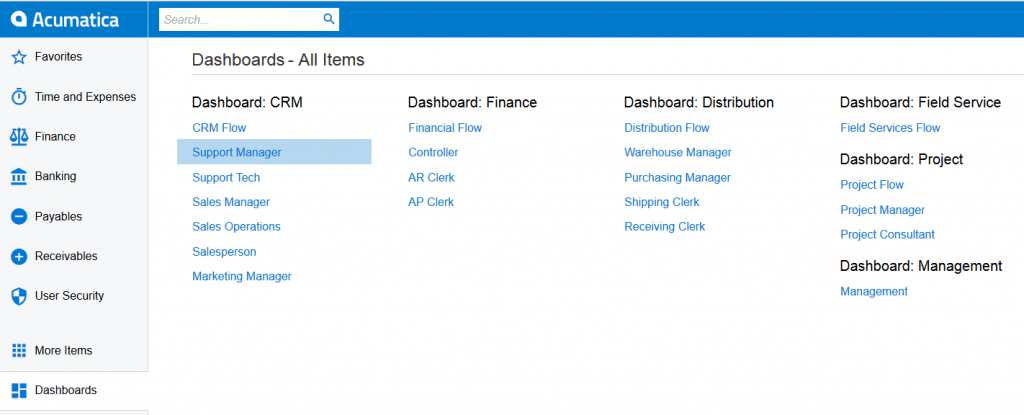
Click on any dashboards. You may have to add a support case, a sales order, or other transaction to see results.
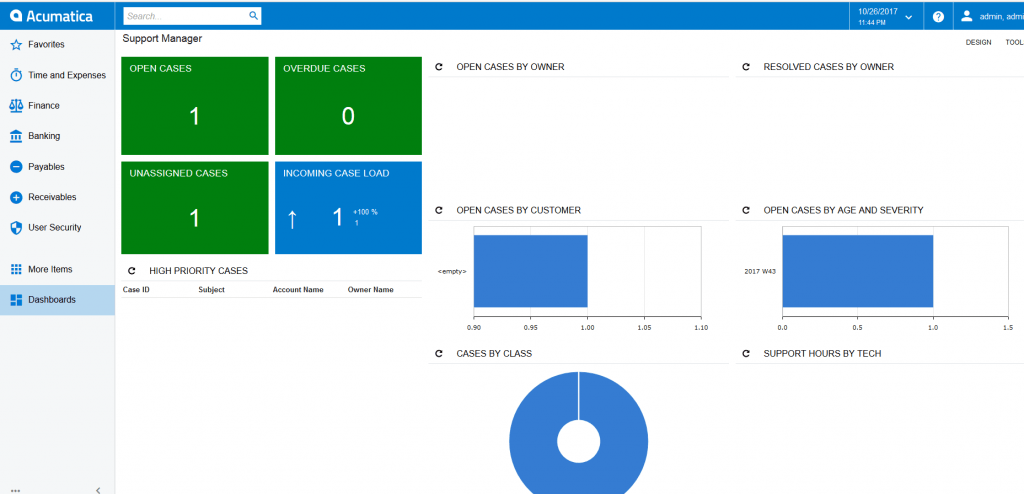
The HTML wiki article dashboards display as well.
Acumatica Customers and Partners benefit from dashboard portability
Acumatica dashboards drive business processes by providing information to managers and alerting operations when specific tasks need to be performed.
The ability to transfer dashboards from one deployment to another enables partners and ISVs to create application specific dashboards and to easily add them to a client deployment. Customers can use this dashboard portability feature to create inquiries and dashboards in a test environment and deploy them to production as needed. All Acumatica partners and customers can use this capability to transfer demonstration dashboards to a client deployment.
If you found this in-depth look at dashboard portability useful, check out the other posts in our Technical Tuesday series. They offer a wide-range of Acumatica cloud ERP topics you can use to help improve your business management processes.
 Canada (English)
 Colombia
 Caribbean and Puerto Rico
 Ecuador
 India
India
 Indonesia
 Ireland
 Malaysia
 Mexico
 Panama
 Peru
Peru
 Philippines
 Singapore
 South Africa
 Sri Lanka
 Thailand
 United Kingdom
 United States


