
 Canada (English)
 Colombia
 Caribbean and Puerto Rico
 Ecuador
 India
India
 Indonesia
 Ireland
 Malaysia
 Mexico
 Panama
 Peru
Peru
 Philippines
 Singapore
 South Africa
 Sri Lanka
 Thailand
 United Kingdom
 United States
 AcumatiCares


Introduction
Reviewed: Jan, 2023
There are many ways to extract data from Acumatica. You can create a generic inquiry or report for example. Most every form in Acumatica contains a grid and has the ability to export columns of data to Excel by just clicking on the available icon on the Acumatica screen. Often, however users may require a custom tailored export to Excel directly from a screen itself. In this post, I will show you how to build a simple custom Excel export process and provide you some sample code to get going.
Consider the following design pattern. In our example, we will create a button on the Expense Claim screen to export some heading information and populate specific grid columns to Excel.

Desired Result:
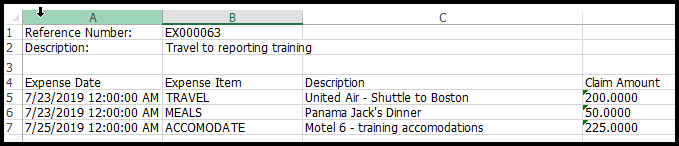
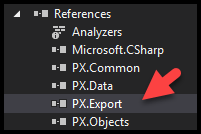
The first step is to include PX.Export as a reference for your visual studio project as follows:
Now you will need to include the following name spaces:
public class ExpenseClaimEntry_Extension : PXGraphExtension<ExpenseClaimEntry>
    {
        #region Event Handlers

        #region Button
        public PXAction<EPExpenseClaim> exportGridToExcel;

        [PXUIField(DisplayName = "Export to Excel", MapEnableRights = PXCacheRights.Select)]
        [PXButton(Tooltip = "Export to Excel")]

        protected virtual void ExportGridToExcel()
        {
EPExpenseClaimDetails details = Base.ExpenseClaimDetails.Current as EPExpenseClaimDetails;
            if (details == null) return;

            PXLongOperation.StartOperation(Base, delegate ()
            {
                var excel = new PX.Export.Excel.Core.Package();
                var sheet = excel.Workbook.Sheets[1];

                string fileNumber = GetUniqueFileNumber();
                int headingRow = 1;
                int titleRow = 4;
                int gridRow = 5;

                // Heading Information
                sheet.Add(headingRow, 1, "Reference Number:");
                sheet.Add(headingRow, 2, Base.ExpenseClaim.Current.RefNbr);

                sheet.Add(headingRow + 1, 1, "Description:");
                sheet.Add(headingRow + 1, 2, Base.ExpenseClaim.Current.DocDesc ?? string.Empty);

                // Create Excel column titles
                // adjust column width
                sheet.SetColumnWidth(1, 20);
                sheet.SetColumnWidth(2, 20);
                sheet.SetColumnWidth(3, 40);
                sheet.SetColumnWidth(4, 40);

                sheet.Add(titleRow, 1, "Expense Date");
                sheet.Add(titleRow, 2, "Expense Item");
                sheet.Add(titleRow, 3, "Description");
                sheet.Add(titleRow, 4, "Claim Amount");

                foreach (EPExpenseClaimDetails row in Base.ExpenseClaimDetails.Select())
                {
                    // get inventory CD for display
                    InventoryItem inventoryItem = PXSelect<InventoryItem,
                        Where<InventoryItem.inventoryID,
                        Equal<Required<InventoryItem.inventoryID>>>>.Select(Base, row.InventoryID);

                    sheet.Add(gridRow, 1, Convert.ToString(row.ExpenseDate));
                    sheet.Add(gridRow, 2, Convert.ToString(inventoryItem?.InventoryCD ?? string.Empty));
                    sheet.Add(gridRow, 3, row.TranDesc);
                    sheet.Add(gridRow, 4, Convert.ToString(row.ClaimCuryTranAmtWithTaxes));

                    gridRow++;
                }

                using (MemoryStream stream = new MemoryStream())
                {
                    excel.Write(stream);
                    string path = String.Format("ExpenseClaimExport-{0}.xlsx", fileNumber);
                    var info = new PX.SM.FileInfo(path, null, stream.ToArray());
                    throw new PXRedirectToFileException(info, true);
                }
            });

        }
        #endregion

        public static string GetUniqueFileNumber()
        {
            string dTime = DateTime.Now.ToString("yyMMddHHmmssff");
            return $"{dTime}";
        }

        #endregion
The code listed in above should provide enough of the basics to help you design your own custom tailored exports. This method will provide much more freedom of the layout and control of the specific data points you and your customers would like to see – instead of using the more limited export scenarios.


