If you have been reading the AND blog over the course of the past few months, you will notice that we have provided informational/tutorials on Acumatica’s development environment that customers and ISVs can easily leverage to get more value out of our platform. We’ve provided information on our API sets, simple debugging, integrations in the form of interviews & written posts.
Today, I am continuing in this vein by showing you how simple it is to customize forms in Acumatica ERP. In this post, I will show how to add new fields to an existing form and do some simple validation as well as show how you can work with these customizations from within Visual Studio. In a future post, I will discuss how you can change the entire look and feel of the product through “theming”.
A powerful core strength of our product is the ability to customize and integrate new or existing external applications and the product itself.
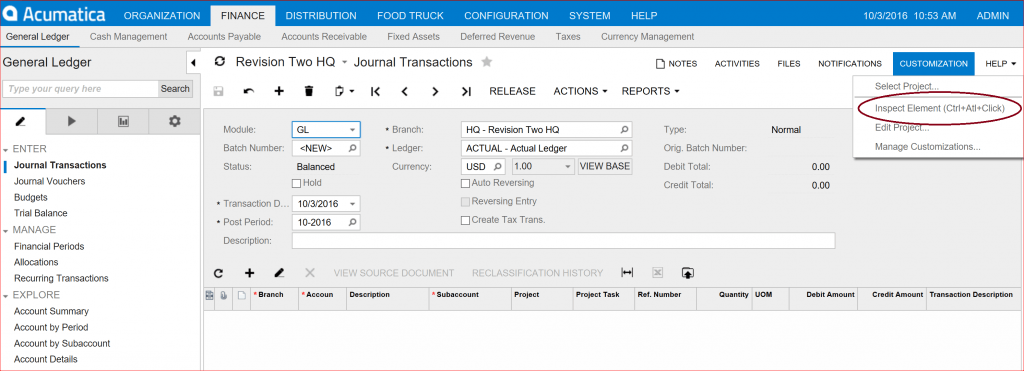
Let’s look at a fundamental customization – creating fields and event handlers that we can use to validate data entry – that both developers and power uses can take advantage of in the product. As you can see from the screen shot below (Figure 1), we have a form – in this case, a Journal Transaction form where we want to add a custom field. To do this, we select Inspect Element from the Customization menu which you can see circled in dark red below.
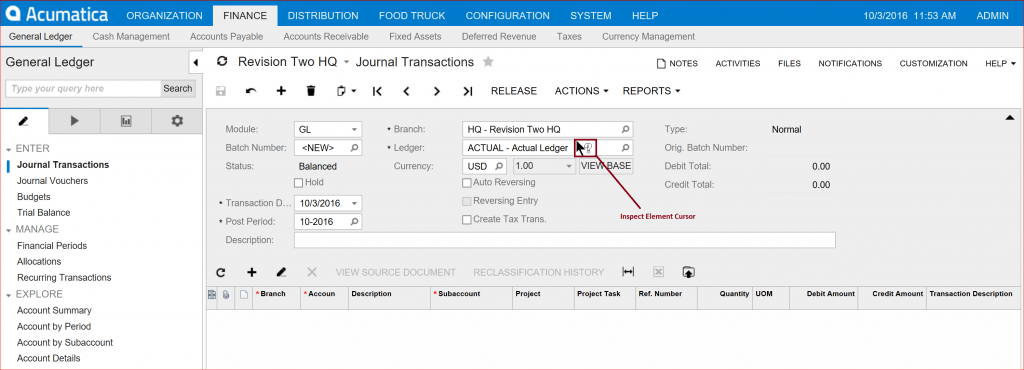
Next, notice that the mouse pointer changes slightly to indicate you are about to select an element on the form to customize. Go ahead now and click on one of the fields on the form.
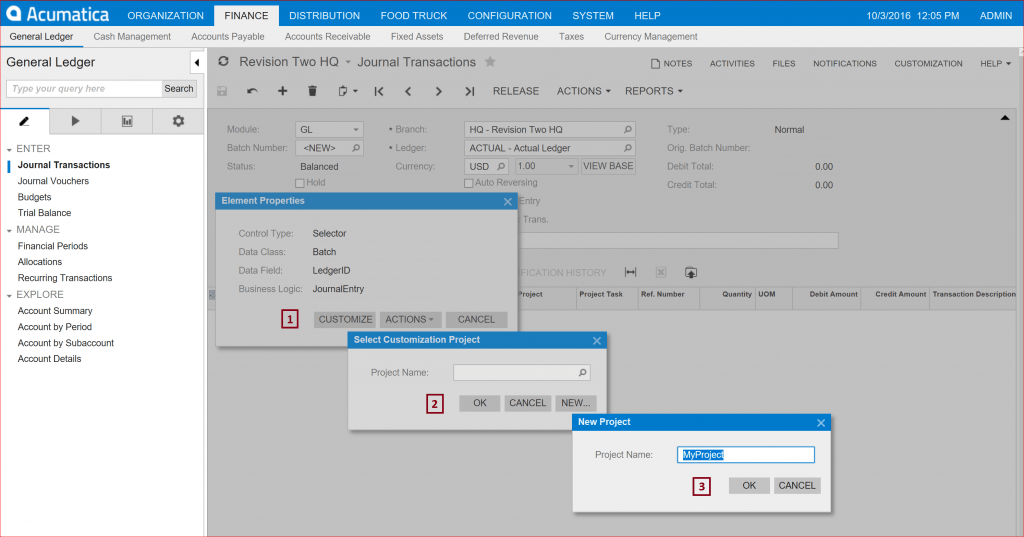
After the field is selected, choose Customize [1], New Project Name [2], and type in MyProject [3] or some other name as you can see cascaded below in the screenshot (figure 3).
After doing so, the following Customization Project window appears (figure 4).
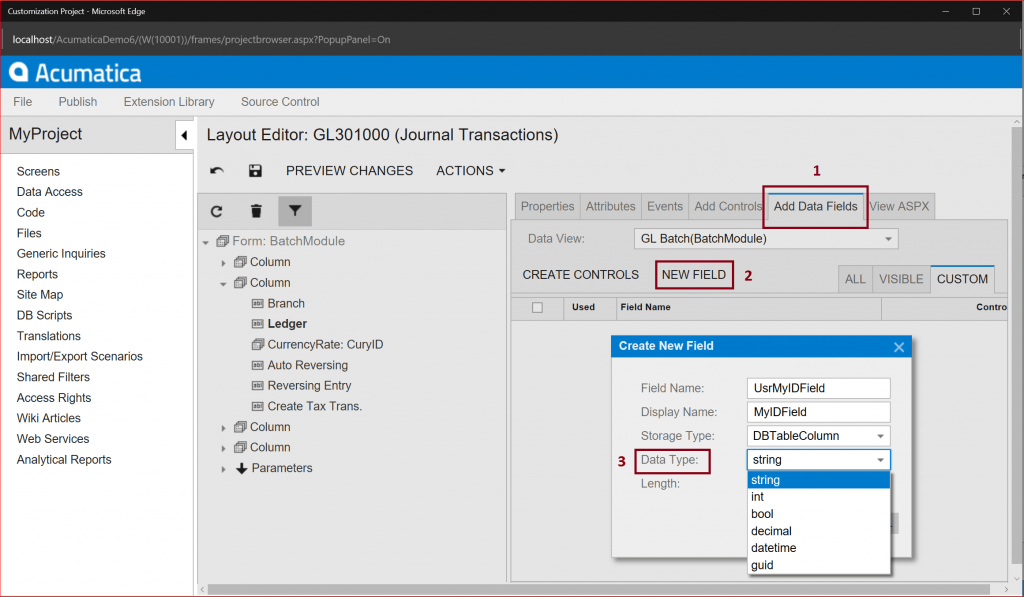
Select the Add Data Fields Tab [1], New Field [2], and type in your Field Name and choose your data type [3]. In my example, I am creating an ID field with String as its data type.
Notice that Ledger is bolded under the second column of the form. This is because I selected this particular field with the Inspect Element cursor. However, we could select any of the fields in any of the 4 columns in order to position our new field. When we actually add the control, it will add the field directly after the field we happen to select. Since I wish to position the field after the Ledger field, it is what I selected on the form itself.
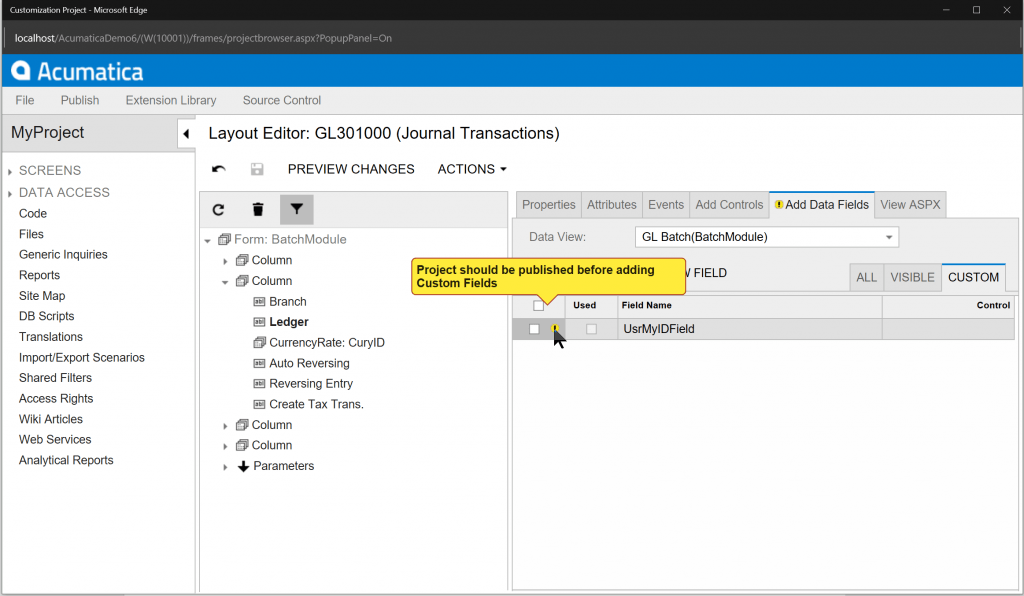
Once we create the field, we need to save and publish our project before adding the control to the field. The exclamation point(!) – both next to the Add Data Fields and the check box shown below in figure 5, directs us to publish the project before adding custom fields.
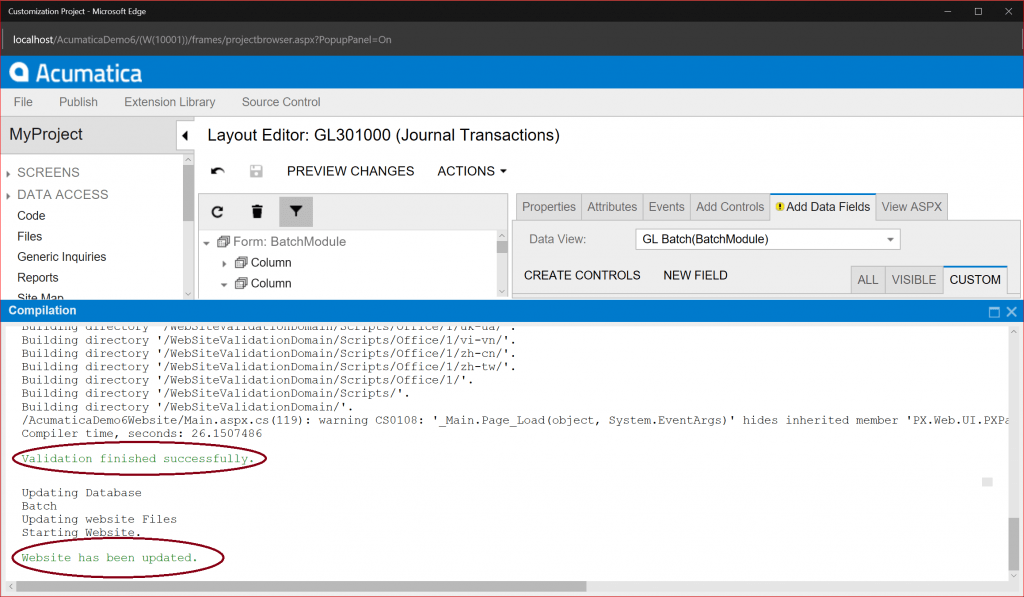
During the publishing process, we auto-generate C# code and update the Acumatica website and create a new .cs file called JournalTransacations.cs. As the code compiles, Acumatica validates our changes and then finishes updating the website as you can see below – circled in red.
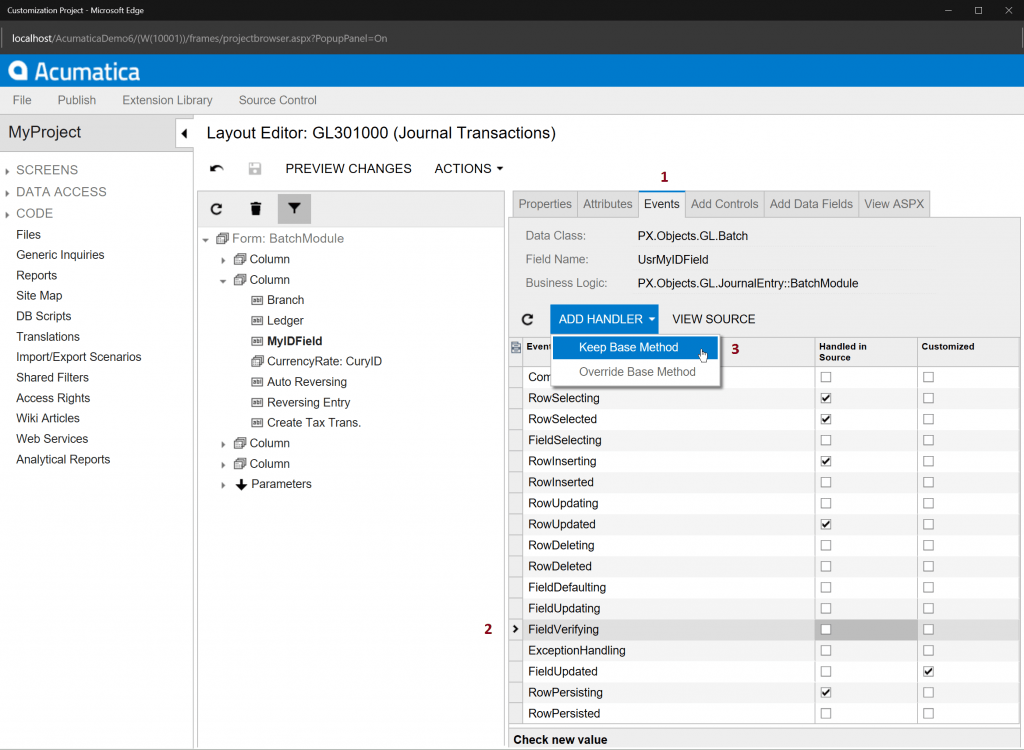
After you get the green light – pun intended – close the Compilation window and then select the Events tab [2], ADD HANDLER – Keep Base Method [3], while first selecting the FieldUpdated Event [4].
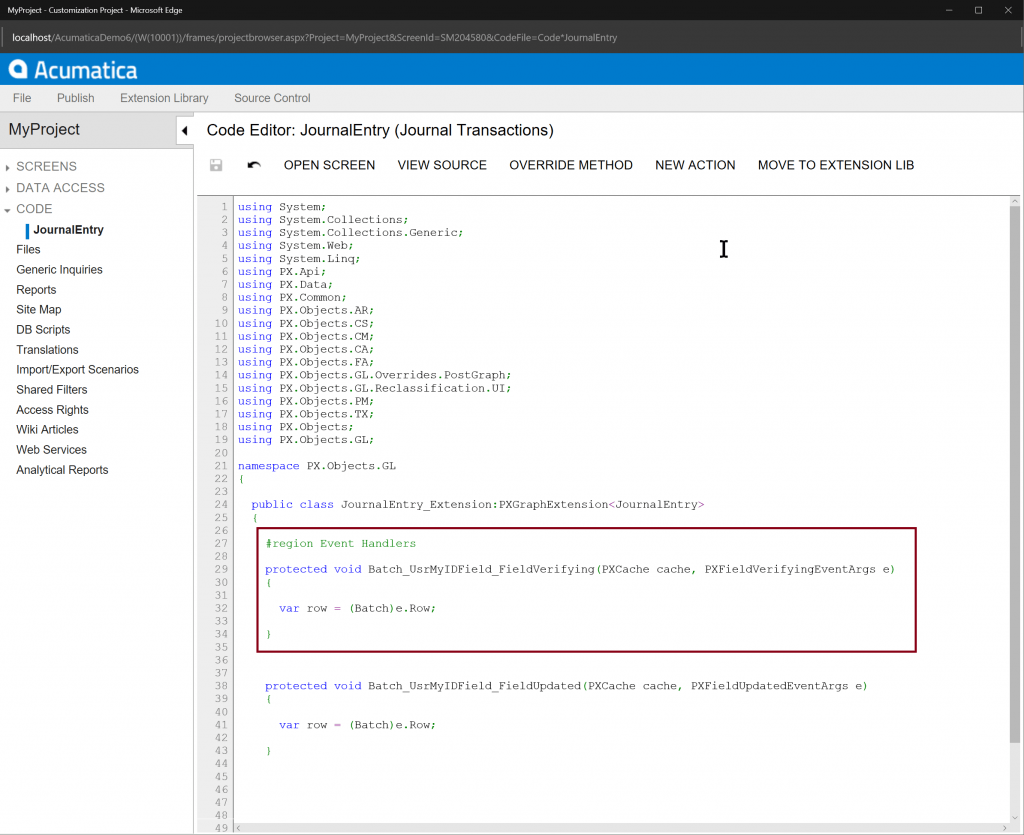
The following Code Editor window appears with the generated source code which you can edit right here – in place, on line 33. However, I would suggest you do your code editing/creation in Visual Studio to take advantage of all the goodness inherent in the IDE such as intellisense and the debugging capabilities, etc.
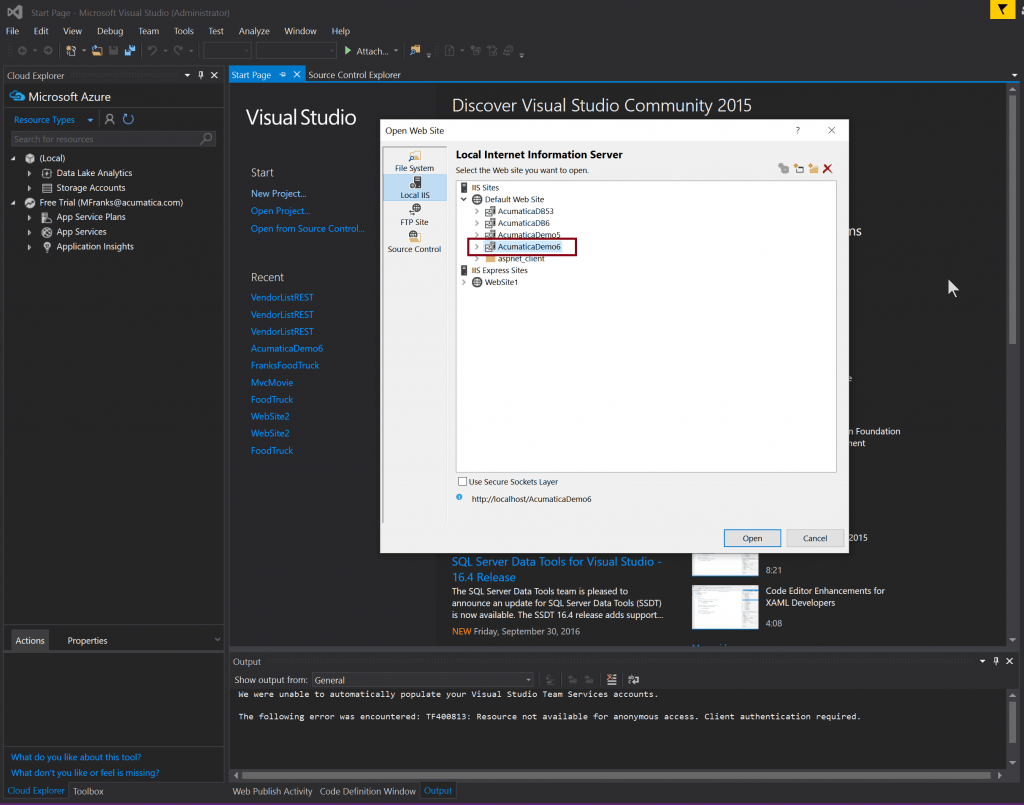
At this point, re-publish your project to update the website with the generated Event Hander code and open up Visual Studio. You will need to Run as administrator to open up the Acumatica website and write your FieldVerifying Event Handler code. After Visual Studio loads, open the website by selecting FileOpen Website. The following dialog appears with a list of the websites you have available to open. In my case, I have few different instances of Acumatica installed. Open the appropriate instance of Acumatica – similar to figure 9 below.
After the website loads, you should have the JournalEntry.cs file [1] present under the App_RuntimeCode folder as shown below in figure 10.
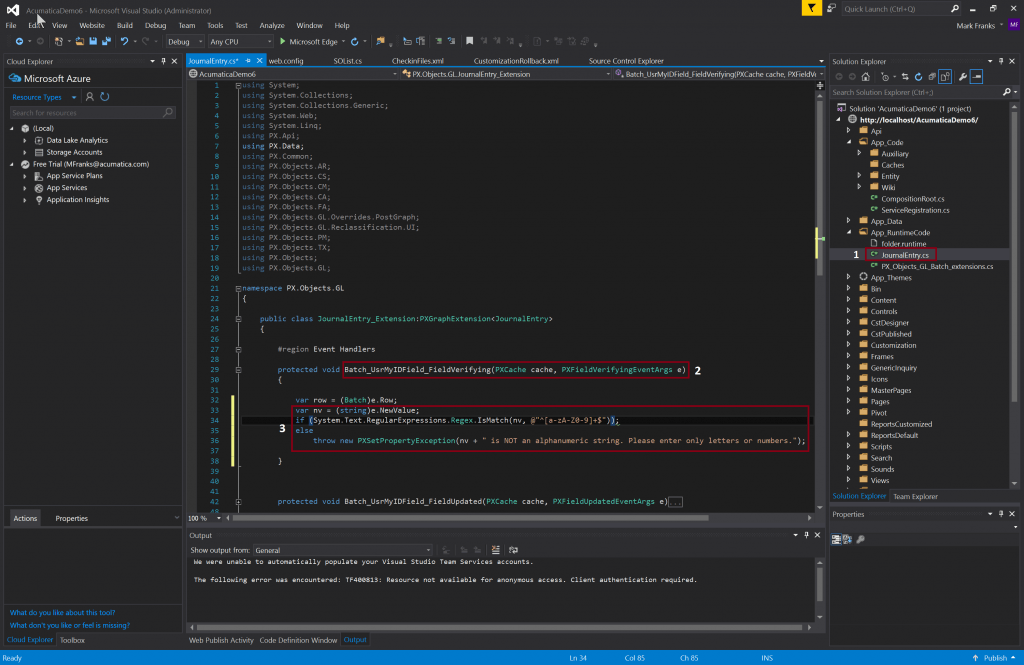
You can see, like in the screenshot (figure 8) above, the same code that was generated – except that I have entered additional code to check for any non-alpha-numeric characters [3] in the Event Handlers #region for the Batch_UtilityIDField_FieldVerifyinghandler [2]. After typing in your code, save the file and return to Acumatica and refresh the application. Now type in some characters and include some non-alpha-numeric characters and tab out of the field.
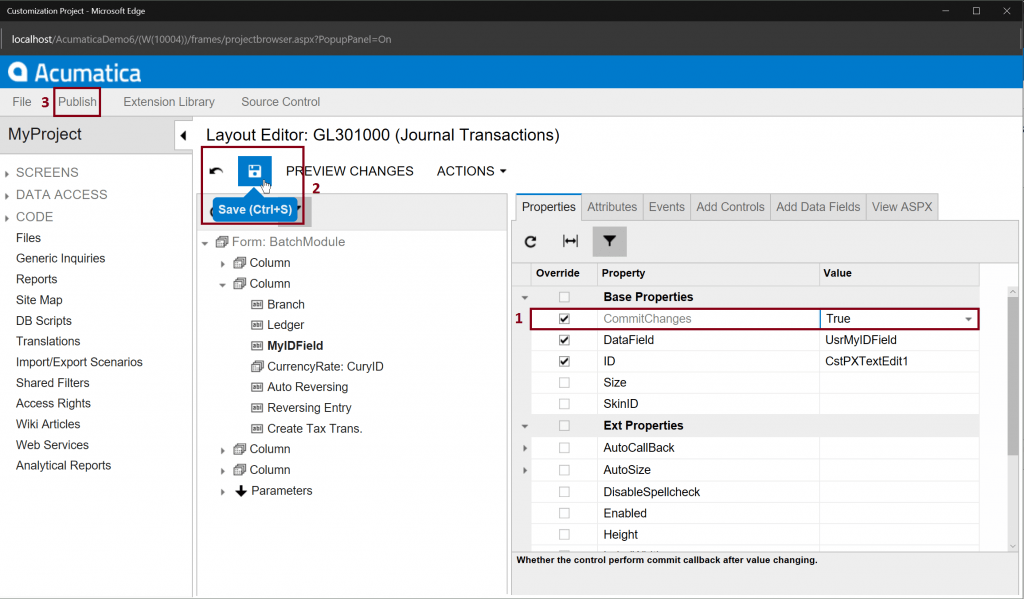
Nothing happened. That’s because we have one more small but important step to perform. You will need to update the Commit Changes property [1] of the field to “true” and save your changes [2] and re-publish [3] your project. See figure 11.
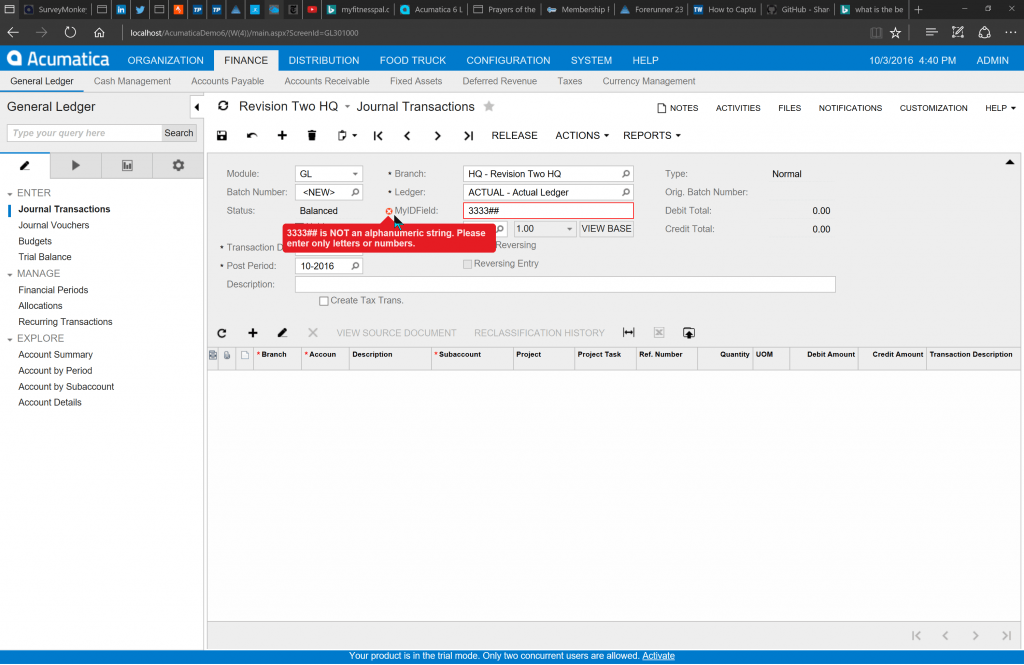
Everything should be working now that we have followed all the steps we have outlined. And when you enter your text into the field as directed above (after tabbing out), you should get a nice little red circled red mark and red rectangle around the field letting you know that something is amiss. When you hover the mouse over the field or the red circled x, you will see something like the message in figure 12 below – 3333## is NOT an alphanumeric string. Please enter only letters and numbers.
And folks, that’s how you create fields and do simple field validation.
Summary
Let’s review the steps and wrap this post up in a nice little bow. We showed you how to add new fields to an existing form and do some simple validation as well as show how you can work with these customizations from within Visual Studio.
Here are the steps:
- Use the Inspect Element functionality from the Customization menu to make changes – adding fields and validation to your forms.
- Create a new project to segment your work from others so your updates don’t conflict or interfere with others work.
- Add a new Field to the form by selecting the Add Data Field Tab and type in your field name and select its data type from the drop down list.
- Save and publish your project and then preview your work to ensure you are happy with the placement of the field on the form, etc.
- Add a Field Verifying Event Handler to the field to do validation – adding your code in Visual Studio by opening up the Acumatica Website and editing the Event Handler #Region within the form’s .cs file that we auto-generated when we created the field and added the event handler – in our case, the JournalEntry.cs file.
- Save your work and return back to Acumatica.
- Update the Commit Changes Property for the field to “true” and re-publish your project.
- Refresh the Acumatica form and test your work.
All of the forms in the Acumatica product are customizable – you can do very simple customizations such as the ones we have demonstrated here or much more complex ones, where you build your own forms and use various data sources and interact with existing external applications. Taking advantage of our rich API sets, which we have discussed in previous posts can be reviewed from the links provided below. You can build robust functionality for your customers tailored to their business needs – providing real measurable value.
As a final ask – please view our latest video from our recent webinar where we demonstrate what we have discussed here. Additionally, we show you how to white label the product which will be the topic of our next blog post. Presentation & Demo on Integrating & Embedding Acumatica Cloud ERP in Your Business Applications
 Canada (English)
 Colombia
 Caribbean and Puerto Rico
 Ecuador
 India
India
 Indonesia
 Ireland
 Malaysia
 Mexico
 Panama
 Peru
Peru
 Philippines
 Singapore
 South Africa
 Sri Lanka
 Thailand
 United Kingdom
 United States


