PowerShell Fundamentals
In this series of blogs, my goal is to convince you to learn PowerShell. I hope to reach a larger audience than just developers with this post. If you are a non-developer ERP consultant this blog is also for you. In fact, PowerShell is not a tool created for developers it was intended to serve systems administrators and consultants and enable them to automate IT administration tasks. But there is lots of power that developers can also get from knowing and utilizing PowerShell in everyday development.
If you claim that you do not know any PowerShell you are likely wrong. If you have used any command line tools or explored systems through a command line then you know a little bit of PowerShell as it is layered overtop of the bare bones command line. So we are going to start this blog with some fundamental file system navigation and manipulation. We are going to use a real-world use case to automate updating a reference library to repoint to a different version of Acumatica Files
Use Case: Update dll Reference Library Folder to use a Different Version of Acumatica
From my experience with working with many different Acumatica developers, they all have a different way of wiring Visual Studio references up to an instance of Acumatica. I have recently learned of a super slick way of doing this task from my fellow developer MVP Stephan Belanger. The strategy is simple. Dll files are copied from the Acumatica Bin directory into a folder in the Visual Studio project and the references are in turn pointed to those files. What I LOVE about this strategy is that the VS project can now be built without the need for an actual instance of Acumatica to point to. So you don’t even need the Web Site to be loaded into the solution. This will lend well to any automated build process or CI/CD. As long as the dlls for the target version of Acumatica are in that Library folder you are good to go. No more finagling references every time you intend to work on a new version of Acumatica. All you need to do is to update the files. We are going to automate this using fundamental command line calls and then chaining them together in a PowerShell script.
ISE vs PowerShell Prompt
There are two fundamental ways you can engage PowerShell. The first is the ISE or (Integrated Scripting Environment). Or two the PowerShell prompt. Generally, you will use the ISE Integrated Scripting Environment to develop, troubleshoot, and maintain PowerShell scripts. Then you will use the PowerShell prompt to use and consume PowerShell scripts and services. Another difference is ISE has Intel sense and the PowerShell prompt has something similar called Tab. Each does the same thing but in very different ways.
Tab Completion
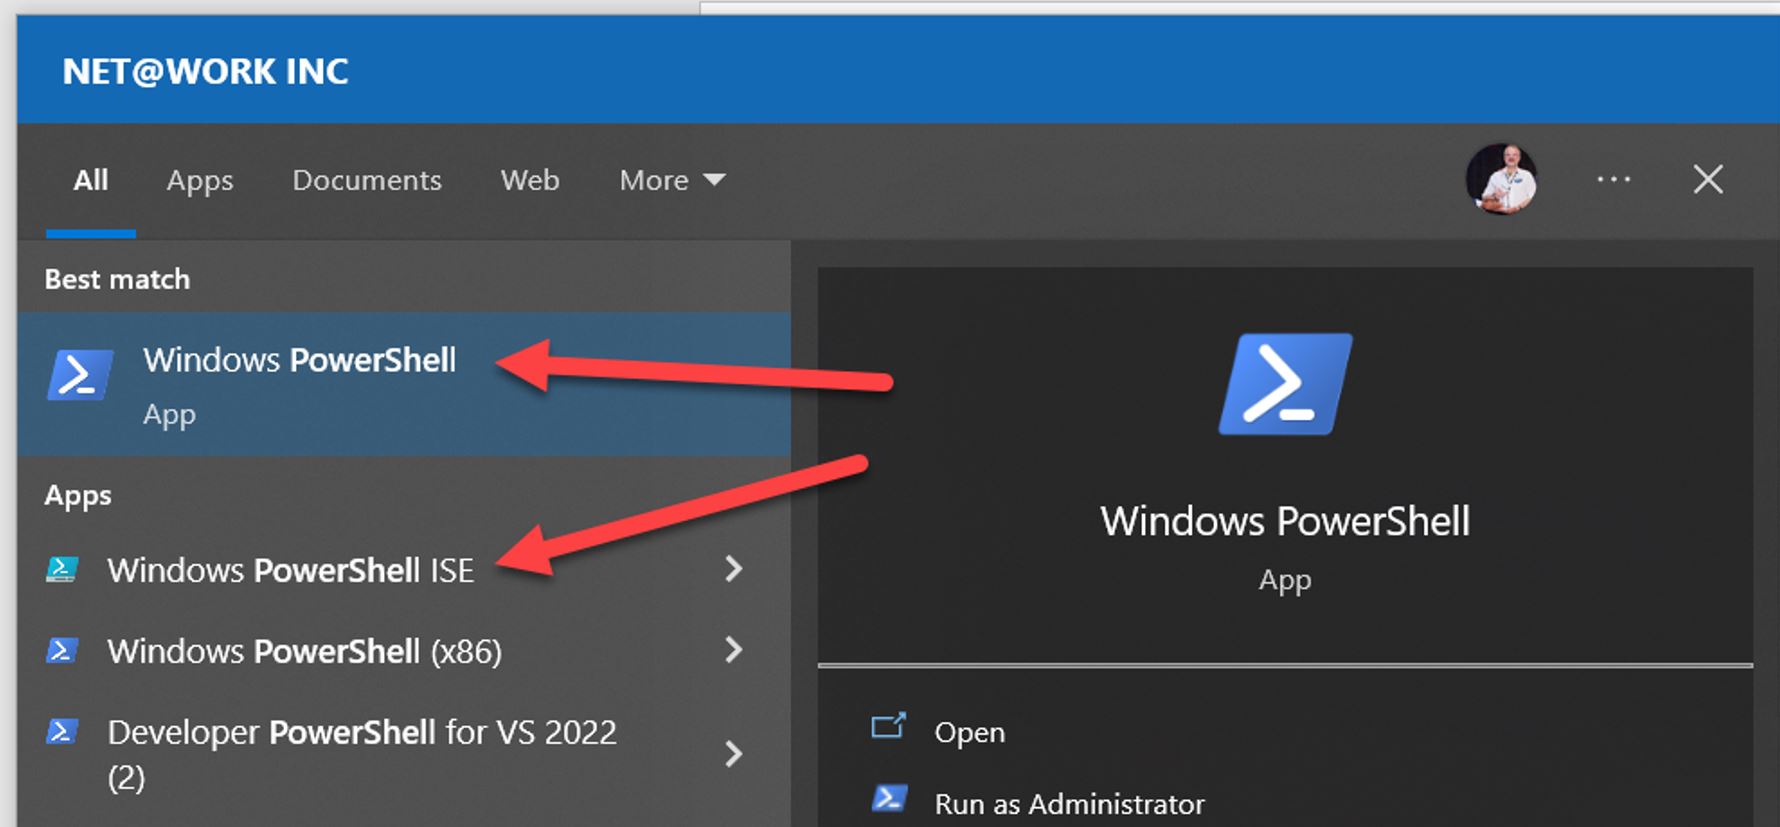
To Explore Tab completion lets open the PowerShell prompt and identify the folder of files we want to update. Open the start menu and type PowerShell. You will get something like the above image the PowerShell prompt is the option without the ISE suffix. Lets open that. Chances are you know of the DOS command DIR to return a directory listing. We can look for our target by typing DIR then c:\ or the drive that holds the project. Lets type in the first letter of the next directory then hit the tab key. You will see the first directly starting with that letter show up. If you have not gotten to your desired directly then hit tab again and repeat until you get to the next directory. If you have gone to far and want to go to the previous directory, then use shift tab. Start typing the next letter or two then tabs until you get to the next part of the path. This is how fundamental Tab completion works. It’s essentially intelligence for a non-graphical command line system. All you need to remember is these two things. There are many things beyond file system navigation that also use Tab Completion.
Tab = move next.
Shift Tab = move previous.
IntelliSense within ISE
Next, we will explore how this works in the Integrated Scripting Environment. From the start menu, let’s open the other PowerShell option which is to open the ISE. In addition to Tab completion, you will also see that an IntelliSense window opens that helps you navigate through the file system. Let’s now identify the folder of files.
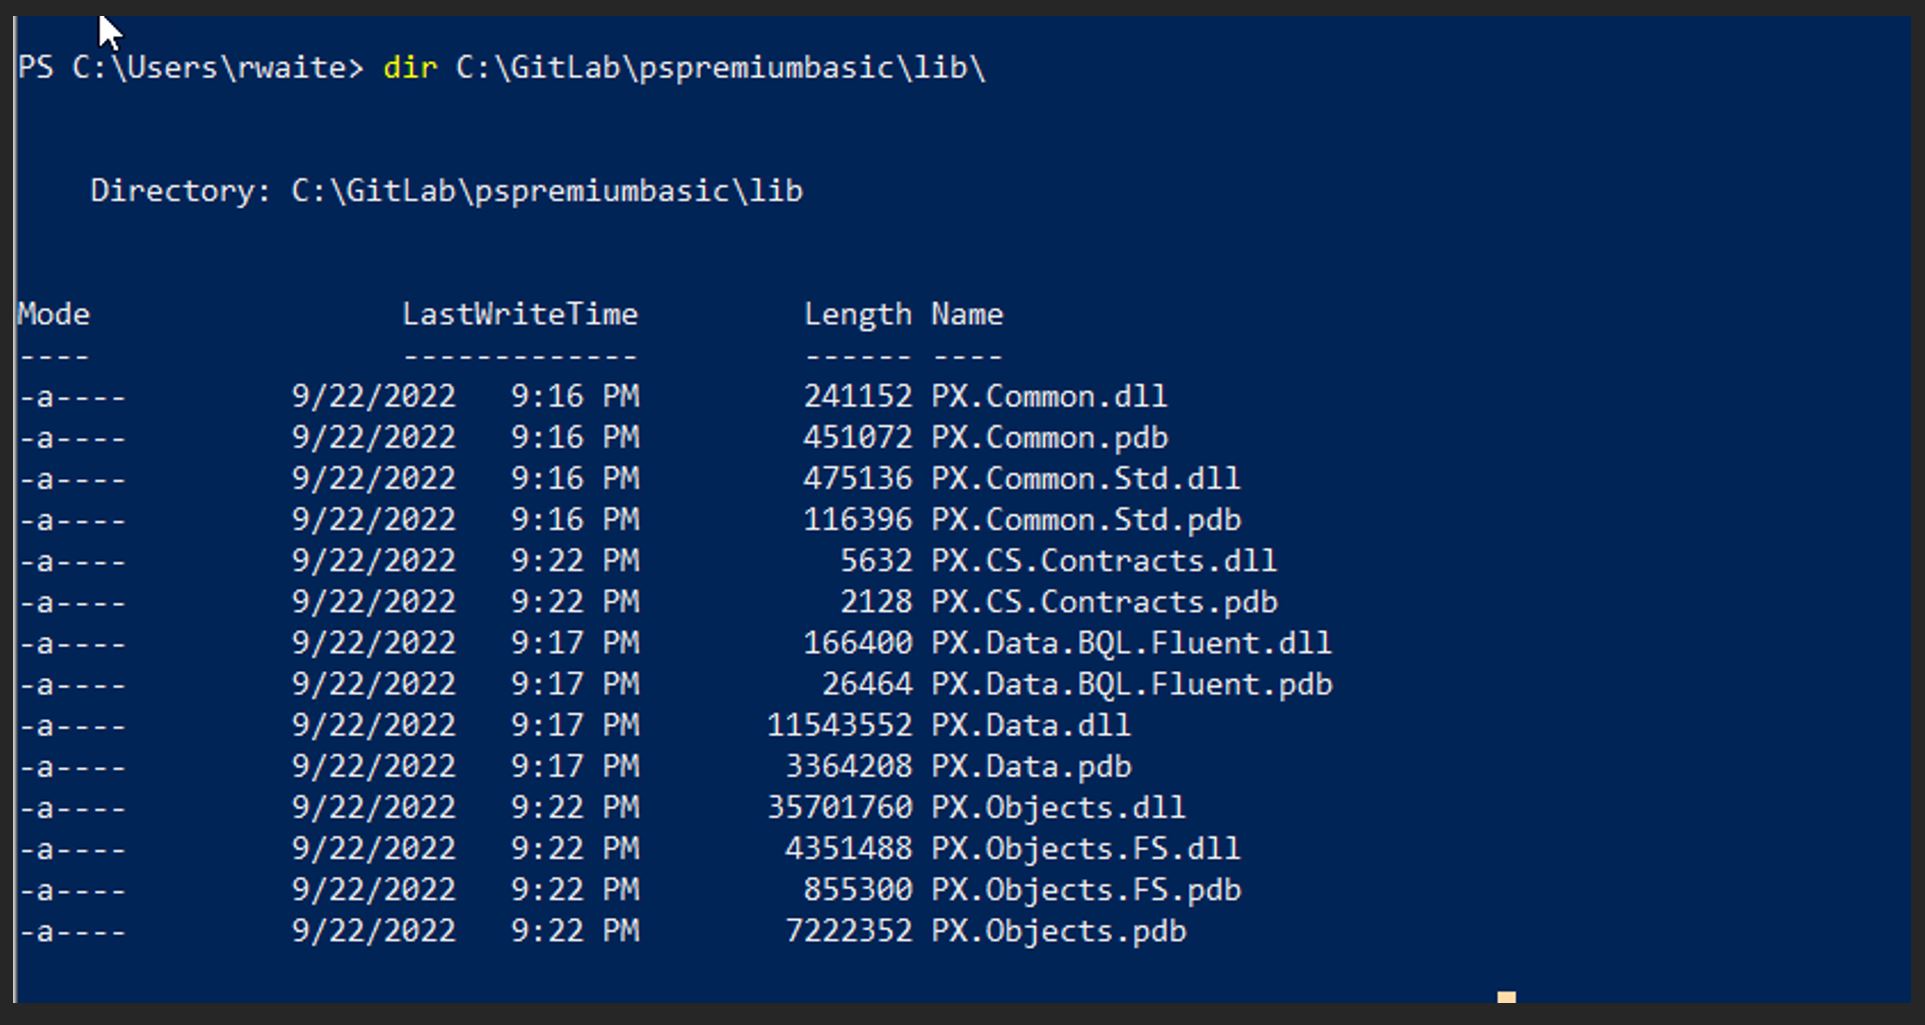
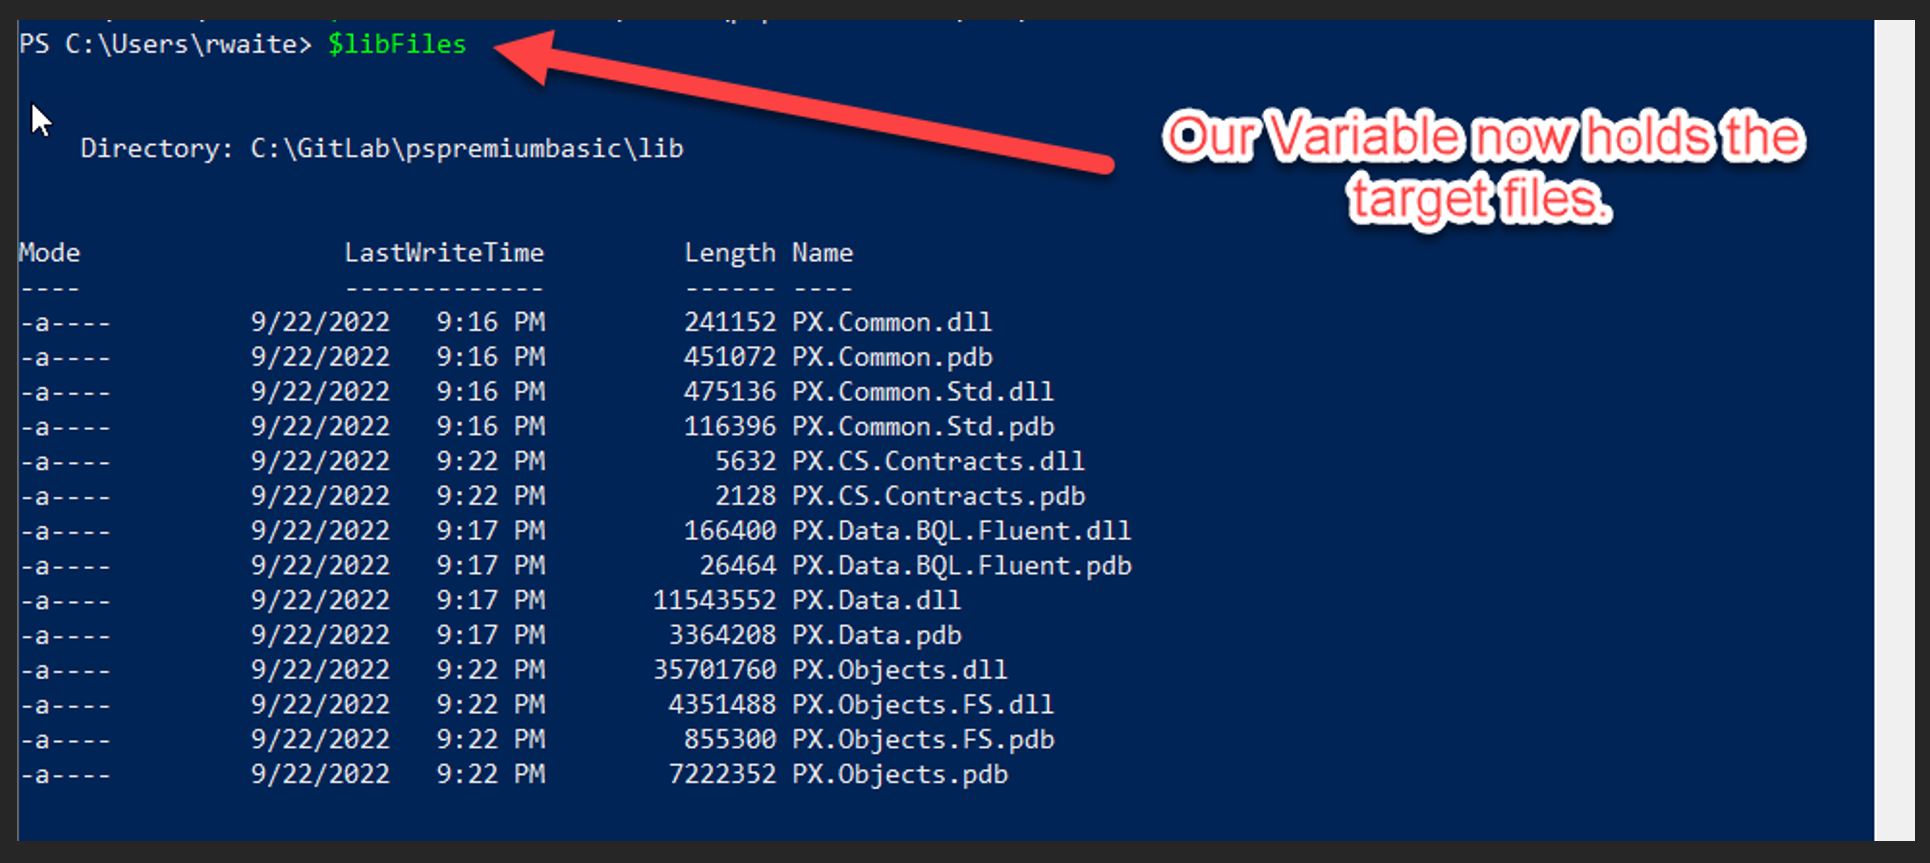
All of the above is standard Command Line interface stuff that PowerShell is built on top of. We can now add a feature that you will not find in the command line alone. That is, we can load the results into a PowerShell variable. All we need to do is use the $ char to prefix a variable name then use the = char followed by the statement we just ran. Instead of retyping the hole command just hit the up arrow to show the last command. Now if you hit your home key to drop your cursor into the beginning of the line. Now type $libFiles = then enter. It seems nothing happened but if you now type $libFiles you will see that it will return the results that were previously returned in the DIR command alone.
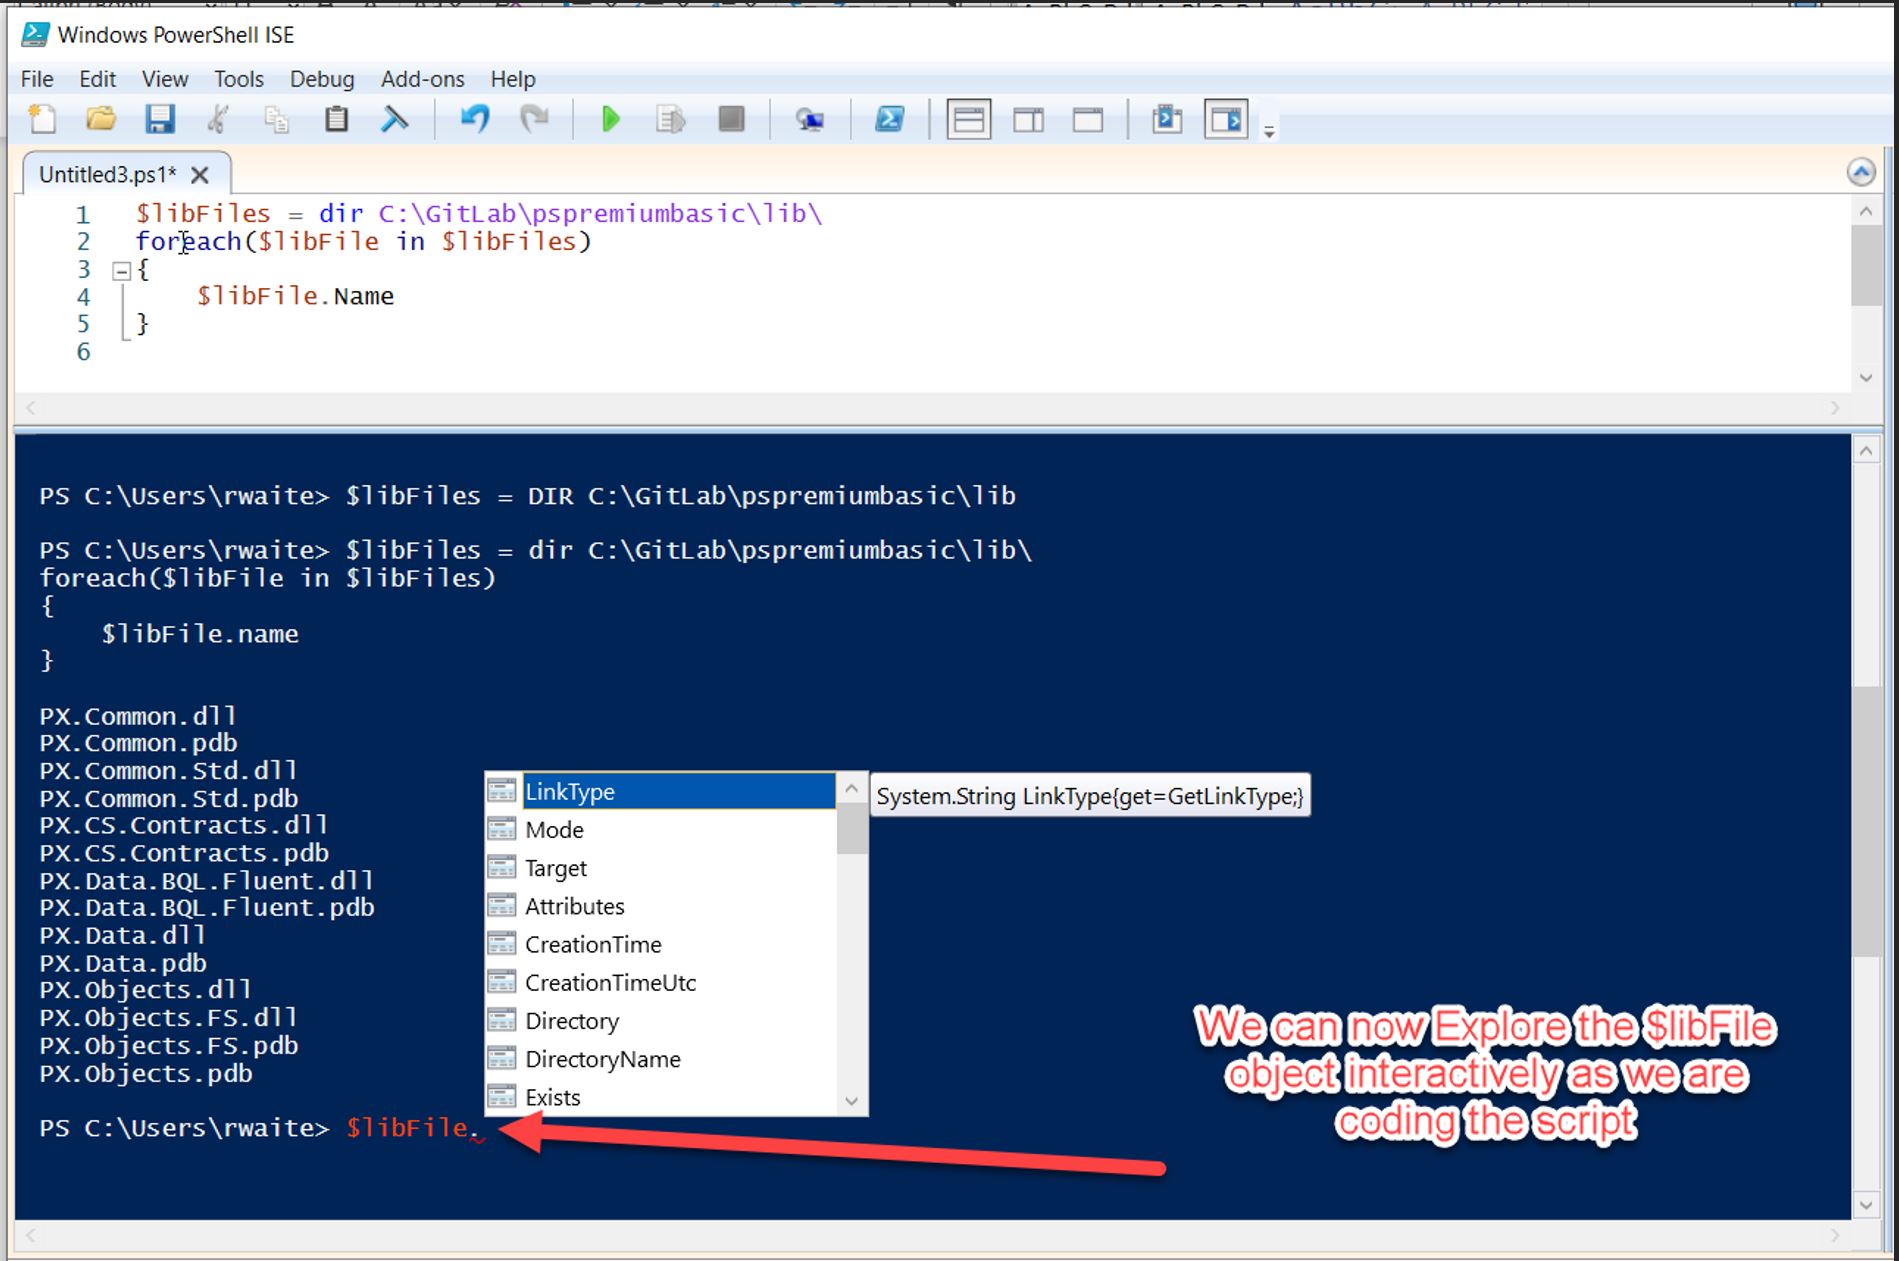
Now what we can do with this variable is put it through a foreach command and then do something with each of the files. Let’s copy our line that holds the variable assignment into the script editor part of the ISE editor. After that line, we will add the foreach file and we will simply return the name of the file to the host. You may notice that you don’t get IntelliSense as you are typing $libFile.name. This is because the variable has never been initialized. A trick when doing these foreach loops it to run the loop once and just return the file itself. Now if you run the script (use F5 as a shortcut) you will be able to interact with the last object in the loop. This is a very powerful feature of PowerShell, which is being able to interact with objects as you are building a script. This will look like the following.
Now what we need to do within this loop is find the updated dlls that need to replace the list loaded into our $libFiles variable. What we need to know now is Where is the bin folder of the source files we need. All we need to know at this point is the Acumatica directory and we can deduce the bin from that. At this point, we are going to engage the script user to enter that information. To do so we will call on the Read-Host command.
Read-Host
The Read-Host is a very useful command. I particularly like to use it as I am working on an unfinished script and I generally refactor the Read-Host out of the script at future stages of the script. Essentially all Read-Host does is asks an end user for a string value. Empty strings or simply hitting enter is an acceptable input. This also introduces a mechanism to add delay into a script to wait on the completion of a manual task. I like to use this technique in the early stages of automating a while process where I could get a human user to temporarily perform a manual task while still being able to automate some portion of the process. I’ll often start a script with only Read-Host lines. One for each step of a process that we intend to automate. Something like the following.

There is nothing happening in the above script other than prompting a user to perform some manual task. Right now we are looking to automate step 6. Once that is in place we could replace that line with our working script and we will then have a semi-automated script that has some manual process to is but is nonetheless saving some degree of time over countless number of times this process needs to be repeated. I often find that I don’t have a whole lot of time to finish up a script. But if I have the habit of making the above script slightly more automated on each run with what little time I have. Then the reality is that in the long run this automation will free up even more time to refine and do less manual work on each iteration.
Getting back to our objective of automating the update of the dll’s what we will add these lines to the beginning of the script.

We have a do while block where the Test-Path command is going to validate if the entered value is good. We can see the Read-Host line will prompt the user and load the value into a variable. The line after formats the input value into a string that should point to the bin directory. The prompt will repeat until a valid input is entered. This is a super easy way to get input from a user. There are more elegant ways to do this. Being that we have the full power of .NET within PowerShell we can even pop up modal dialog boxes that will assist with the selection. We are after just the basics in this blog. But we will get into a more advanced topic that includes granting GUI input in a future blog in this series. We have what we need so we will proceed with the next part.
Now that we know where the source dlls are we can now update our loop to do the job we are after. Given the intractability of the PowerShell prompt, we can use it to explore the next part. As we find pieces that work we can use the up arrow key to get the last command and then add it to the script portion. If you use tab completion or intelligence on the $labile variable you can determine that we are going to need the fullname and name values. Let’s load them into variables like this.

We can then concatenate the source folder and destination as such and now we know the destination path and source path of the file that needs to be copied over.
![]()
No going back to basic command line stuff we can use the copy command to do the job.
Something like this:
![]()
But we can add a couple of PowerShell parameter names to make what this is doing slightly more understandable.
![]()
Once we test that this is working for the single command we can now use drop all the working lines into the script. Instead of using the up arrow key for each of them, we can use the Get-History or just hist to get all the commands we have entered into this session. Get-History is another useful tool when building scripts as it will eliminate the need to retype stuff you have explored using the PowerShell prompt. Just simply cut and paste to get these lines into the foreach loop. Our end result is as follows.
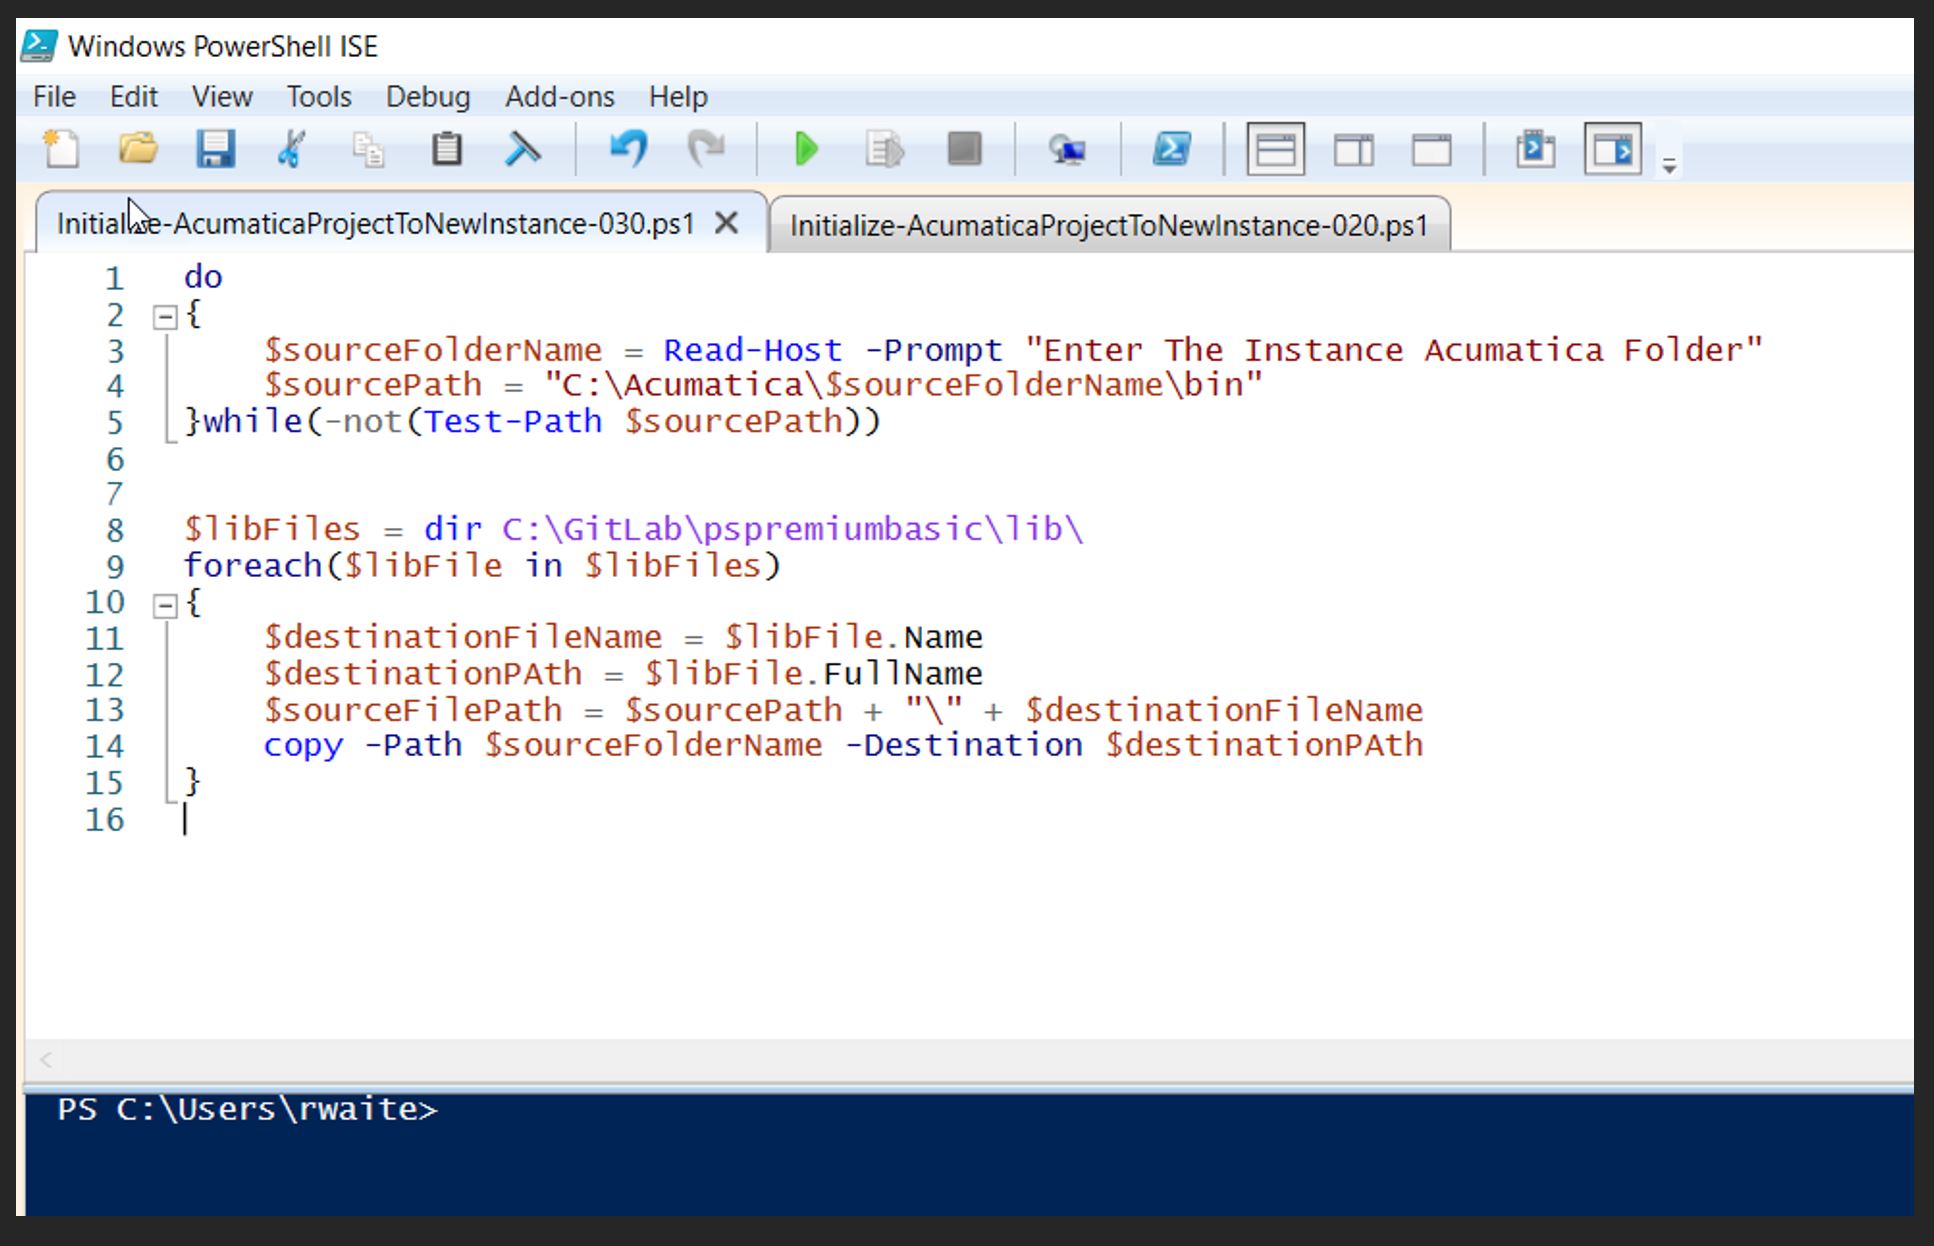
Let’s run the script and see if we get the results we need. If you see all the files as the desired version then it was successful.
Functions
We can refine this script a bit better by encapsulating what is needed into a function. And instead of having a static LibFiles directory and a Read-Host prompt, we can configure these as parameters as these are the two pieces of information needed for this task. In the param() section we will define two variables and set their type as System.IO.FileInfo. The magic of setting this as the type of variable instead of just the string default is that when you use this function at the PowerShell prompt it will know you are looking for a Path. In turn, you get all the IntelliSense or tab completion awesomeness that makes things easier
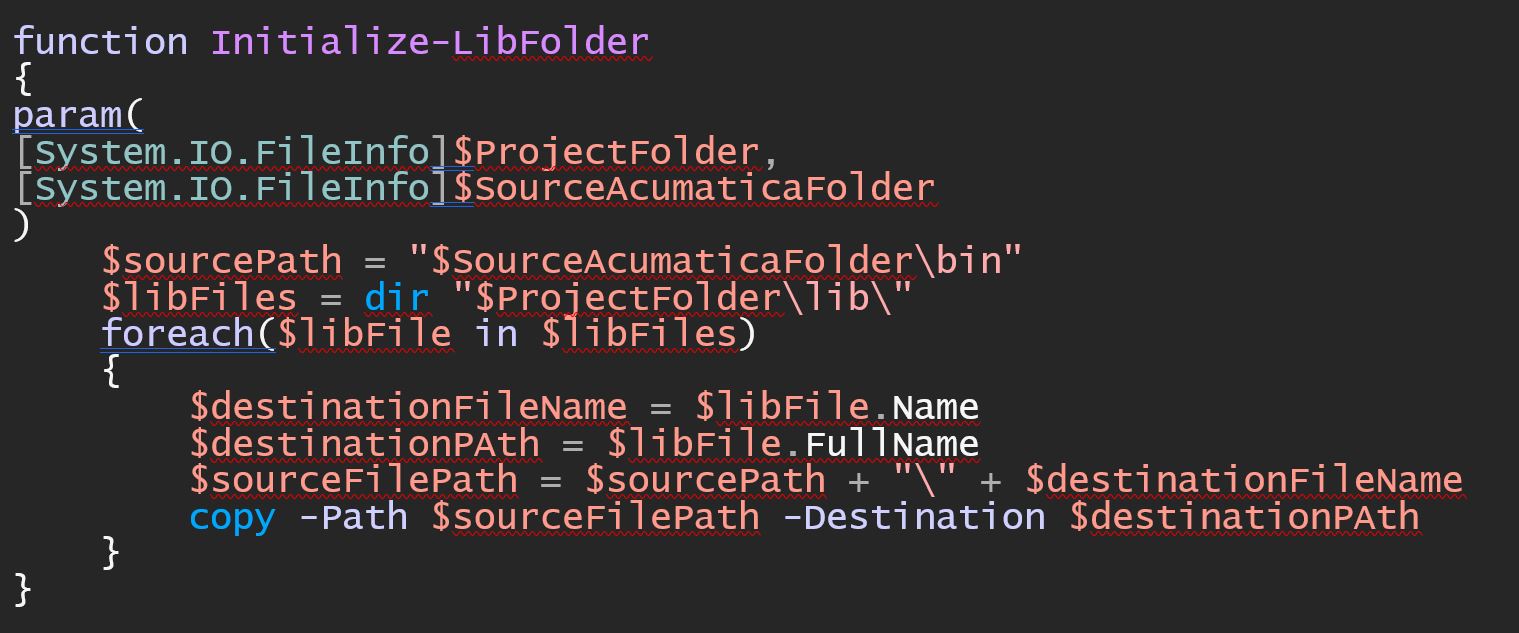
Now a line such as this will automate what was once a manual process. If this process is repeated hundreds of times a year then the ROI in time spent creating this script will quickly pay for itself.
![]()
Summary of What We Learned
The whole intent of this blog is to use a common “copy” command line tool to automate the process of manually copying these files over. We learned that anything you can do in a command line you can do in PowerShell scripts. It is worthwhile knowing how to do a task from the command line because you could save yourself a lot of time by incorporating what you know about the command line into a PowerShell script. We learned a little about the two different tools to engage PowerShell called the PowerShell prompt and the PowerShell ISE (Integrated Scripting Environment). Read-Host is a powerful tool to introduce controlled delays, prompt users for information, or prompt users to perform a manual step that will later be fully automated. Tab Completion and IntelliSense help save keystrokes and allow you to explore objects interactively. We learned how to use Test-Path to assert a path exists and incorporated it into a do while loop to validate a Read-Host entry. We did not get into creating Functions in great detail but we did wrap up the blog by converting our script into a function. We created parameters of the type System.IO.FileInfo which in turn helps us use tab completion and IntelliSense when inputting the needed source and destination paths.
Up Next
We are going to further automate the process of initializing an Acumatica Extension Library into a function. The next item we want to automate is to redirect the solution to send the extension library dll to the target Acumatica instance Bin directory. We will get into more fundamental PowerShell and how it can be used to load up data form CSV files or XML. Our target will be to update the project and solution XML files as to redirect where things will go during the build process.
Happy Scripting!


